Chủ Nhật, 23 tháng 9, 2018

Youtube daily how Sep 23 2018

Painting an easy landscape. "Green Meadow and Hills"

Blue of sevres.

White.

Dark Pink.

I begin with a blue sky.

For the base of the clouds I add a little dark pink.

Lemon yellow.

Medium red.

I add a bit of yellow and red to the white to paint the illuminated areas of the clouds.

I'm going to paint some distant hills. Mix yellow with a hint of blue to obtain a light green that will later clear with white.

Painting the background with light tones and not very detailed is what will give us the sensation of distance and depth.

Burnt umber.

I paint some nearby hills using darker shades.

Let s go with the field. A green meadow.

I paint dark areas.

With a flat brush I give small touches to detail the grass.

To finish use the fan brush to detail some areas of the foreground and soften other areas of the background.

Last details to the clouds and the hills.

I hop you liked it!!!

For more infomation >> PINTAR PAISAJE al óleo. PRADO🌿 y COLINAS ⛰⛰. - Duration: 23:21.

-------------------------------------------

How to Vote in Massachusetts in 2018 - Duration: 3:12.

Hi Massachusetts. If you want to vote, first you need to get registered.

You can check your registration status right now using the link in the description.

If you're not registered, or you need to update your name or address, you can go to

the link in the description and register online right now, as long as you have a Massachusetts Driver's License or state ID.

If you don't have a Massachusetts ID, like if you're a student from another state or

you don't drive, you'll still use the same link to fill out your registration form,

they'll just ask you to print the form at the end, sign it, and mail it in.

You've got until October 17th to register, but you might as well open up a new tab and get started right now.

Once you're registered, there are a few different ways you can vote.

If you're going to be out of state on election day, or you have a disability or religious

belief that prevents you from getting to the polls – you can apply to vote absentee by mail.

There's a link to the form in the description that you can fill out and mail or email to

your local election commissioner – there's a link to all their contact info as well.

You have until November 5th at noon to apply to vote absentee, but the sooner you do it

the better, so that you have enough time to get the ballot in the mail, fill it out, and send it back by November 6th.

If you're gonna be at home on election day but you still want to vote early, you can do that!

Just go to any early vote site location in your town or city from October 22nd through

November 2nd during their normal business hours and cast your ballot.

All the times and locations will be posted at MassEarlyVote.com in October, and some

cities will have special evening and weekend hours available too, so check the link to find out when and where you can early vote.

If you really wanna vote in person on November 6th, there's a link below that will tell you where you need to go to vote.

Polls are open from 7am to 8pm, and you may be asked to show an ID, especially if this is your first time voting.

A driver's license or state ID, utility bill or bank statement, or any printed ID

with your name and address on it all count, so bring one just in case.

I also recommend bringing a sample ballot.

You can get one from the link below, and it'lll tell you everything that you'll be able to vote for in the midterm elections.

You don't have to vote for every single thing on the ballot for it to be counted,

but those local elections are super important, so it's helpful if you want a chance to

do some research on the candidates in your local elections.

You can even fill it out and bring it to the polls with you, so you can be sure you remember how you want to vote.

One last thing: if you're going to vote—open up your notes app or grab a piece of paper and make a plan.

Write down when and how you're going to register, what time you're going to vote,

how you're gonna get there, what ID you're going to use if you need one, even who you're going to bring to the polls with you.

Having a plan is a great way to make sure that nothing unexpected stops you from voting on November 6th.

There will be links for everything you need to check your registration, vote early and find your polling location are in description.

Thank you for voting.

For more infomation >> How to Vote in Massachusetts in 2018 - Duration: 3:12.

-------------------------------------------

How To Download Tekken 7 Paly Store 2018 Tricky Boy - Duration: 3:08.

Tekken 7 | Android Game Download & Install

how to download tekken 7 on android

How to download tekken 7 on play store

HOW TO DOWNLOAD TEKKEN 7 Free Download Pc 300MB.2017.

How To Download Tekken 7 Full Hd Game On Android | Only 250 Mb | (HINDI) 2018

How to download install & play Tekken 7 FR Android game (HINDI)

For more infomation >> How To Download Tekken 7 Paly Store 2018 Tricky Boy - Duration: 3:08.

-------------------------------------------

How to help a pregnant cat! - Pregnant cat care 101 - Duration: 4:48.

hey guys welcome back to relax my cat my name is Savannah and here with me is

Mia already planning their escape and

today's video is told mainly from experience ok so some of you may know

that Maya is a grandmother probably a great-grandmother and that kind of leads

us on to what this video is about I'm just going to get right into anyway it's

what to do or what to expect when your cat gives birth ok so some of you may know

that Maya had a litter of five kittens when she was much younger and honestly

the pregnancy there wasn't many signs with Maya because she was a bit of a

tubber anyway so you couldn't really tell physically oh my god she's offended

it could really do anything if you do suspect that your cat is pregnant

especially if they're very old or very young and definitely take them to the

vet because the best thing about the vets when you cat is pregnant is first

off they'll be able to tell if they are or not second off they will give you a briefing

on what to do when the birth actually happens what to do in the weeks leading

up to that and it's really really helpful so definitely go to your vet and

make sure you get checked and honestly no matter how informative I think I am

the vets advice is going to be better okay so getting into the birth part make

sure you keep your space really clean like under sofas behind wardrobes just

everywhere that's tight and dark that your cat will find safe make sure you

keep that really clean because and us safe and dark and small because they'll

probably want to make their nest there as far away from where people usually

pass through Maya was under a bed so that's probably the kind of

he's looking for also keep any special stuffed animals nice and safe and away

because we don't want another incident like what happened to mr. bear where

Maya proceeded to rip out his stuff in and use that as a nest to give birth on

also when the birth is happening make sure you give you a cat plenty of space

I know it can be scary and no you might want to hold them but she probably knows

what she's doing and just be there to observe and make sure everything's going

okay if you are worried you can always call the bats and a lot of vets will

actually talk you through the birth while you're on the phone which is super

helpful and it comes you down a little bit the other thing is though I would

recommend being very quiet you don't want any loud sounds and you freak it

out that's gonna scare you can't and the last one that I would say is really

important is don't touch newborns and any kind of object that can imprint a

smell is really dangerous with newborn kittens because capsule a bit fickle

when it comes to parenting and if they don't recognize the kitten they won't

look after it so if the kitten just get a little bit too far away from mom I

just use something that doesn't have a smell some kind of object to gently push

them back towards it it should be fine that's what happened one of Maya's

kittens and she managed to crawl all the way out of the bed and we couldn't touch

her so how do we get her back there my dear

and so my sister gently nudged her back in everything as well obviously with the

subject there are so many things to talk about so many do's and don'ts and if I

put them all into one video it would be a really long video so what I've done

instead I put a couple links down below in the description just that I thought

were really good advice and that you can look through if this isn't what you're

going through so with that said as always Maya as always we have a t-shirt

winner to announce you can't see because my eye is actually here for once that's

nice

tshirt we do it now and I'll do that for you now so our winner this week is mocha

which thank you so much everyone for coming tonight ma quit heading over to

Instagram to send us your address and your size so you can get a shirt sent

out for you everyone else like I said last week don't worry it's going on

again this week so I need to do is number one be subscribed to relax my cat

hit the bell bottom decide because it just makes easier and then number two

post a comment down in the video section comment section below within an hour of

this video going up you're entered so thank you again so much and I will see

you next week thank you! Ba bye

For more infomation >> How to help a pregnant cat! - Pregnant cat care 101 - Duration: 4:48.

-------------------------------------------

Float Tanks: How Being Completely Vulnerable Helps Alleviate Anxiety, Stress and Fear - Duration: 8:58.

David Jaffee with BestStockStrategy.com and DavidJaffee.com and today we're

going to discuss an exercise that you can do to decrease the levels of fear,

anxiety and depression. A lot of the thoughts that we have carry over from

day to day probably around 90 percent that's a statistic that I heard of your

thoughts repeat on a daily basis and a lot of those thoughts they end up

impacting your motivation your feelings your behavior your habits and in essence

they impact your future unfortunately a lot of those thoughts that we have were

formed as children we were ill-equipped to negate or to counteract a negative

thought from a supervisor a parent or a teacher as adults you are much less

impressionable because a lot of your ideology has been formed so if someone

walks up to you and tells you that you're a jerk or that you're worthless

it's not gonna have the same impact on you as it will if like your father or

your mother tells you when you're like 7 or 8 years old

that's why we can keep those repetitive and negative thoughts with us throughout

our adulthood even though it happened like 25 30 40 years ago one way that I

have found to decrease negative thoughts is to actually make yourself completely

vulnerable so if you're walking let's say you're walking on the street a lot

of people are I'm just gonna talk about myself I tend to be even I tend to have

like a heightened sense of awareness right so I'll look at the people I will

just feel a little bit anxious at times other times I'll be completely calm but

other times I won't be or a good example is what I'm in the ocean I will be aware

of the people who are around me because I live in Miami we'll go into the ocean

and then if they're like five or six people around me I will just be aware of

their presence or even when I'm at home I will be aware that someone is right

next to me they don't have to be talking to me I don't even have to know that

they're there or anything like that or another example is if I'm in the Sun and

there's someone right next to me from me it's a less world

experience to have that person there than this for me to be alone for some

reason I am just recharged when I'm alone and I feel better than if I have

someone next to me during in time when I want to be relaxing now I think that

that makes me an introvert as opposed to an extrovert because extroverts tend to

gain energy when they have other people around them but the reality is that for

me personally I just seem to be a little bit more anxious and a little bit more

stressed when I am around people during situations when I want to relax one way

in one exercise that I've used to mitigate these feelings of anxiety and

stress are you go into the ocean and you almost like create a float tank for

yourself so absolute vulnerability is freedom and what I've done in the ocean

is I would just go there and I'm gonna put my head down and I would hold my

breath and I don't care how many people are around me and I just put my face

completely down in the ocean I hold my breath and I try to just give in and

relax fully I don't think about anyone else in the water I don't think about

being able to breathe or hold my breath or I don't think about bumping into

anyone or whether if someone's gonna bump into me I don't think about

anything I just really tried to focus on my breath and just not really focus on

anything not engage in any thoughts that come into my mind and if I'm able to do

this for about five or ten minutes that has been the best meditative practice

for me where it actually helps them surrounded by other people because I go

into the ocean and there's usually a lot of people there and I just put my head

down I hold my breath and I just try not to react to anything and I try to take

in and show gratitude for being able to live in an amazing place and be in that

situation where I'm able to be in the ocean so again to reiterate I think that

this works because when your lane went when you're facedown

in the ocean not breathing you can't see anyone around you

you're absolutely multiple you really are you're completely vulnerable and I

do believe that absolute vulnerability is freedom its freedom from negativity

freedom from being judged freedom from negative thoughts and when you're in

such a vulnerable state and then you realize that nothing bad happens to you

you're completely vulnerable you're holding your breath you're facedown in

the water and you're not feeling any fear or anxiety or for any negativity

and then after 5 or 10 minutes when you do this you're able to get back to

normal life and you're no worse for wear nothing bad has happened to you so I

think that what typically happens is people think that the anxiety that they

have protects them they think that the negative thoughts that they have protect

them from a danger that's out there but I don't think that that danger actually

exists or if that danger does exist I believe that the cumulative negativity

and the cumulative harm that come from those negative thoughts and from that

fear and from the anxiety significantly outweigh the danger that is actually out

there meaning that if you walked around with no fear with no anxiety with no

negativity that you would be way better off in just dealing with the negative

and the negative situations that come up as they come up

then you would be to actually be on alert and be anxious and be fearful and

be negative in trying to avoid that negative outcome so like I said before

absolute vulnerability is freedom and this is something that works for me

every single time where I go into the ocean I welcome having a

lot of people around me I just put my face down I'm completely vulnerable

I don't engage my thoughts I do it for five or ten minutes and I think what it

does is it resets the natural anxiety and fear and negativity that I have them

when I walk around I just feel much more calm I don't have to like look at other

people and like pass judgment or try to assess his if like this person is a good

person or this person is a bad person it just brings it it brings it down and

it's something that I have to do much more often and I believe that in the

future with continued practice just like anything else there's a possibility that

I'll be able to significantly mitigate those feelings of anxiety or those

feelings of fear and I think that those feelings are something that a lot of

people do have or maybe they don't maybe it's just me in which case that's

completely cool but I'm just telling you that this specific exercise has worked

for me where you go in the ocean you make yourself completely vulnerable you

put your face down and you just allow yourself to be open to whatever happens

and then by not reacting to the thoughts and when you make and when you're done

with the exercise you realize that those thoughts those anxiety that negativity

that judgment does not actually protect you from reality because if you're free

from that negativity and those thoughts and those judgments you're going to have

the same exact outcome as you would with those thoughts so why do you have those

thoughts to begin with and I think that by repetition every time you do it it

just mitigates it it brings down the level of anxiety of here etc and if you

just do it continuously then you will eventually get to a point where maybe if

you're feeling if you're walking around and you're feeling likes like a 70 out

of a hundred feelings of anxiety fear negativity perhaps by doing this

exercise you can bring down those feelings to about like the 20 or maybe

continuously do it you can bring down to a 10

who knows everyone's different and unique but I'm just telling you this

exercise because it works for me and if you have any questions let

me know please like comment share subscribe leave a comment below I

respond to every comment and once again this is David Jaffee with BestStockStrategy.com

BestStockStrategy.com and if you have any questions I'm here to help thank you

For more infomation >> Float Tanks: How Being Completely Vulnerable Helps Alleviate Anxiety, Stress and Fear - Duration: 8:58.

-------------------------------------------

free microsoft gift card codes-how to get free microsoft codes-free microsoft codes - Duration: 3:29.

microsoft gift card codes for free 2018

For more infomation >> free microsoft gift card codes-how to get free microsoft codes-free microsoft codes - Duration: 3:29.

-------------------------------------------

How To Overcome Estrogen Dominance Naturally | "Doc Talks" with Dr. Daniel Nuzum - Duration: 2:33.

Jonathan Hunsaker: Too much estrogen flowing through your body?

Jonathan Hunsaker here with Organixx, once again.

Thanks for tuning in.

We're going to talk about estrogen.

Dr. Daniel Nuzum: In our environment, we have a lot of

estrogen-mimicking things in our environment.

There's plastics, there's hydrocarbons from petroleum,

mercury, lead, cadmium is estrogen-mimicking.

Those are heavy metals that are estrogen-mimicking

in both men and women.

Bottom line is we have to detoxify our system of these chemicals, number one.

We have to cleanse our livers in particular.

We have to get waste out of our system.

We've got to get our filtration systems filtering properly.

Another important thing is cruciferous vegetables.

Cruciferous vegetables are extremely important.

They have - the antioxidants in cruciferous vegetables chelate, pull estrogen out of our system.

They're wonderful.

Another thing is to supplement with iodine.

Iodine is, itself, an anti-estrogen.

It actually blocks the bad estrogens in our system

that promote heart disease, promote diabetes, and promote different kinds of cancer.

But it also enhances thyroid function,

and thyroid is an anti-estrogen.

Anyone that has a slow or underactive thyroid

will naturally tend to be estrogen dominant.

And then we come to adaptogens.

Adaptogens modulate things.

And modulating means regulate.

So, we look at detoxification, supplementing with iodine and other nutrients,

consuming cruciferous vegetables, and then adaptogens.

Those are things that we can do to reduce our estrogen levels, lower our cortisol levels,

and help promote healthy thyroid and testosterone levels.

Jonathan Hunsaker: Wow. Thanks, Doc.

He's such a wealth of information, isn't he?

I just love listening to him.

I learn so much every time I listen to him.

If you're loving this information, if you're inspired,

if you're getting healthier, if you love watching Doc

share all of this information, please click the Subscribe button,

like us, share it, and give us your feedback in the comments below.

We're reading them, we want them, we're new to doing all of these videos and

we want to give you the information that you are looking for.

So, let us know your feedback.

Thanks for watching.

For more infomation >> How To Overcome Estrogen Dominance Naturally | "Doc Talks" with Dr. Daniel Nuzum - Duration: 2:33.

-------------------------------------------

How to Create Your Own Signature Watermark in Photoshop CS6 Tamil - Duration: 3:21.

For more infomation >> How to Create Your Own Signature Watermark in Photoshop CS6 Tamil - Duration: 3:21.

-------------------------------------------

DJI Mavic Air Unboxing and Review! How to Charge DJI MAVIC AIR CONTROLLER and drone - Duration: 10:27.

hi guys welcome back to my channel and this time I am doing something a little

bit different I'm reviewing and unboxing the DGI mavic air which is this tiny drone.

First of all I got this on Amazon and I got it with a flymore kit essential bundle.

Basically what that means is they put few extra things with your drone they

throw it an extra battery a backpack to carry the drone microSD card with an

adapter and a microfiber cloth to clean the lens okay so this bag was also in

the kit unzips like this the cool thing about it is that these little

compartments you can change them up you can unstick them change them ok wait

not not like that but for example this gonna go like that and now there's room

for the drone I don't know it's I feel like it's useful so the drone itself

comes in a box

it comes like this in a container to keep it safe and it feels really nice

and it's like I think the drone is pretty safe in here

so then when you unzip the box inside is the drone and it is so tiny

it fits on my hand like on the palm of my hand which i think is amazing it

comes in like two other colors it comes in this white and black and red I think

also in the box there's a controller and two boxes that have accessories in them

and manuals and everything else that you might need for the drone there are two

RC cables for your controller, a USB cable, AC power cable, two extra control

sticks and a USB adapter and you're going to need this little adapter later

to charge your controller then there's an AC power adapter and this is a part

that you attach to the battery in the second box there gonna be four extra

propellers and a whole bunch of manuals that you can read through if you want

and they're going to tell you all about how to use your drone and how to start

it and all that good stuff also there's a set of four propeller guards that you

can attach to your drone and supposedly they protect your propellers I mean your

drones propellers from getting ruined so I guess it's a good idea when you first

unbox your drone it's going to be covered in stickers there are two

stickers on the side and there are two stickers on the back so you want to just

read through them and remove all of them the easiest way to unfold it is you can

slip it like this you unfold the back legs first

so they flip like this and then the front ones unfold like this

these two little things also unfold so this is how it looks when it's unfolded

and after you unfold your drone you can now remove the rest of the stickers

there's just three more one at the bottom and two clear stickers at the top

and you want to do the same thing with the controller which only has two

stickers both this and the controller needs to be charged before turning this

on the battery can be charged inside of the drone or it can be charged

separately so right here in the back there's like this little flip thing

where you can charge your drone and this is where you can insert your microSD

card

and if you want to charge it separately you got to remove it so there are two

little sliders right here on both sides one and here's the other and you just

pull them like that and it just pops up and comes right out

this is where you plug the charger and on this part at the top you want to make

sure that the battery and the charger are aligned properly and then you just

want to press them together without forcing anything and then you want to

take your AC power cable and plug it into the AC power adapter and then you

want to plug that into a wall outlet to charge your controller you're gonna need

that tiny USB adapter they came in the same bag that had the spare control

sticks and then you want to take your USB cable and attach the USB adapter to

the cable just like that so you just unplug the RC cable from the side of the

controller and instead of that you plug in the USB adapter so then you just want

to leave them both to charge and when the lights don't blink anymore it means

that they're fully charged so then you just want to unplug the cables and put

everything back the way it was when you put it back you just got to make sure

that this thing at the top is aligned with this thing on the inside and that's

it place it right here and slide it in and press until it clicks you also want

to make sure that the red color on the sides is not visible anymore because if

the red is visible that means that the battery is not secured properly this is

the camera in the front and it has a cover right here that is really easy to

remove there these two little kind of like hooks so you just press them

together like this

and this thing lifts and then you slide this forward

it is important to you know keep this and not throw it out and not lose it

because it protects the camera and you want to put it back on after you down

flying so that it doesn't get scratched or damaged in any way when you carry it

all right so that's it for the drone for now and let me just show you the

controller when you are first unboxing your drone these little handles they're

not going to be in here you're gonna need to screw them in and they will be

inside of the controller actually so the way to get them is you just open this

bottom part and this other side and they're going to be right here in these

slots that's where they were and then you just take them out and you screw

them in it's really easy this is where your phone gets plugged in and I have an

iPhone thing on here it comes with other adapters so if you have Android there's

an adapter for it too these are antennas so you just lift them up and then you

got to twist them very gently because you don't want to ruin anything but they

twist like opposite ways so one twist this way and the other twists this way

so it looks like this

this is the power button for the controller so if I want to turn this on

I click once and then I click again and holy and that sound means that it's on

and then if I want to turn it off I do the same thing click once and then click

and home and now it's off and you can see if it's on or off by the lights here

so you turn on the drum the same way the power button is actually on the battery

which is here until you press it once and again and hold and is it on yes it's

on so the drum takes a little bit longer to turn on so the only thing left is to

fly it I guess and hopefully it will work and if it does I will show you how

the video looks since this is a review I'm just gonna put a video without any

editing or color correcting just to see how it actually looks to be sorry is

fine weakness comes and goes my weakness

comes and goes I'm reaching out for the easy hi please father

strength weakness comes

jobs and

okay guys so this was it for the video and thank you so much for watching I

hope you liked the review I don't know what I'm doing really and this is the

first time I ever even held the drone in my hands but you know I still wanted to

share the unboxing and just give it a quick review and hopefully it was

helpful anyways thank you for watching and I will see you in my next video bye

For more infomation >> DJI Mavic Air Unboxing and Review! How to Charge DJI MAVIC AIR CONTROLLER and drone - Duration: 10:27.

-------------------------------------------

How to Vote in North Dakota in 2018 - Duration: 2:45.

So you want to vote in North Dakota.

Well you are in luck, because North Dakota is the only state that doesn't require voters

to register, so you have one less step than everybody else.

There's a couple of different ways you can vote.

One of the easiest is to vote absentee by mail.

Any North Dakota voter can do it.

All you have to is fill out the form that's linked in the description and mail it to your

county election official – their addresses are linked below too.

There's no specific deadline to request an absentee ballot, but the sooner you do

it the better – they'll start sending out ballots on September 27th.

Once you apply, you'll get your ballot in the mail, and all you have to do is fill it

out at your own pace and mail it back in time for it to be counted on November 6th.

You can also vote early in person if you want to skip the lines on election day – there's

a link in the description to find the early voting hours and locations for your county.

That's the same link you'll use if you want to find out where to go vote on November 6th.

The hours each polling place is open on election day vary by location, but they usually open

between 7am and 9am and close between 7pm and 9pm.

When you look up your polling location, it will tell you the exact hours you can vote.

Whether you vote early or on November 6th, you'll need to bring an ID with you.

This could be a driver's license, a non driver ID, a tribal ID, or a long term care certificate with your current address on it.

If your address on your ID doesn't match where you live right now, you'll need to go get it updated it before you can vote,

or you can bring along a bank statement, utility bill, paycheck,

or a document from a state, local, or tribal government that does have your current address on it.

You can also see everything that's going to be on the ballot ahead of time.

Just use link in the description to find your sample ballot.

You don't have to vote for every item on the ballot for it to be counted, but your

local elections are very important so this gives you a chance to research the candidates ahead of time.

If you want to, you can even print out a sample ballot, fill it out and bring it to the polls

with you so you can remember how you want to vote.

One last thing: if you're going to vote—open up your notes app or grab a piece of paper and make a plan.

Write down when and where you're going to vote, how you're gonna get there, what ID

you're going to use, even who you're going to bring to the polls with you.

Having a plan is a great way to make sure that nothing unexpected stops you from being counted on November 6th.

There are links in the description for everything you need to know to vote early or on election day.

Thank you for voting.

For more infomation >> How to Vote in North Dakota in 2018 - Duration: 2:45.

-------------------------------------------

How to Vote in Michigan in 2018 - Duration: 2:27.

Hello Michigan!

If you are a US citizen who will be 18 or older by November 6, 2016, and you live in Michigan, you've come to the right video, because it's time to vote.

First you need to register though, and if you're not sure whether or not you're

registered already there's a link in the description where you can go check right now.

If you're not registered, or you've moved or changed your name since the last election, you'll have to register by mail.

I know it's a pain, but you can print off the form using the link below

and mail it in by October 9th if you want to be registered in time for the November midterm elections.

Otherwise, you can find a paper application at your local Secretary of State branch office

or city, county, or township clerk's office if you don't have access to a printer.

Links to locate those offices are in the description.

Once you're registered, you get to vote.

In most cases, you're going to be voting in person on November 6th, but you can vote

absentee by mail if you will be out of state on election day – that includes if you are

a student in another state but would prefer to vote in Michigan, you're over 60 or can't

vote without assistance, or you have a religious belief that doesn't allow you to get to the polls.

If any of those apply to you, you can request a ballot by printing out the form in the link below and mailing it to your local clerk.

You can request your ballot any time between now and November 3rd at 2pm, but the sooner

you get your request in, the longer you will have to get your ballot, look it over, research

candidates, and vote before you send it in by November 6th.

For everyone else, there's a link to find out where you need to go to vote on November 6th.

Polls are open from 7am to 8pm and you'll need to show a photo ID.

A driver's license, state ID, student ID, passport, military, or tribal ID are all acceptable.

You can also go to michigan.gov/vote to look at a sample ballot that tells you everything you'll be able to vote for in the midterm elections.

You don't have to vote for every single item on the ballot--you can leave things blank

if you want to – but your local elections can be pretty important, so it's worth checking out what's on there ahead of time.

You can even print it out and bring it to the polls with you so you don't forget who you wanted to vote for.

The best thing to do if you're planning to vote in the midterms is to make a plan

to vote right now – from what day you're going to register to whether you going to vote in person or absentee.

What kind of ID you're going to use, and where it is, even what time you're going to vote and how you're going to get there.

Write it down, put it in your notes app, text it to your friend, just make a plan so that

nothing unexpected stops you from being counted on November 6th.

All the links you need to check your registration and polling location are in the description.

Thank you for voting.

For more infomation >> How to Vote in Michigan in 2018 - Duration: 2:27.

-------------------------------------------

How to Solve a 2x2 Rubik's Cube (2018) - Duration: 7:20.

In this video I'm going to show you how to solve a 2x2 Rubik's cube

Check out my other videos showing you how to solve a 2x2 Rubik's cube..

a 3x3, a 4x4 and even a 5x5

So in this video I'm going to show you how to solve this 2x2 Rubik's cube

This is 2x2, my last video I did was on the 3x3

This is called 2x2 for obvious reasons

Now if you've watched my previous video on my 3x3 Rubik's cube

Or you already know how to solve a 3x3 Rubik's cube

Using the exact same method I did, it's a pretty standard method

Then you basically already know how to solve this

Im going to solve this using the exact same formula as how I solved the 3x3

We will have to use two algorithms

But it's two algorithms that we already know from the 3x3

And one of them is extremely easy to remember anyway

The main difference is

With it being a 2x2 we haven't got any centers

So we're just basically doing the movements that we would do on the corners of the 3x3

Right, once we've mixed it up

We need to decide on a colour we want to start with again

And just for consistency I'm going to start with green like I did on my 3x3 video

Now we don't have any centers as I said because this is a 2x2

So we're just working on the corners

Before we started by making a cross

To make this side completely green

And line the sides up as well

If you remember, after we made the cross we just lined the corners up

And that's basically what we're doing

We're just pretending we've already got a center here

You'll see what I mean

If you remember from the 3x3

We look for another green that was on the side, such as here

And then we wanted to put it underneath the cube where it wanted to go

So I'll call this one my first one so this will be my top

This one's yellow and red

But this one's pink and yellow

This is a different type of Rubik's cube

Normally this would be orange, but it's pink (or purple) for this manufacturer

So you look for the colour that matches

So yellow

So this one's got red and yellow

This one's got pink and yellow

So they've both got yellow which means it wants to go on this side

Which means it wants to go here

So it means this cube wants to go under here

And what did we do for the 3x3?

We just turned into the green

Brought the square down

Turned it back

And turned it back up

And there's the first two

Now look for another one one the side, we've got one on the side here

This one's got pink and white

So we've got pink here

So it wants to go here

Bring it underneath

Pink, pink

Turn into the green

Bring it down

Replace

And turn it back up

Then the last one

Well there's only one square it can go

Turn into the green

Bring it down

Turn back

And turn up

And there we've done our first green side

And also the first row

As with the 3x3 video

Turn it over so now the green is the downward face

Once again this is our front

This is the back

Left

Right

Down

Up

With the same letters

F

B

L

R

D

U

We're going to solve the corners

In exactly the same way that we solved the corners on the 3x3

So now we've jumped straight to stage 6 of the 3x3

Imagine we've done the cross

And we've matched the side colours

And we don't have these on this cube

So now we're just putting the corners into position

We want to put the corners into position before we rotate them

Pink and yellow, pink and yellow, this one is [in position]

Red and white

Red and yellow, so this one's not

Red and white

Pink and white

White and pink

Red and yellow

So this one is in the correct position

And like with the 3x3

We put the only one that's in the correct position in the top right corner

Remember sometimes you might find that you've got two always in position

In which case just do the algorithm

But you want to position it so the only one that is correct is in the top right of our front face

And then we're going to do the algorithm that we used on the 3x3

To cycle these three in a counter clockwise direction

If you've learnt the 3x3 from my video or other video's very similar

This will be already familiar to you

So the algorithm is

U R Ui Li U Ri Ui L

So we go..

U R Ui Li U Ri Ui L

And they're not in position so we need to do it one more time

U R Ui Li U Ri Ui L

Now this one's in the correct position

So is this one

So is this one, so is this one

And the third and final stage is exactly the same as the final stage on the 3x3

We just use the Ri Di R D algorithm

If you don't know how to do that, check my 3x3 video out which explains it in more detail but

We're just basically repeating that algorithm until we put the blue on the top

And remember to always keep the same front face

There will be times when we move this side and move this side

So we are technically changing all four faces of the front face

But just imagine this hole is the front face and always keep this to the front

Lets begin to put the first corner on the top

Ri Di R D

Ri Di R D

Ri Di R D

This time..

Ri Di

And there it goes

R D

Do not forget to put that D back

Bring the next one round

Remember keeping this our front face, imagine the little hole [is our center]

Ri Di R D

Ri Di R D

That's the next one on top

Bring the next corner round

Ri Di R D

Ri Di R D

Ri Di R D

Ri Di R D

And the final one

Ri Di R D

Ri Di R D

And just turn it

And we've solved it in three steps

As I said before

Check out my other how to solve a Rubik's cube video for a detailed explanation on any of these steps

The link's in the description as well as the time stamp to just to the step you need

Hope it helped and thanks for watching!

For more infomation >> How to Solve a 2x2 Rubik's Cube (2018) - Duration: 7:20.

-------------------------------------------

How To Use Premiere Pro CC (For Beginners) - Duration: 7:36.

In my opinion, Adobe Premiere Pro CC is the best editing software out there.

So I'm here to tell all the beginners how toy use Adobe Premiere Pro CC. Telling you

about the interface and all the small simple features.

Coming up.

Hello Creator.

What's going on? My name is Ra'liyah Blythe and welcome back to the channel.

If you're new here and you need someone to help, aid, assist you with growing your YouTube

Channel and your editing skills then subscribe to the channel right there.

Let's jump into the computer and get started.

Now if you're a Mac user, now I'm a Windows user but if you're a Mac user then you're

in luck because at the bottom of the screen I'll tell you if I'm clicking a certain shortcut key

and I'll put the shortcut key for you down in the corner.

We're here in the interface and this is the interface.

It may look a little bit different because you can adjust your interface with the windows

right here and you can see what you have to put inside of anything that you want in each

part of the interface.

Here in the color one, it's not much different but like if we had a timeline then you can

see more.

No clip is selected because we have no clip in the timeline or anything in there yet but

when it is you can see all the colors and you can adjust the color grading and everything

like that.

Effects you can go in.

It's a little bit different since it shows you all of the effects.

Here we are and you can see it's not much of a difference.

We have the main everything that we'll need plus the effects onto the side.

You'll have the main ones that I use which is video effects and video transitions.

Those are the main ones that I use.

So since you have that I would really just have it like this.

You have your program or your main footage here.

You have your timeline, your project bin, your editing stuff or your effects controls

over here.

That's what I would stick with.

Now at the bottom is your main thing.

This is your timeline.

This is going to be everything where your editing your clips and stuff.

Editing all the clips in the timeline.

Up here is called your main plain.

That's what I call it my "Main Plain" because that's the main thing that you'll see.

You'll see the effects that you put in the timeline, you see all the things

that you need up here.

Down here is your project folder.

I really get into detail with it and get into like each section.

It really just depends on how you want.

You can just add everything you need and then boom start putting it in but I add everything

I need and then put it in color coordination.

I'll show you that when we get a chance and then we can go to media browser where we see

all the media and it will automatically be put inside of the project.

Now I need to add in a couple things so we can get into actual editing.

Ok now I have everything that I want inside.

So by default, you see these colors?

These colors are your "labeled colors".

So I do this for like a specific thing. Like a certain color for this type of thing, certain

color for that type of thing and that's why I do.

It doesn't really-so I just pick a color and is like this will be it for this video.

You can go ahead and change it by right clicking on the thing then click label then choose

your color.

I'm going to do blue for audio.

That's what I usually do.

For audio I do certain things, for my intro/outro I do certain things.

And it's just really there for like--uh oh wrong thing.

But it's just really there for getting your things together so you can not get everything

confusing.

It's just very organized. Here's video.

And the video that I chose is my rant video that I did and it's not out on the channel

yet out for me but it will already be out on the channel for when this video comes out.

So we're going to choose this one.

So , we'll put in and drag in your first clip.

Ok so you see that here is the audio.

So it goes A1, A2, A3, and it goes down for like ever.

V1.

V2, V3 for video.

I changed my shortcuts so I'll put the link in the video- I watched a video about the best shortcuts

and it's the best shortcuts for different things like best for your editing.

Then I'll put that video in the description.

You can find that video and get my shortcuts.

So I'll put the original Mac shortcuts in the corner of this video but for mine for

Windows it may be different since I've said oh it's this but it's originally from default

something else.

So i'll put the video in the description so you can change it for the best way and I feel

like it's really good.

It's really fast.

It makes your video editing faster for this.

And if you're a Mac user you can still use it the same way.

If you want to cut something you have to click C for the Razor Tool.

The Razor Tool right here and go to the point that you want to cut.

So if you want to cut it here, cut it right here it'll be 2 then boom.

You can cut it from here to here and these are 2 different clips cut.

Now you can cut again by going back to C. Boom you can cut it now it;s clipped.

And to delete it, right click and then click ripple delete.

Now if you want to trim something, go ahead and let's trim it in and just drag it in to

trim it in some more.

Another hotkey, that you can come is Text.

T for Type Tool or Text whatever you want to say is T. So click T and then boom you

have the Type Tool and you can type all that you want and stuff and for Text just just

scroll down to text part and type something in.

Double click it so you know it's selected and you can go in and change the font, change

the size, change the boldness or something like that, change the color, just do all that

you want right here.

Another key that you may really need to know is instead of clicking this button here to

go back to moving things around, clicking things then click V on your keyboard.

That's really it.

I told you a couple hotkeys.

If you really want me to go more in depth with hotkeys and what you can do with that,

tell me down in the comments for that specific video.

If you want me to go in depth with key frames or any other small little tutorial from Premiere

Pro or anything like that.

This was just to know the interface and know what you can do.

A couple cool things that you can do as well.

And not get into a lot as much.

Because yea this was only for beginners.

That's like the main things that you'll need to know.

Like this video if you enjoyed and the main thing that I want you to tell me down in the

comments other than that stuff is what do you think the worst software to look into?

We all say hey what's the best one!?

BUT which one should we stay away from?

And if you're interested in videos just like this one then subscribe to the channel right

there.

For my last video which was the rant. I'm pretty sure.

Click the video at the bottom for the video perfect for you.

My name is Ra'liyah Blythe and I help, assist, and aid Creators.

Thank you.

Bye!

For more infomation >> How To Use Premiere Pro CC (For Beginners) - Duration: 7:36.

-------------------------------------------

How To Download WWE 2K18 For Free (Most Easy)(Link In The Description) - Duration: 2:28.

First Of All Open Your Browser

Go to Oceanofgames.com

Search WWE 2K18 in the search bar

Then press enter

Click on the game

Click on the download button

Game Is Now Downloading

You Can Also Watch The Tutorial To Install It

For more infomation >> How To Download WWE 2K18 For Free (Most Easy)(Link In The Description) - Duration: 2:28.

-------------------------------------------

Diy A Sofa : How To Make A Sofa More Comfortable, Build A Sofa From Scratch - Duration: 45:04.

how to make a sofa frame

how to make a sofa cushion

sofa making process

how to build a sofa from scratch

how to make a sofa frame video

how make sofa

how to make a sofa more comfortable

how to make a sofa pillow

how to make a sofa out of pallets

diy a sofa

how to build a sofa frame step by step

building a sofa frame

how to make a sofa step by step

sofa making book

For more infomation >> Diy A Sofa : How To Make A Sofa More Comfortable, Build A Sofa From Scratch - Duration: 45:04.

-------------------------------------------

How to know if the yeast is good or bad - Duration: 2:52.

Hello Friend how are you?

I'm Svieta.

Today I'm going to show you how to check the validity of yeast, if it's still good and working

or not anymore

Let's see how to check the validity of baker's yeast, which is used

to make bread and pastries, like yeast rust type chemistry, also known as

baking powder and used to make cupcakes and muffins.

It is so that you avoid possible dislikes and do not waste your money.

Let's see how to check if it's good or not dry baker's yeast, yeast

of fresh baker and chemical yeast also known as the yeast type royal

or baking powder.

Grab a teaspoon of chemical yeast or baking powder and put it on a saucer.

Add 1 tablespoon of hot water.

The water to be so hot, that when you put The finger can not hold more than 1 second.

The reaction (bubbles and noise) ensures that the chemical yeast is good, that you can

use it to make sponge cake and muffins.

If there is no reaction, it is bad.

To check the validity of dry yeast of bakery put in a glass 2 - 3 tablespoons

of warm water by pulling hot, that at feel your finger hot

But without burning you.

Add 1/2 teaspoon of sugar.

Add 1/2 tsp. of dry or granulated yeast.

Stir and leave the mixture at rest about 10-15 minutes

After this time the yeast is in conditions will have been activated.

You will know that yeast is good when when removing it, the bubbles appear, as

If it were sparkling water or sparkling wine.

If there are no bubbles, buy the new yeast.

The validity of fresh baker's yeast it is verified exactly the same.

In a glass put 2 - 3 tablespoons of warm water pulling hot.

Add 1/2 tsp. of sugar.

Add a piece of yeast, the size of the nail of the big finger, about 2 - 3 grams.

Stir very well and leave the mixture at rest About 10 minutes.

The little bubbles that appear indicate that with This yeast can make bread and rolls.

If there are no bubbles, buy the new yeast.

Tell me in the comments what you think the psi video you liked the tips.

And in the case that you have one more, and you want to share it, I would be delighted

to read it.

If you liked the video, share it in Social networks with your friends.

And subscribe to my channel, it's totally free.

So you'll be aware of the videos that I go up

And do not forget to give the bell, for YouTube to notify you when uploading a video

new.

Until next time.

For more infomation >> How to know if the yeast is good or bad - Duration: 2:52.

-------------------------------------------

How to pollinate passion fruit flower - Thụ phấn chanh leo - Duration: 1:49.

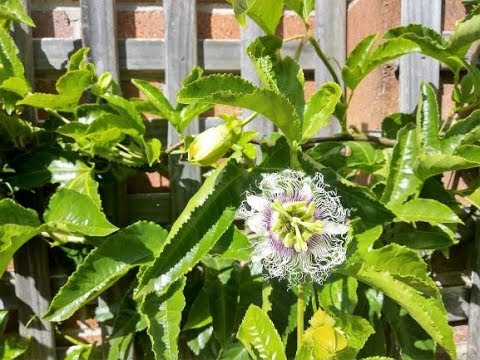
For more infomation >> How to pollinate passion fruit flower - Thụ phấn chanh leo - Duration: 1:49.

-------------------------------------------

Amazing Chocolate Cakes Decorating Ideas 2018 #5 | How To Make Chocolate Cake at Home Video 2018 - Duration: 2:41.

For more infomation >> Amazing Chocolate Cakes Decorating Ideas 2018 #5 | How To Make Chocolate Cake at Home Video 2018 - Duration: 2:41.

-------------------------------------------

How to Vote in Wyoming in 2018 - Duration: 2:23.

Hi Wyoming, If you want to vote, first you need to get registered.

If you're not sure if you're registered, you'll need to contact your county clerk and check.

A link to find your clerk and their contact info is in the description.

If you moved, changed your name, or didn't vote in the last general election, you'll also need to update your registration.

First time voters and people who need to update, there's a link in the description to the voter registration form.

You can fill it out and mail it to your county clerk's office by October 22th to get registered,

or you can go in person to your county clerk's office and fill it out there.

If you miss that deadline, don't worry.

You can also register at the polls on election day.

So once you're registered, you get to vote, and there's a few different ways you can do it.

If you'd rather vote from the comfort of your own home, you should contact your county clerk to request a mail ballot, also known as an absentee ballot.

There's no official deadline to request a mail ballot, but the sooner you do it, the

better so there's enough time for you to get your ballot in the mail, fill it out at your own pace and send it back before November 6th.

If you want to beat election day lines, you can also vote early in person at your county

clerk's office between September 27th and November 5th.

If you're not planning on voting early, you can go to the polls between 7am and 7pm on November 6th.

There's a link in the description to find out where you need to go to vote.

You won't need to show an ID unless you registered by mail and this is your first

time voting in Wyoming, so if that's you, bring a photo ID or a document like a utility

bill, paycheck, bank statement, or lease that has your name and address on it.

Lastly, If you want to see everything that's you're going to be able to vote for in the

midterm election, you can go to your county clerk's website and find your sample ballot.

This gives you a chance to research the candidates for your local elections ahead of time.

You don't have to vote for every item on the ballot if you don't want to, but it's

really helpful to know what's going to be on there before you walk into the voting booth.

If you want, you can print one out and bring it to the polls with you so you can remember how you want to vote.

One last thing: if you're going to vote – open up your notes app or grab a piece of paper and make a plan.

Write down when and how you're going to register, what time you're going to vote,

how you're gonna get there, even who you're going to bring to the polls with you.

Having a plan is a great way to make sure that nothing unexpected stops you from voting on November 6th.

All the links you need to find your county clerk, vote early, and find your polling location will be in the description.

Thank you for voting.

For more infomation >> How to Vote in Wyoming in 2018 - Duration: 2:23.

-------------------------------------------

How to Vote in South Dakota in 2018 - Duration: 2:30.

Hi South Dakota, Before you vote, you've gotta be registered.

If you're not sure if you're registered already, You can check using the link in the description.

If you're not registered yet, or you've moved or changed your name since the last

time you voted, you'll need to fill out a registration form.

To register in South Dakota, you're going to have to fill out a form on actual paper.

Probably the easiest way to do it, as long as you have a printer and a stamp, is print out the form that's linked below and mail it in.

You can also fill out a form in person at your County auditor's office, city finance

office, driver's licensing office, or public assistance agency.

There's links to their locations and hours below.

Either way you register, you've gotta do it by October 22nd if you want to vote in the November general election.

Once you're registered, you get to vote.

If you want to vote without even having to leave your house, you can download an absentee

ballot application in the links below, fill it out and mail it to your county election official.

You can technically mail it in all the way up until November 5th, but the sooner you do it the better.

Your ballot just shows up in the mail, and you fill it out at your own pace and send

it back or drop it off at your County Election official's office by November 6th. It's that easy.

If you want to vote in person on November 6th, polls are open from 7am to 7pm and you

can figure out where you're supposed to go at the link in the description.

You'll need to bring an ID with you, like a driver's license or state ID, military

ID, student ID from a high school or college in South Dakota, or tribal ID.

If you don't have any of those, you can still sign a personal identification affidavit,

basically a promise saying you are who you say you are, and they'll allow you to vote.

You should also consider bringing a sample ballot with you.

You can find one on the same website you used to look up your polling place.

It'll tell you everything that you'll be able to vote for in the midterms.

You don't have to vote for every single thing on the ballot for it to count, but if

you want a chance to do some research on the candidates in your local elections, it's

a pretty good idea to look at a sample ballot first.

You can even fill it out and bring it to the polls with you, so you can be sure you remember how you want to vote.

The best thing to do if you want to vote in the midterms is to make a plan to vote right

now – from what day you're going to register to whether you going to vote in person or absentee.

What kind of ID you're going to use, and where it is, even what time you're going to vote and how you're going to get there.

Write it down, put it in your notes app, text it to your friend, just make a plan so that

nothing unexpected stops you from being counted on November 6th.

There will be links for everything you need to check your registration, vote absentee,

or find your polling location are in description.

Thank you for voting.

Không có nhận xét nào:

Đăng nhận xét