This is our vizag beach
Hi..Friends Welcome to my channel
Cooking videos, Best Recipes
Please do subscribe for New updates
Please do subscribe
Mix it wel
New Year Cooking Recipes
New Year Special Recipe Ready
Please Support to my channel
-------------------------------------------
Floral Foam ASMR | Crushing And Cutting Compilation Video #38 - Duration: 4:14.
Floral foam asmr
floral foam asmr
floral foam asmr
-------------------------------------------
RAHATLATICI SLİME VİDEOLARI #58 RELAXİNG SLİME VİDEOS#ASMR#SLİME# - Duration: 10:26. For more infomation >> RAHATLATICI SLİME VİDEOLARI #58 RELAXİNG SLİME VİDEOS#ASMR#SLİME# - Duration: 10:26.
 -------------------------------------------
10 Best Amateur Radio Videos of 2018 - Ham Radio Q&A - Duration: 5:22. For more infomation >> 10 Best Amateur Radio Videos of 2018 - Ham Radio Q&A - Duration: 5:22.
 -------------------------------------------
Keep Calm and Crunk Knight #Humor #Music #Funny #Videos - Duration: 3:53. For more infomation >> Keep Calm and Crunk Knight #Humor #Music #Funny #Videos - Duration: 3:53.
 -------------------------------------------
Most Oddly Satisfying Video that Help You Fall Asleep Try Not To Get Satisfied Challenge Videos 2018 - Duration: 12:04.
Most Oddly Satisfying Video
Most Oddly Satisfying Video
-------------------------------------------
Lite 😘bgm 💜sound music 💙status video 🎶 - Duration: 0:20.
LRG Editz
-------------------------------------------
Cristiano Ronaldo - Wake Up - Motivational Video 2019 | 1080p HD - Duration: 6:30.
-------------------------------------------
Ninnila Ninnila | Lyrical Video | Edited Version For WhatsApp Status | Video By Dharsh Feelings - Duration: 1:34.
Ninnila Ninnila
Chusane
Kallalo Kallalo
Dachane
Reppale Veyyananthaga
Kanula Pandage
Ninnila Ninnila Chusane
Adugule Thadabade Nivalle
Gundeloo Vinapadindhiga
Prema Chappude
Ninnu Cheri Poyee Naa Pranam
Korenemo Ninne Ee Hrudayam
Naa Mundhudhe Andham
Nalo Anandham
Nannu Marchipoyela Ee Kshanam
Ee Varshaniki Sparshunte Nee Manase Thakenugaa
Ee Yadholo Nee Pere Palikene Ivale Ila
Ee Varshaniki Sparshunte Nee Manase Thakenugaa
Ee Yadholo Nee Pere Palikene Ivale Ila
Subscribe Dharsh Feelings For More Updates And Share This Video , Like This Video & Comment This Video !!!!!!
-------------------------------------------
Top 5 Videos I have that reached the Highest Views - Duration: 5:47.
Welcome Guys to Another Video But today we are doing something Different! We are
Making A Top 5 Video! And this video is called Top 5 Videos of Mine that have
reached the highest views. Shall we Start? Yes We Shall!
So Starting off At Number 5 Of My *Stuttering Sorry lol*
How it Feels to SUFFER in SFM REACTION Part 2! Part 2 is actually a beginning
Of a Reaction that has one of the highest views before I before I publish the part
1 it took me a few months to publish this video but at the same time it took
a quite a few effort to get the intros through and if you ever want to get
through the intro so you're gonna have to go to the WWE now I will show you a
preview of my video my next video would be roblox pet sim gameplay as in the
video that I it was the first video I ever made that had an intro in it the
first video ever
so as in my other my other videos the so like my other video you have to go to
WWE Android comm creations I'll have a link in the description for you to go
there and here is my preview my third video would would be a third video would
have been a bad day is coming it's a bad day has come is a video that I made when
I couldn't put any of my intros in my videos because uh well I couldn't add it
to any of my videos cause none of my programmer supported the file and this
is how the intro went
just imagine how bad that would be without being able to put that in any of
your videos so that's number three hope y'all enjoyed let's move on to stage
number two all right guys stage number two would be five nights at
freddy's gameplay at 25 views this was a video that I made back when
yes I did have it no I didn't have an intro in it it was before
roblox pet gym gameplay in it so I didn't have an intro in it so there's no
use in trying to show intro but I won't show you a preview number one would be
how it feels to suffer in sfm reaction part one I hit 398 views with this video
I am so happy about this video it really is really emotional towards me two weeks
ago it was at 264 views now it's at 369 398 hope you all enjoyed this top 5 it's
the first top 5 is first top 5 I have ever made and I will show you this
preview in a few seconds
-------------------------------------------
How to Apply Painting Effects on Video Clips in Photoshop - Duration: 17:25.
Hello.
Thanks for watching our channel.
Today we're going to show you how to convert any video into an artistic animation or cartoon,
with Photoshop.
Before starting, please watch this short video.
One minute, no more.
It's enjoyable, isn't it?
I think it worths more than a precarious technical quality like this annoying color cast and out of focus…
So why don't we try to improve it?
Redrawing the entire animation by adding some artistic effects might be the way.
Let's see how it can be done using Photoshop, nothing else.
Start Photoshop and open the video file.
The "Timeline" panel activates by default.
All frames are contained in a video layer placed inside of a video group.
In the Layers Panel, the video layer is identified by a filmstrip icon.
You can edit a video layer just like a regular Photoshop layer.
However, to apply a filter to all the frames, a video layer must be converted into a Smart Object.
For the beginning, let's diminish the color cast.
In the Layers panel click the Adjustments icon and then select Curves.
In the Properties panel, Alt-click (Windows) or Option-click (Mac OS) the Auto button.
Under Algorithms in the Auto Color Correction Options dialog box, select Find Dark & Light
colors and Snap Neutral Midtones.
Now, let's enhance the colors.
Convert Video Group to Smart Object.
Switch to 16-bit image and then change to Lab color mode.
Don't rasterize.
Apply a Curves Adjustment layer and choose the convenient settings.
Include Video Group and Adjustment Layer in a new group.
Convert it to Smart Object.
Change to RGB color mode and then switch back to the 8-bit image.
Don't rasterize.
This new 8-bit RGB group, as a Smart Object, retains all of the previous color-setting information.
We can access it with a simple double-click.
If needed, we can make changes to these internal .psb files at any time, save them and return
to the 8-bit RGB group without any loss of information.
Duplicate and rename these two groups "Outline" and "Color" respectively.
We are now ready to apply artistic effects to the entire video.
We'll start using the "Outline" group for sketching the scene with
a few adequate Photoshop filters.
Because "Outline" is a Smart Object, each filter will affect equally
all the frames this video group contains.
First, hide "Color" group.
Then, apply to the "Outline" group the Poster Edge artistic filter.
This filter finds the edges of the image and draws black lines on them.
That's the main reason I am using it here.
The specific sliders allow setting edge thickness, edge intensity, and the posterization
(the number of colors in an image).
For the moment I prefer the minimum value for Edge Thickness,
a medium value for Edge Intensity, and the maximum value for Posterization.
As long as we work with Smart Filters, these settings can be reviewed if needed, at any time.
Now, what will be the next filter to add?
Well, it's not exactly a filter.
It is the Threshold adjustment I prefer to apply here as a Smart Filter.
The Threshold command converts a color image into high-contrast, black-and-white image.
The slider position sets a certain luminosity level as a threshold.
The pixels lighter than the threshold are converted to white, and the pixels darker
are converted to black.
It is an effective way to extract outlines from an image.
In this particular case, the minimum value for the threshold level seems to be the best option.
However, this sketch we just created has jagged lines and a dusty appearance.
For cleaning it, I prefer the Oil Paint filter.
That's an effective means to smooth the details, control the image stylization and
the fluidity of the lines.
Stylization slider is controlling the smoothness of the stroke, ranging from a splashed appearance
at 0 to smooth strokes at 10.
Cleanliness slider is controlling the length of the stroke, ranging from shortest and choppiest
at 0 to longest and fluid at 10.
As a result, the combination of the smallest values for Stylization and Cleanliness has
no significant effect, while the high values can strongly distort the details.
Let's limit the Stylization to 1 and Cleanliness to 3.
The jagged lines and dusty appearance of the image are conveniently corrected.
Scale slider is controlling the apparent thickness of the paint, moving from a thin coat at 0
to a thick coat at 10.
Bristle Detail slider is controlling the apparent paintbrush-hair indentation, from soft at
0 to strong grooves at 10.
Scale and Bristle Details options are ineffective if the Lighting option is not activated or
the Shine slider is set to zero.
Otherwise, the details controlled by the Scale and Bristle Detail options become visible.
When running an animation that includes this effect, these thin lines might disturb the viewer.
That's why, in this case, I will keep these options inactive.
Now let's move onto the Color group, unhide and activate it.
Set the Blending mode for the layer to Multiply.
Apply the Poster Edge filter with these settings: zero for Edge Thickness, zero for Edge Intensity,
and 5 for Posterization.
Next, apply the Oil paint filter with these settings:
5 for Cleanliness,
1.5 for Stylization,
Lighting inactive.
As can be seen, the scene needs a little sharpness.
For this, I prefer the High Pass filter.
Set Radius to 3.
Apply Linear Light blending mode and keep 100% opacity.
These settings look nice for now.
If needed, we can come back later for review.
Next, can be helpful to apply here some adjustments as Smart Filters.
For instance:
Levels to adjust the tonal range and make the scene a little lighter.
Vibrance to gentle enhance the color saturation.
Color Balance to equilibrate the colors of the scene.
Before finishing, it is helpful to visualize a few other frames.
If it's OK, the work can be saved.
You can save it as any regular Photoshop file or, if its size exceeds 2 gigabytes, as a
Large Document Format file.
Each video layer references to the original video file.
You can come back to edit it at any time, without altering the original video or image
sequence file.
To maintain the link to the original video file, you must keep it in the same location
relative to the Photoshop file.
Now, the last step:
Choose File > Export > Render Video.
Choose the file name and define the destination folder.
From the first pop-up menu, select Adobe Media Encoder and choose H.264.
This format is the most versatile, including presets for high-definition and widescreen
video, and output optimized for tablet devices or web delivery.
Select the rendering options.
In this case, I prefer this YouTube preset.
Check All Frames button and press Render.
You can see here the final video compared to the source.
Before ending let's resume.
Over time, Photoshop has offered, from one version to another, more and more useful tools
for video processing.
Now, for instance, you can easily add painted effects using the large Photoshop's built-in
filters gallery.
And, more important, helping with Smart Filters, you don't have to process each frame independently.
The technique I've just presented uses two video layers, each created starting from the
same video source.
All the frames in the first layer were converted to outlines.
On the other layer were applied painting effects, then it was set to Multiply blending mode.
Poster Edges and Oil Paint are the most important filters used.
You can also experiment with various other filters, adjustments, and settings.
Notice that the rendering processing can take some time depending on the performances of
your computer.
It can significantly increase with the number and the complexity of the filters and adjustments used.
If you're ready to spend two more minutes, please watch a few video clips created by
this method using different settings, filters, and adjustments.
Thank you for watching.
For now, that's all.
If you enjoyed it, please "Like" it and leave your thoughts in the comment section below.
Please subscribe if you didn't already.
See you back soon for more on Technograph.
-------------------------------------------
Eating A 3-Course Meal At 7-Eleven - Duration: 8:51. For more infomation >> Eating A 3-Course Meal At 7-Eleven - Duration: 8:51.
 -------------------------------------------
My Mom Reacts To My Dance Videos - Duration: 13:55.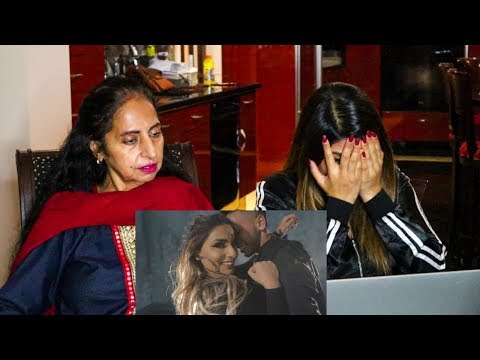
Translation: Jean is too ripped
Translation: Mom even Simmi's jean is ripped
Translation: Yours is ripped more
-------------------------------------------
I Used AI To Propose To My Wife In Her Native Language - Duration: 12:46. For more infomation >> I Used AI To Propose To My Wife In Her Native Language - Duration: 12:46.
 -------------------------------------------
恐怖映像TOP5 Top5 Japanese Ghost Videos Vol.150 - Duration: 11:13. For more infomation >> 恐怖映像TOP5 Top5 Japanese Ghost Videos Vol.150 - Duration: 11:13.
 -------------------------------------------
Actually,I'm a little lady - Funny monkey video 2018 - Duration: 1:57.
Are you kidding me?
Look at me.
Make a pose and take a picture.
Please eat it.
-------------------------------------------
Trucks Construction for Kids - JCB Backhoe, Excavator, Dump Truck - Digger Cartoons for Children - Duration: 16:05. For more infomation >> Trucks Construction for Kids - JCB Backhoe, Excavator, Dump Truck - Digger Cartoons for Children - Duration: 16:05.
 -------------------------------------------
very very funney😂 😂new Comedy Videos 2019 |new funney videos 2019|funny video 2019 whatsapp - Duration: 8:00.
New Funney Comedy Video 2019
-------------------------------------------
Mixing Slime - Biscuits Made From Ghostly Slime - Relaxing video new 2019 - Duration: 9:11.
Video Slime Thư Giãn - Bánh Quy Làm Từ Chất Nhờn Ma Quái #006
Không có nhận xét nào:
Đăng nhận xét