Add 5 cords
Add this chain and cut all unused cords
-------------------------------------------
Advice on How to Make the Transition from Paraprofessoinal Educator to Full-time Teacher - Duration: 1:28.
I am a kindergarten resource teacher, and I work in a lot of county and public schools.
And I love it.
I like to get to know my students as well as figure out what learning styles work best
for them.
But just seeing what I could bring to the table kind of lit a fire under me that I needed
to push to be a teacher where I could implement that more than a paraprofessional, where I
was just following what the teacher had said.
My degree definitely helped fill in some gaps.
It's not like any educational experience I've ever had before.
I loved the full online immersion of the school.
I took full advantage of that, and I completed eight classes a term, and I was able to very
smoothly transition from paraprofessional to a teaching position this school year.
I get to interact with these kids in a completely different atmosphere.
I'm the teacher, not just a staff member or just an assistant in the room.
I'm the person that can stand up for the kids and defend them if they need defending, advocate
for them on their behalf, helping figure out what they need to succeed - whereas as a paraeducator,
I had input, but it only went so far.
It's definitely a struggle transitioning from paraeducator to full-time teacher, but it's
completely worth it.
-------------------------------------------
How To Show Love And Affection To Your Husband - Duration: 7:23.
This video is how to show love and affection to your husband. And I think
I've got a few tips that will really make a difference for you and your
marriage.
Hey, my friend. I want to share with you something that would make a big
difference in how you and your husband connect together. You know, something I do
is I want him to hear my voice. I wanted him to hear me talk to him and to share
my affection, my love with him. You know men, they have a lot on their plates. They
have a lot of responsibilities providing and taking care of our family and our
home. And one thing that I can do for him, is for me to verbally express to him
my love and my affection. And sometimes, there was there was actually a time in
our life in our marriage when we were struggling. We were going through a
really difficult time in our life. You know, where my husband I were both
overweight. We were both financially just having a really difficult time in it
with our finances. We were just not living the life of our dreams at all.
Like not even at all. And it was kind of like at that time, our life was just kept
going down in and not a good way. And I decided that together, we could make a
difference. And so, I began to talk to him in a way that really boosted him up. Even
though we were really struggling and we were really having a... Just difficult
life, I would talk to him as if I was seeing him in the future of the man that
I knew he could be. Even though in that moment, it wasn't actually like true but
it was what I could see him to be. I talked him about being a great provider
for our family. Now, he was a good dad. I told him that he was like the best dad
on the planet. That there was no dad better than him. And I would tell him how
much I loved the way he took care of our kids and he and the way he touched our
kids and talked to our kids and loved our kids. And I would... I would tell him
those types of things and it made such a difference. Then I would talk about how I
appreciated all the things he did from our family and how I appreciated how
hard he worked for us and all the things that he did for us and how he took care
of our home. Even though at that time, he was not really providing great for
our family and he really wasn't taking care of a lot of things in our family.
But I kept telling him that story. It was absolutely amazing because it wasn't
very long and all of the things that I would tell him began to come true. And
that was awesome. And I would tell him how super sexy he
was, I would I would just just give him all the passion by my words. I know that
my voice, he'd loves to hear my voice. And so, I
would get really close up to his ear and I would tell him all these things in his
ear and it just made him feel good. He actually stood taller. He actually,
he was much happier. And I really saw the difference and even just me talking to
him, he would actually treat my kids even just how much better and it just really
made a difference in our relationship. By the way, I spoke to him. I spoke to him as
if he was the most amazing man that ever walked the planet and that made a
difference. Something I've found that men are... They are so physical. They just want
us to touch them all the time. And you know, it's so easy for us as women to be
so busy taking care of our kids and taking care of the house and taking care
of all the responsibilities that we have. But I know that when my husband gets
touched by me, even if it's just like to rub his back or to rub my fingers
through his hair or to tickle his back or to massage his back, it makes such a
difference for him. He loves feeling that touch and that connection because
you know these guys, they work hard. They're out doing stuff all day long and
they're make it happen. And so by me touching him, he feels important.
He feels loved and that can make... Your marriage just totally connected and
stronger when you could have that beautiful physical connection. So, the
more I touch him the happier he gets. Here's another idea for you. There was
this day that my husband decided he was going to clean our garage out and it
needed cleaning like it really needed cleaning. There was so much stuff in our
garage and so like, "Okay, you do your thing on the
garage." And it wasn't part of my plan that day so he was doing it on his own.
And he he's out there cleaning out the garage and he takes everything out to
her out of our garage and he puts it out on the driveway. And I come out there and
I would... At first I was kind of shocked. I was like, "Oh, my gosh. What are we going to do?
Are we going to like have our garage on the driveway for the rest of our life?" Kind
of scared me for a minute. But then I reeled that back in and I realized, "Okay,
what he needs right now is a good validation moment." So, I took that time
and I validated him. And I'm like, "Oh, my gosh! This is amazing, I love the garage."
It looks so clean. And it's going to be so amazing when you when you put everything
back in the garage. "And oh, you did great putting all these things together and
all the tools together and all the all the gardening equipment together. You did
so good on getting all that stuff organized. And oh, my goodness. We're going to
get rid of some of this stuff. This is awesome." And I just kept validating him
and telling what a great job he was doing and complimenting him and then
letting him know how I could like... I could imagine what its going to be like in
the garage when he's done. And he just stood because I could kind of tell he was a
little bit overwhelmed. I don't know about you but if you've ever gotten into
a really big project and you weren't sure exactly how it was going to turn out
and when I walked out I could see that look in his face on his eyes. And so I
knew that the way I could touch him and make a difference was would be to
validate him and help him to feel like he can pull it back together again.
And as as I did that, he stood taller and he got his confidence back and he got
right back at it and the garage looked amazing when he was done. Now, another tip
I want to give you at the same little situation here is you know how when your
husband puts up a shelf or a picture and it's crooked? You want to just say, "Oh, my
goodness. Honey this is so amazing. I love what you've done. Thank you so much for
taking such good care of our family and I thank you for putting up this
shelf and you are such a man." Because you know what? Sometimes they just need to
know how much you love them. No matter what the project actually
looked like, they just need to know if you love them. And then you validate them as a
man. Hey, I am super glad that you watched
this video today. My husband I have a class called Royalty
and Romance. Oh! It is amazing. It's 3 days here in Salt Lake City, Utah. I would
love to have you attend our class so that you can learn so much more to
support you and your husband and having the most amazing life ever in your
romance of marriage. You know what? If you've got a few tips you'd like to add,
go ahead and add them here to the comments.
-------------------------------------------
How to solve for x given a right triangle - Duration: 2:01.
Welcome back to speller math tutorials in today's tutorial
We're given a right triangle and we have to solve for X
If you find this tutorial to be helpful, please subscribe and/or like and share
So here we have a larger triangle that's comprised of two smaller triangles and those two smaller triangles have right angles
Here we see an expression for that right angle, which is 3x minus 6. So let's rewrite that 3x minus 6
and
Remember that a right angle or a right triangle measures 90 degrees. So we're going to set this expression equal to 90 and
Then we're going to solve for X. So we begin by adding 6 to both sides
So we have 3x is equal to well 90 plus 6 gives us 96. Then we're going to divide both sides by X
I'm sorry divide both sides by 3 leaving us with just an X
So 3 goes into 9 3 times and 3 goes into 6 two times. So here we see the value of x is 32
Now let's verify that we have the correct answer by doing a direct substitution of 32 for the variable X
so here we have 3
Times 32 minus 6 and that there should give us 90
well 3 times 32 is actually 96 and then 96 minus 6 is what's left over and
Then 96 minus 6 is 90. So here we have 90 equals 90
So we see that our calculations are correct if you found this tutorial to be helpful
Again, please like share and or subscribe and as always
You
-------------------------------------------
Как работает TOR | TOR Network и TOR Browser - Duration: 4:53.
You've probably heard about what is TOR and TOR browser.
In this video, we will explain how does the TOR network work on
basic level.
You are on the channel CryptoInside and we getting started.
TOR stands for The Onion Router
What is TOR?
Tor is a tool for anonymity, used by people aspiring
to privacy and anonymity their actions on the Internet.
For starters, let's see in how it interacts
regular user with by the internet.
Every time you use Internet, everything you do
- gives your IP address.
IP address is a sequence numbers that identifies
your device on the Internet.
Every device that connects to the internet
has its own IP address.
Due to IP addresses, various nodes in the network can interact
between themselves.
When you go to any website, your computer
sends specific package information to the server
this website.
Package of information sent, also contains the IP address
your device in order so the website can send
specific package of information back to your computer
and you could see the web page.
Because of how it works Internet, your IP address may
be used in order to determine your location
and tie all your actions on the internet with your personality.
And we gradually come up to the TOR network.
Simply put, TOR hides your real IP address and replaces
his other.
Information is also changing. and about your location.
But TOR is not just software. running software
only on your computer.
TOR is a huge network consisting of thousands of computers
distributed throughout world who use
the same software provisioning and connected
to each other.
Some of these computers are nodes of TOR which
provide transfer information within the network.
When you run TOR, software
first uploads the list all nodes in the network.
Then, TOR chooses the path, through which will be transmitted
information.
This is the default path. consists of 3 knots.
Each node has own role.
Let's take an example.
You, using the TOR network, go on some kind of website.
The request to the website should go through 3 knots.
First node - Input or same sentinel node which
is the entry point to network TOP.
Input nodes are usually selected. of those that work enough
long and have high throughput ability to.
Next, a package of information passed on to the next
node - intermediate.
Next, the packet is transmitted on the last - day off
knot.
Output node is a point exit from the network top.
From this node, a package of information goes to destination
chosen by the client.
In this case, the website receives a packet of information
containing the output IP address host, not your computer.
There is a question.
How can a customer be sure is that his information
will not be opened and read any knot.
The network of TOP is built like this. way that sent
client information is encrypted.
And the nodes that have this information pass on - can not it
view.
Information is encrypted on client's computer
way to end as a result, it could decipher
only output node.
Encryption process source The data consists of the following
stages: • Client encrypts data
so that they can decipher only output node.
• This data is then again encrypted so that their
could only decipher intermediate node.
• Then this data again encrypted so that their
could only decipher watchdog node.
It turns out that the original data turned into layers
encryption is similar to structure bulbs.
As a result, when transmitting information through the TOR network,
each node has only the information that
he needs - where did they come from encrypted data and
where to send them.
Such encryption is useful. all - client traffic is not
open and nodes do not respond for the content transmitted
data.
Important notice: Weekend nodes can see the source
data as they need send them to their destination.
But this is only possible event information
was passed over unprotected protocols like HTTP
FTP or SMTP.
If information is transmitted secure protocol
for example, https, then even the output the node will not be able to see
raw data that you sent since they
will be encrypted.
To make outgoing traffic is always transmitted
over HTTPS protocol, we recommend install extension
for the browser - HTTPS EveryWhere.
This extension is automatically uses HTTPS protocol
to transfer data and blocks unencrypted requests.
Even if the output node belongs to the attacker
who wants to intercept your information he can
do this only if if you used unprotected
transmission protocols information.
And the remaining nodes so not will be able to see the source
data as it is encrypted.
Data transfer over the network TOR can be used
not only in the browser but also in various programs
chat rooms, cryptocurrency wallets or in the whole operating room
system - Tails, where any outbound traffic forwarded
through TOR by default.
Do not forget to click on bell to not miss
new videos as well subscribe to our channel
in the telegram, the link to which is in the description.
-------------------------------------------
How to Make Little Hearts with Apples for Valentine's Day / Snack, Edible Garnishes - Duration: 1:43.
How to make little hearts with apples
Using an exacto knife or a small paring knife,
draw the shape of a heart
Cut slightly diagonally following the shape of the heart
Remove the heart and add lemon juice to prevent blackening
Follow the shape of the heart to create another identical one
Do as before for the rest
Serve as a snack or use as a garnish for Valentine's Day
Cut a slice on the side of an apple (at least 1 cm thick)
Add lemon juice
Follow the shape
and carve out the heart, keeping the thickness of the apple
Remove the heart and add lemon juice
Insert a toothpick to create a bite-size piece
Cut an apple in half
and use as a base for the bite-size pieces
Happy Valentine's Day to all the lovers !
To subscribe click on the circle on the right
-------------------------------------------
How To Change The World - Duration: 2:05.
- Hey everybody, Daniel Fusco here.
Welcome to today's Two Minute Message.
So in the greatest commandment, Jesus, the greatest teacher,
the Son of God, the Messiah,
he said that we should love God
with all of our heart, soul, strength and mind
and we should love our neighbor as we love ourself.
I love to call that, upward, inward and outward.
Upward is about our relationship with God.
Inward is because of that relationship with God,
how do we see ourselves?
And guess what, the upward and the inward,
it drives us outward to love other people,
to live out loud in the world.
And here's the thing.
The way we treat other people,
shows us what our view of God is
and how we see ourselves.
And one of the reasons that the world is so messed up,
unfortunately, is because people aren't loving God,
the true and living God with all their heart,
soul, strength and mind.
And then aren't allowing that relationship
to change the way they see themselves.
So really all of our actions are an outgrowth
of the upward and the inward.
So for the next season of your life,
I have a simple question that I want you to ponder.
It's simply this.
What is the greatest way that you can positively impact,
your community and your world,
living outward and what are you gonna do to do that?
You see that?
We wanna steward our lives for impact, the greatest impact.
And what's one single thing that you can do,
that will have the greatest positive influence,
on those around you locally and the globe
and that is how we wanna live outward.
Now many of you already know,
I wrote a book called Upward, Inward and Outward,
where I explore all three directions
and how to cultivate it
and I'd love for you to pick up that book,
wherever you like to buy books.
But in this next step,
all we wanna do is focus on the outward.
What's one way we can steward our lives
for the maximum impact for those around us?
So this is what I want you to do.
First, I want you to share this video.
Because listen, we all live upward, inward and outward
and I think we can all agree we want the world
to be a more beautiful place in the way
that we treat one another.
And in the comment section, I want you to write,
this is the one way I'm gonna steward my life for impact.
This is the one thing I'm gonna do
to have the greatest positive impact,
locally, in my community and in my world
and we're gonna be able to learn
and encourage one another as we take those steps together.
God bless you today.
-------------------------------------------
How to Garlic - with Chef Cash White👨🍳 - Duration: 3:51.
- Hello, people of the interwebs.
Today we're gonna play
with your favorite vampire repellent, garlic.
I'm chef Cash White, and I'm here today
because God delivered me from my circumstances
and led me to a place where I can
share my love of food with you.
So today, we're gonna play around with a little garlic.
Everybody loves it, it's delicious.
Most people think garlic kinda is Italian.
Quite honestly, I put garlic in the majority
of things that I cook.
Actually, the spice that I use for the base
for all of my seasonings is a mixture
of salt, black pepper, and granulated garlic.
And all granulated garlic is is dehydrated garlic
that's been ground up.
It really balances flavor, raw garlic can be spicy,
you can caramelize it, it'll be sweet,
you can clarify it where it's savory.
So what we're gonna play with today is
I'm gonna show you a couple of different ways
to prepare the garlic.
So this is a bulb of garlic.
This is garlic paper, it's just like onion paper,
it's real thin.
Whenever you're pulling out a clove,
you peel away some garlic,
you just stick your finger in there and pop one off.
That's a clove of garlic.
I'm gonna get two cloves of garlic
so we can prepare it two different ways.
We have our two cloves of garlic,
as you can see, still covered in the paper,
and in the middle here is the part that we want.
So the easiest way to get all of this paper off,
take your knife, take the flat part, and lay it
directly on top, just make a fist,
be careful because of the blade, and just pop it.
Maybe a little harder than that.
And it breaks the paper and gets the garlic out,
just pops right out, just like that.
So we're gonna start with this one and we're gonna do
the most common preparation of garlic,
and that's gonna be the mince.
Make sure to hold your fingers
with your middle finger up front,
your other two fingers behind it,
and your pinky and thumb to hold
whatever you're cutting back here.
You slightly bend your finger and you're gonna
press the edge of the knife up against there
so that way you don't cut yourself.
So we're gonna start right here,
and I'm gonna place the tip of the knife
on the cutting board, and I'm just gonna do
an up and down motion.
I'm just gonna cut this into small little slices,
little chunks as I move my fingers
out of the way as I slice.
I'm gonna turn it 90,
no, I'm gonna,
yeah, 90 degrees, I'm gonna turn it 90 degrees,
and then I'm gonna run it through one more time that way.
Then I'm gonna take what I have left
and I'm just gonna run over it quite a few times.
It's gonna stick to the side of your knife,
so just slide it on off.
Oh you can smell the garlic oils.
And there you go, you have a nice mince, just like that.
Now, the next thing we're gonna do is
we're gonna do crushed garlic.
Crush garlic is gonna be something that you're gonna use
in sauces, and something you're gonna cook
at a lower temperature for a longer period of time,
so that way it'll have a chance to fully break down.
So I'm gonna do the same thing, I'm gonna place
the side of my knife, the flat part of my knife
up against the garlic, I'm gonna give it
a nice smash, but I'm gonna hit a little harder this time,
and I'm gonna get the garlic out, throw your paper away,
give it a once through, just like that,
and you're gonna take your knife
and you're gonna smash it again, you're gonna press it.
All you're really doing now is exposing all of those oils.
You put that in your sauce and let it cook through
until it basically just dissolves into it over time.
Guys, I really enjoy showing you these little
tips and tricks.
You know, in our cooking classes,
one of the biggest reactions we're getting
is people are thoroughly enjoying
getting back to basics.
So if you have any suggestions about
things you want to learn, leave it in the comments
down below, we're happy to work through them with you.
Don't forget to click subscribe,
click the little bell next to it,
and it'll let you know any time we post a new video.
Guys, the most rewarding part of doing these videos
is the very very end right now
when I get to remind you to keep the faith,
and enjoy the food.
I love you guys, good night.
Oh, hi people of the internet, just kidding.
I know, it's really cheesy.
-------------------------------------------
Kurt Nasıl Evcilleştirilir - (Minecraft) How are wolves tamed? - Duration: 0:13.
We are giving Wolf Bones
Hello to you today How we make a wolf in Minecraftta I'll show him
-------------------------------------------
How To Stay Safe In The Cold Weather - Duration: 2:14. For more infomation >> How To Stay Safe In The Cold Weather - Duration: 2:14.
 -------------------------------------------
Philadelphia 76ers at Los Angeles Lakers: Game Preview, How to Watch NBA Online, TV Channel, Live St - Duration: 3:00.
The Los Angeles Lakers will end January 2019 as they continue to search for their identity
They have a tough 76ers team coming to Staples tonight and look to restore some pride with a win tonight at home
Coach Luke Walton ended his two game losing streak at home by beating the Phoenix Suns 116-102 on Sunday, and LeBron James' impending return from a 16-game absence gives further cause for hope
76ers (-7) at Lakers 10:35 ET on TNT When: Tuesday, January 29 Live Stream: fuboTV (watch for free) Where: Staples Center, Los Angeles, California Lebron James practiced on Monday but the Lakers are planning on playing without the four-time MVP
James has been out since Christmas with a groin injury but it looks like he will sit out at least one more game
The Sixers have won five of their last seven in a tough stretch of games against opponents who
500 or better. They look to bounce back after a 126-110 loss at Denver on Saturday
Philadelphia will have all their stars in the lineup tonight as Joel Embiid will be back and will be tough to handle with his 27
2 points a game average. Jimmy Butler will be looking for a big game at Staples as the Sixers always play well out in Los Angeles
Coach Luke Walton is hoping power forward Kyle Kuzma will be ready to go on Tuesday after he sat out Sunday's contest against the Spurs with a hip injury
Lonzo Ball has been sidelined the past three games with an ankle. The 76ers are flying high in the Eastern Conference and seeking a 10th win in January, while the Lakers are on the brink of falling out of the postseason race and are very much ready for LeBron's return
How to Watch More NBA You can watch every marquee NBA game all season long with fuboTV, including nationally televised matchups on TNT and NBA TV, as well as nearly every regional network, such as NBC Sports Philadelphia for 76ers games
Sign up now for a free trial to start watching – no contracts required. fuboTV is available on all of your devices, including web, iPhone, Android, Roku, Apple TV, Google Chromecast, and Amazon Fire TV
We recommend interesting sports viewing and streaming opportunities. If you sign up to a service by clicking one of the links, we may earn a referral fee
-------------------------------------------
Temperature, wind chill and how cold it's going to get - Duration: 2:28.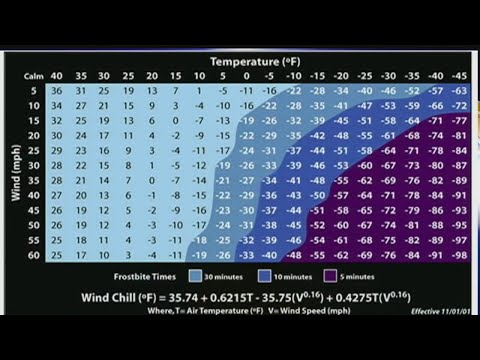 For more infomation >> Temperature, wind chill and how cold it's going to get - Duration: 2:28.
 -------------------------------------------
Hindi - How To Check Tire Pressure [शीघ्र] - Hyundai Elantra - 2011 - 2016 - Duration: 2:31. For more infomation >> Hindi - How To Check Tire Pressure [शीघ्र] - Hyundai Elantra - 2011 - 2016 - Duration: 2:31.
 -------------------------------------------
Leslie's Tutorials - How to Use the Easy Spray Mop Kit With Adjustable Mop Plate - Duration: 5:17.
Hello, and welcome to Leslie's Tutorials. As you may have guessed, I am Leslie.
I am a part of the H2O at Home Global Team.
Are you wondering why I am dropping by to say hello?
Well, it's very simple.
We've all had that moment where we thought, "What is the purpose of this product?"
And how do we use it?
So, at H2O at Home we thought, "Training videos - that could be valuable!"
So we made this video to show you tips and tricks to use simply this product.
A few people asked us how to use the Easy Spray Mop Kit.
Well, I will show you today, in a few simple steps, how to use it.
And, even while barefoot! Come on, let's go!
I don't know about you, but now that I have the technique,
I can't stop doing this!
Stay tuned for another new and exciting product video tutorial.
Another one? Okay!
-------------------------------------------
How to Lensball Photography - Night to Day - Duration: 13:38.
oh it's cold it's somewhere between zero and minus 10 but I have to make the vlog
because commitment right how's it going fer wait I said I'd try something new um
what is up fellow light hunters my name is Ilia and welcome to the weekly Wednesday
vlog we are currently in Pegasus which is a horse stable right behind me
we're doing kids camp and I decided to use the opportunity to record another
cool video one of the things I decided to do for my videos this year's repeat
some of the successful steps that I did for my videos last year so I'm gonna do
another video on the lands fall is a really trending type of photography on
Instagram and I've received thousands of views across my lunch while videos and
most of my questions and active engagement comes from those videos one
of the videos I did was replacing the contents of the lens ball which was fun
but now I'm gonna take it up a level and take a picture of the lens ball in the
night setting and then replace the contents of it into kind of daylight the
trick with that is to to sell the effect you have to have the less ball glowing
on to the snow below so we're either gonna be using one of these cool lights
that I used to set up for the vlog or just a phone that's also enough and
maybe I'm gonna use the phone just because it's easier for you guys for
those of you who don't have this kind of cool light LED setup so for this whole
experiment we're actually going to need four separate photos hold it right there
I realized later that it's only three images not four because there are no
reflections coming from the side of the camera so there's no no need for that
reflection map image go back we're gonna need a simple photo of the lens ball
with the background which we're gonna pull the background out of we're gonna
need a photo with the lens ball on the phone hovering over it for the glow
effect on the snow and we're gonna need the daylight photo of the same subject
okie dokie so these are our three images of the lens ball this one is the main
image where we're gonna pull the background from and everything this is
the light map so I literally took my phone and hovered over the phone let me
check the settings in was on it was on f9 the aperture was at 9 it was at 16
millimeter 1000 ISO and a shutter speed of 10 seconds so during those 10 seconds
I was waving my phone around and this is the daylight picture we're gonna be
putting inside lens ball so let's drag all of these into Photoshop and get onto
like step first you're gonna want to edit the pictures to your taste put on
any filters you want make sure they're all the same so you can synchronize them
later I'm at the lens Bo glow picture a little bit warmer than the rest so it
casts a kind of yellowy light but that's also something you can do in Photoshop
okay so first let's go to lens ball glow picture copy it and paste it on top of
our main background picture make a copy of the background so it's not locked and
we're gonna go edit Auto align layers and just let them Auto align so they're
perfectly in sync so we can mask one over the other and when they're synced
I'm obviously gonna crop it so that we don't have those little edges peeking
out since the layers kind of moved a little bit okay so now they're aligned
and I can put a black mask on top of the second layer so that it disappears and
we're gonna take a brush and start masking in parts of the image primarily
the glowing things now it's okay if we leak over onto the lens ball because
there right now it's not important we're gonna be replacing the content anyway
but what is important right now is the light we're putting onto the snow now it
looks like we're just dodging it or whatever the other tool is call it looks
like we're just putting white paint on us no but it's not really the same it
wouldn't sell the effect as well because this is actually the image of the light
leaking on the snow so it's actually realistic I just dropped something
it might be a little bit too strong for you or even too weak right now but you
can tweak that later and some of these tweaks we're gonna be
tweaking throughout the entire video and some of them we're gonna leave to the
end just to balance it out to your own taste so now we take the daylight
picture and I'm actually gonna crop it larger than it is already because I want
a full square so that we can get maximum space for this for your izing filter now
I'm just gonna select the top and bottom white bars and do a content-aware fill
which will fill it in with what's needed to complete the picture this is a pretty
easy picture to do that way and it's gonna look pretty good okay now before
we get into sea rising I want to actually add a more interesting sky
because this looks pretty white and pale and boring and I just searched up sky in
the pixels plug-in and it's gonna download this nice blue sky for me which
I can replace obviously I'm gonna resize it first so it fits nicely into our
frame move it up above the house where it actually is and change the blending
mode if you know blending options there is a blend of function so our pretty
much set it if the underlying layer is dark then it
doesn't blend which is a pretty easy way to blend layers together so I take the
mask and I'm gonna hand mask the rest of it make sure the trees pop out a little
bit more and make sure that roof isn't disappearing in the background and I'm
actually gonna use the burn tool to burn the background a little bit because in
reality if the trees were in front of such a by background they'd be a little
bit darker honestly I don't like the saturation much but those trees are
hardly gonna be visible in the final product anyway so it doesn't make much
difference so back we go to brushing I'm gonna make this a pretty hard brush
because we need a nice straight line on the roof shift-click on two points and
it's gonna mask the roof back in I'm also gonna rasterize the layer and blur
it a little bit lower not that much just a tiny bit so it fits into the image
more because the image we dragged in is quite a bit sharper than the image we
took because it was downsized so that just just does the effect that tiny bit
better one final touch is getting a sunray where's my favorite Sun this is
one of these pictures yet this one I like to use it a lot it's got a really
nice look to it and it's easy to mask in as a kind of sunray overlay drag it in
I'm gonna turn it into screen blending mode overlay mode thing right away and
I'm just gonna bump up the levels so that it sticks out a little bit more
flip it upside down because I like to longer Ray's on the bottom side leaking
over the house place it in position make it a little bit bigger just looks
like in yo face cuz I remember all this is pretty small and I'm just gonna take
a brush and mask out all the ugly top part it's kind of hard I need it to be
softer let's find a little bit bigger mask it out I need to be a little bit
bigger mask out the corners and it's fine of course it kind of blends into
the light unfortunately it would look way stronger and brighter if it was in
the blue part of this guy but now I can pretty much place it anywhere around the
house and it's gonna look decently decent okay so I'm gonna merge all these
together in a new layer and finally go to this view I stool which is gonna make
our whole thing looks like the contents of the lens ball
you'll find that under filters distorts your eyes I'm gonna put it at a hundred
percent and actually for some pictures this could be enough but I just want to
squeeze it a little bit more so with control F I'm gonna repeat the filter
and it's gonna make it what am I looking for filters control F it's gonna make it
even stronger on it that might be too much so it's really up to you how far
you want to go but again just for the purpose of this tutorial I am doing it
really rough so transform make it smaller position it around the lens ball
make sure it aligns with all the winners that should be good now the blending
mode goes to screen or lighting or screen kind of flip through the blending
modes it depends on the picture some of them may look better I don't want to be
normal I want some of the texture of the lens ball and the snow to show through
so it looks a little bit more realistic okay so now we need to start masking out
the snow underneath because obviously the entire lens ball is not seen and I
know this is kind of an iffy solution to this because technically there's you
could do this without the lens ball it just helps it make look more realistic
you could literally just take a picture of the house and put this fear in front
of and it's gonna look okay this is slightly more realistic for the best
version you should actually leave your camera for a couple hours from when it's
light to when it's dark in the exact same position so you take a picture of
the lens ball in the house when it's light and then let's blow on the house
when it's dark and then literally just put one picture on top of the other and
and mask out the lens ball so that you just have the day when over but you
don't always have the luxury to do that especially when there are people walking
around and things happening you can't just leave your camera in the same spot
for hours and expect it to not move Plus this is kind of an exercise for your
intermediate photoshop skills and it's fun to make now the thing that we
couldn't accomplish with the phone is the light leaked immediately under the
lens ball which would probably in real life circumstance be a lot brighter so
we're gonna make a layer of just white paint and then tweak the opacity to make
just this little two or three millimeters trip around the lens ball a
lot brighter as though the lens ball is glowing on
the snow and I'm actually gonna separate into several layers and make each layer
thinner but also not as opaque so that you kind of gradually get it into a
brighter and brighter light towards the lens ball okay so now the lens ball kind
of looks like it's sitting in the snow you have that effect you might want to
make it brighter or that's right depending on your preference as always
and now it's time to start working on the lens ball itself because obviously
things are not gonna be as crisp and sharp and looking otherworldly as they
are right now so the first thing to do is start blending the circumference of
the lens ball because first of all the circle we cut out with the marquee tool
is way too sharp sharper than any elements on the image so they need to be
blurred plus if you look at pictures of lens ball the outside parts of the lens
ball are always less sharp than the center of the lens ball so we're just
gonna go around in a circle and unsharp the parts of the lens ball which are
closer to the outside to make it more realistic and then you have the center
of it which is really sharp next I'll make a new layer with a black mask I'm
gonna select the lens ball - the selection of the mask of the snow mask
and put that mask on so pretty much we have the lens while that's peeking out
masked and we're gonna take a fat white brush and just paint around the circle
of the lens ball because again if you look at pictures of a lens ball as it
goes out to the surface it starts fading because of the way the light bounces
through it and then we lower the opacity down I'm keeping the same thing but it
just all these steps taken to make it look more realistic and I'm gonna take
the background lightness down more so it looks like it's actually night and not
dusk or blue hour or whatever and that makes the lens but I'll just pop out and
make it look like it's a light source play around with this a little bit just
to figure out how light or how dark I like it and I'm actually gonna color it
a little bit more because I want it to look like it's daylight inside the lens
ball and daylight is more yellow than generally lights during the night so
that's kind of greenish so I'm gonna take away a bit look a little bit of the
green making more orange and that again sells the effect a little bit better you
see what these little stripes do to it um
let's colorize this as well to make it more yellow saturation lightness a
little bit down too much make it yellow mmm that's fine so all these little
filters are not perfect if you want this image to look really good you need to
spend a long time on each of these details figuring out what makes it look
realistic and good and not too fake I guess but this is just me going through
the steps to show you an idea and maybe if you come up with something better
then share it with me somewhere and if I think it's cool I'll definitely share it
either in my Instagram stories or in my next vlog I guess we'll see the last
thing I want to do is add a starry sky to fill in that boring block of sky
that's over the house and that's pretty easy it's even easier than the blue sky
we did on the yellow house because you don't have to do blend dips
we'll literally just position it and mask out the bottom part with a
paintbrush because everything is blurring anyway so you just need a soft
brush to roughly mask out the location I'm using a pretty soft one around the
trees and all those branches because it looks soft
but then for the roof of the house we're just pretty straight I'm gonna make it
smaller so that it's not as fluffy too messed it out and it looks good again
playing around with the blending modes to see what you like screen just looks
super bright right now but maybe that's what we want and then of course I'm
gonna box blur it so it looks so you get that depth of field that we have going
on in our photo but you still have the Milky Way and that streak from the plane
so it just adds a bit to the image to make it more interesting alternatively
you could flip the contents of the lens ball because in a real life situation
when you fold when you take photos through a lens ball they're upside down
but since we're doing this whole fantasy you know otherworldly thing anyway we
might as well flip it to make it look upright and there you have the final
photo again it's not perfect it could take 2 or 3 hours to make it a really
good photo but this is just an a cept we did in 15 minutes and hopefully
inspires you to do something similar well that is the end of this fun video I
hope was useful I hope this something you can try in your photography if you
try this send me the results either in a youtube comment or on my Instagram
account where I post a lot of photos every single day thank you so much for
watching it as always I'm gonna see you guys next week and I have to change that
part of the vlog around to because it's a repetitive
-------------------------------------------
how to fix a dolls hair - Duration: 4:34. For more infomation >> how to fix a dolls hair - Duration: 4:34.
 -------------------------------------------
Tech Fox Tip #29 : How do I get help!? - Duration: 0:19.
hello I'm Orkin and this is another tech Fox tip
today's tip is how to access help files
in most applications if you press F1 you'll open the help file
this has been a tech Fox tip thanks for watching be sure to follow for more
-------------------------------------------
Hur man animerar i premiere med photoshop (How to animate in Premiere with Photoshop, SUB) - Duration: 21:03.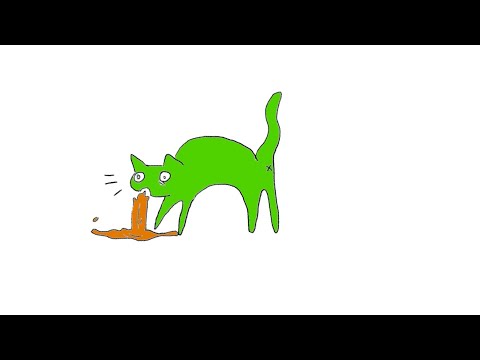
Animation.
something that will probably make you cry in the long run
(eh) if you don't know your way around the programmes
and your teacher after you've called them seventy-twelve times
during the night, asking how to import a file yet again
That is why I've made this tutorial about
the basics in animating in Premiere by using Photoshop
We're using premiere and photoshop specifically due to them already being installed on our school laptop
and it is those programmes that our teachers have decided we should use
and we're students without free will sooo, ehh
You, CAN, use whichever programme you want to. You don't need to use just Photoshop
because you can import whichever pictures you want to make an animation in premiere
so you can draw your animation in whatever programme poor people use
But, Photoshop has a pretty big advantage when you use it in premiere
that we will go over later.
So, let us beginn with... PART ONE: PHOTOSHOP
Step one is then to, of course, open photoshop. Pretty obvious but, regardless, a step
So, we begin with opening the launchpad and it should be there--if it isn't just search for photoshop up here
and then you'll see this pretty little blue icon (uwu)
press it and wait until it starts
it can take a few years but.... here we have it!
Look at that! Now when we have PS upp and going it is of course time for creating a new file! Where we'll draw our beautiful animation
so we press "create new" OR we can press "FILE" up here and then "NEW" (file>new)
At this point it is time to choose how big we want our canvas to be, and believe it or not, animations are often seen on screens and we should therefore
choose a size that fits screens. So, we don't end up with ugly black corners... because, well, it just doesnt fit and then it has to fill it out with something
and there is different types of sizes, these are the most common ones. I've decided to (ehhh) use "1280x720px"
and since I'm making a very simple animation, with few details, so I will only have 150 in resolution. The higher this one is the more pixles will "fit" on the screen
but since this is just a simple little tutorial it isn't WoRtH that many pixles
so, then we press on create here and here we have our... canvas
We begin with, of course, creating a layer. The first layer we have here is the background. If we press down here on this pretty little icon we create a layer
every new layer I create will become a "frame" in the animation, with that I mean one of the pictures in this fast "slideshow" that will create the illusion of an animation
So, just to illustrate a bit... if I draw this BEAUTIFUL and PERFECTLY round circle, it'll be our first frame
then we create another layer, and this is quite important:
When we later import this into premiere it will read all these layers as frames and it will read from the TOP TO THE BOTTOM
so it is very important that you have your layers so that the first frame is at the top and the last frame is at the bottom
it is a bit of as hassle, unfortunaly, but there is nothing you can do about it so you'll just have to move your layers
so here we have layer 2, that is frame 2, and here comes yet another pretty ball...And then the third frame WOW
all of them are visable now but when we have them in premiere it will look something like this... and it will play it super fast so that you get...
a nice... illusion... of... movement... I just need to sit and do this and we'll get (oops! hah)... feeling of "ah, this ball it is moving a bit!"
maybe not in the smoothest way, since I am after all...sitting here and BANGBANGing on it... but that is how it will work
SO! Now it is time for us to get started, so, I'm planning on just animating something simple then throwing it into premiere
Something important to think about when animating is to lower the opacity (here), that is how visable it is, when you're going to draw the next picture
about... here, maybe? So, when you're drawing on the next layer it will be much easier because you'll be able to see what you're doing
is it just me or is this v acid trip-y?
yes, def v acid trip-y
SO! Now we have our...handsome...green...puking CAT here, which is, incredibly artsy
and now we'll move on to the next part which is... PART 2: PREMIERE
so, of course, the first step is to--again--open the programme which is this pretty little purple...or...pink maybe? icon
and...wait...and wait...and wait...
Now, when we have our start page here and just as in PS we press "NEW PROJECT". It is named "project" because it isn't souly for animation, the programme can be used to edit videos as well---it's kinda like a studio
so up here we can see that it says "untitled" so we'll name it "the puking cat ANI", so that I know it's an animation later...
Here we have some setting that we have to check are correct, since we want to use premiere for aniamtion...
Renderer should be "MERCURYPLAYBACKENGINE", Display format should be "FRAMES", which is quite important because sometimes it's set on "timecode" but we want it on frames since we're doing animation
"Audio" we don't need to give a damn about, since we won't have any sound so it doesn't matter. And Capture should be on "DV"
we press... OK
YES! And here we have our STUDIO! The thing is, that as many other Adobe programmes you can customise your layout---as you can see I can pull on it--so your layout might look a bit different from mine but it should be the same
So, up here we have where I will have all my media...videos, pictures, yada yada, texts... everything willl be here!
Here we will see...well, we'll see what we're working with as a thumbnail, you could say
and here we have our timeline, where most of our editing will take place, in all it's simplicity
To start up this party we must, again, check our setting... so we go to PREMIERE CC PRO up here then to PREFERENCES and lastly to TIMELINE
And directly we're faced with a bunch of text, which can be very overwhelming, but what we will focus on is VIDEO TRANSITION DEFAULT DURATION at the top
What it controls is the transitions between the pictures. Premiere is a bit smart and fades the pictures when it changes, it does this to smoothen out the animation so it doesn't look too rugged
and here I can choose how many pictures I want it to do this with. It works a bit like when you spread out cards on a table: they overlap each other, but it is still a complete sequence.
here, it doesn't really matter what number you have because it is better to experiment bc some amounts works better with other animations than others. Experiment to see what looks nicest
but, I've decided to go with two frames, because I feel like it is a good standard. Again, ignore AUDIO, since we won't be working with sound
STILL IMAGE DEFAULT DURATION basically means how much space your pictures will take in the timeline. I've choosen 2 frames, again, because it works for my workflow but feel free to experiment and see what fits
since this is my tutorial---BANG whoops, I dropped...everything...--- feel free to just copycat me and experiment a bit more when you, well, get the programme
OK! we press Ok, and everything looks good, NOW the fun starts!
and here comes that advantage I spoke about earlier... we are now going to import our pictures and we do that by pressing FILE then IMPORT
then we have to find our little catto here, the PSD file... it is important that it is saved as a PSD file so we still have our layers
ANDHEREIS that advantage I spoke about!!!!!! Since it is PS, I can now just import the whole psd file... and it will read all the layers as individual frames
if I had chooseb to do just a bunch of different pictures I'd have to import them all one after one, which can be a pain in the neck if you're working on a video with 100 frames, then you'd have to import a BUNCH of frames
So, now we can just take the PSD file--which is so handy! And...import! and then we wait...
and then here, instead of merge all layers we take INDIVIDUAL LAYERS. We do this because we want all layers, not just A picture, then we select the ones we want... I want all. Check if you have all you want
I see that I also have the background, if I choose not to have it the background will be back, but I don't so I keep it. Press OK
And now we have put it into our...arts and crafts box... but, we don't want it there ! We want to work with it so I drag it and release it over the TIMELINE
and now it looks all types of crazy, and you may wonder "OH NO DID I MESS UP", but fear not it is actually like this it is supposed to look...
As you can see a bunch of stripes have appeared
they work a bit like layers do in PS, and, I call them "shelves". If I select all these frames, as you usually do, I can move them between the shelves by dragging them
it still looks as crazy as before.
But, I do the exact same thing with this one.
And that is the background.
And then it will look normal.
But, if I grab my little timemarker here, I will notice that "wait a minute here, It only looks a bit cuckoo there"
okay, but I want the background over the whole picture.
(mm) we can solve that too.
When I hover over this part, I can see that a small red arrow will appear. That points in different directions.
If I "click and hold" on the red arrow.
I can drag my frame, so that the frame will cover this whole part.
And then I just let it go where I want it.
And now I can see that the background is over the whole picture.
You can do this with any frame you want. Maybe I feel that " aaw ok I want him to stand there a little longer"
Then I can just mark these, move these ones a bit forward.
And then drag it out.
So now I can see that it will be visible, for 6 frames.
Wich is written here.
And I can see it, beacuse of this.
Now I'm just gonna mark these again, and move this one back. (and to the same procedure here)
And now that I have done that he will stand there for a little longer now. (as you can see)
If i want it to show in time. Beacuse I have no idea how long of an animation this is.
Then I can left-klick here on the small number. Or just on the numbers over here.
And choose " show audio time units"
And now it will show how many seconds this is.
So we can see that about here it has only gone one second. So this whole thing is only a little more than one second long.
We also have some tools up here.
This one is "play", I will use this if I want to watch my animation.
"whoop, and there he is puking." ( and after that the animation stops)
This one is " step back end frame"
And here we have the tool for skipping to the end.
The icons for the different tools can differ, depending on wich program you are using. It is a bit individual.
If you press the "plus" over here you can choose wich buttons you want.
One button that is really good to have is this one. The "loop" button.
I have already added this button. But if you press it, it will be added here.
So if I press the loop button, my animation will repeat again and again. Which is very handy while working.
But! Now I notice a tiiiiiny little thing here in my animation: Oh NO! this part isn't coloured in
Cuss. This is rather sad, goes my train of thoughts, now I have to re-import the whole cuss again!
But nOoooOnOOO!! This is a great advantage with photoshop, again, I can just swipe up with three fingers (on the mousepad)
and make my way back to photoshop, find the faulty frame, (here) and just then fix it! Because at this very moment this file is synched with premiere
so if I change something here, and SAVE, it will automatically change it in premiere as well
which is very nice beacuse then I can fix and mix with my animation much faster than if I had to import a bunch of pictures all the time
a negative thing with this, though, is that it isn't a totally perfect system--I can't change /everything/
if I, for example, rename or add or delete a layer premiere would think I'd yeeted the whole file in the trash
and go all crazy... So, that is something you're NOT allowed to do. I can't rename, add or delete layers but I can change the already existing layers as much as I want
so it is very good to decide how many layers you want to have before you start animating, so you know before you begin
but, then, we press CMD+S to save and then we go back into premiere and then we can see that BANG it's yellow (orange but ok)
AAAAAND here we have our beautiful, puking, cat animation! Pretty simple, when you understand the logistics...
(eehhh) Now when I've made this and I'm pretty pleased with it.I think it is very good. And now I, of course, want to...HAVE... it...
...................
exported... as a little mp4, that is a video file. And I want it to be, eh, maybe a minute long?
So, I select all this, press CMD+C (copy), move my time indicator to the end...
and then I press CMD+V (paste) to duplicate it
Now I'm not... ehhh... oh well
now you can see that I have double the amount (of the frames) and now it is 2 sec long
and then I do this...
for.....how long.... I feel it is... needed. How long do I want it?
EHHH. Maybe, I want it to be one minute... so we'll paste it for a bit more.... a bit more
and BANG! There we have it, just little above a minute
So, now I want to export this. So I press FILE, just like when we imported the pictures, but instead I press EXPORT and then MEDIA (file>export>media)
Then we wait... as always...
So, here we have the aniamtion again and a LOT of text. But... that is okay, because we only need to focus on the top here
OUTPUT NAME is "The puking cat", just as we named it (in the beginning)
then I want to have H264 as a format. Which is, really, the most important thing and what you need to look at
I want H264 beacuse then it will be exported into an mp4
There are other formats here that you can choose, like PNG (just a regular picture), quicktime which is another form of video formats...
This H264 is mp4 (we get in hunny) which is a pretty common forma, so, that is what I use anyway...
and then we check export video, export audio, and then we press EXPORT and let it work for awhile
Lookie here! Now we have it exported to our desktop... and if we double click on it we can watch it once again
Here we have him... THE BOY!
AND that concludes this tutorial! And... OF COURSE we have it end it with some bragging~
so here's some other animations I've made with photoshop and premiere, and I hope that it is all a bit more clear now!
or, at least, that I didn't make you more confused. Toodles!
-------------------------------------------
How to Find Your Printer Name or Number | HP Printers | HP - Duration: 2:03.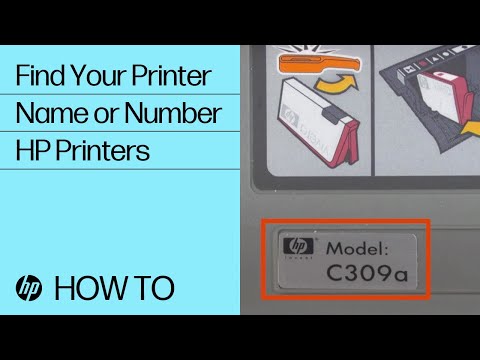
Check your printer and its labels to find your printer name and number.
You need your printer name or number when navigating HP's customer care website
to download the latest drivers,
find product information, order replacement parts, find troubleshooting topics, or check warranty status.
So, what is the difference between a printer name, a product number, and a serial number?
The printer name identifies what components were used to build a group of printers.
Your printer has a name in the same way that a car manufacturer gives a specific car a model name.
The product number identifies your HP printer within a model number series
and establishes the region where that printer is sold.
The serial number is unique to an individual printer and is used to
check warranty information and track the repair history.
For example, there could be 10,000 HP printers with the same printer name
but only 1,000 that share the same product number,
and only one printer with a unique serial number.
Check the following locations to find the printer name or number.
On most printers, the name or number is on the front of the printer, on or next to the printer control panel.
On some DeskJet or Photosmart printers, the name or number is located on the top of the printer.
On some printers you need to open the top cover to find the name or number.
On some OfficeJets, the name or number is listed on the inside of the ink cartridge access door.
The number is listed on the door itself.
There are two locations to check for the product and serial number.
The most common location is on a label on the back of the printer.
The product and serial number are on the same label.
On some printers, the label is on the bottom of the printer.
Write down the printer name and number and store them in a safe place for future reference.
Không có nhận xét nào:
Đăng nhận xét