Is it good?
It's really good.
So cute.
Aigoo, so cute.
Why are you just pretending? --Huh?
Why did you just pretend? --I put on my lipstick now I can't do that to you.
OK.
Totally no makup.
Oh so cute.
We're really bare-faced.
Our sense of humor are surprisingly similar.
I make umji crack up.
Why were you smiling bitterly?
You know how much I love your laughter, right?
How is my laughter? --Her laughter is...
Everyone is laughing because it's funny, but she sounds like she finds it the most interesting.
She's even losing her breath.
You laugh like this.
I cry "ppooeng" and laugh "higguk higguk".
This.
This is from our old dorm.
- Old dorm. - Can you show them briefly? - A year ago?
It's so cute.
Wearing a facial mask, without any makeup at all.
- Avatar. - So cute.
It's so cute.
- This is cuter. - This one? - This one.
Like this.
Isn't it cute.
Unnie I like your brown hair.
I like your black hair too.
That's why you didn't talk to me much when I had black hair.
I thought you were angry at me.
- Its a misunderstanding. - You're talking talking me now that because I have brown hair.
Did you know that I didn't look at sowon unnie when she had red hair.
I love sowon unnie whatever hair color she has.
No, If the camera wasn't here, she didn't talk to me when I had black hair.
I thought she was angry at me this whole time.
So you do it to me these days?
Really?
- Everyone, this is... - I got surprised in the kitchen and room.
There's a wall in the room and a dressing table is here.
You need to take the corner to see the dressing table.
I just dropped by their room and she was organizing stuffs on the table.
I was standing in the corner.
I was there for a few minutes but she didn't notice.
So I thought if she had a weak heart.
She gets surprised very easily.
We do our best to surprise each other. We shout out loud "Boo!"
But I couldn't do that to her, worrying it may harm her heart.
Do you know how I did? I stood there still and said, "Boo".
- It's too weak for us. - I said "boo".
So I said, "Sorry, so sorry. I didn't know it surprised you so much".
- A few days ago, - It was hilarious.
I was chopping something in the kitchen.
Suddenly, I have good ears
and I can hear sounds from afar.
But there was no sound of others being around.
- You can hear sound of footsteps. - Right, loudly.
Sowon has a unique foot structure and her footsteps make loud noise.
Kidding me!
- If it's TMI, don't say. - So her footsteps are loud.
Because she puts her weight on her footsteps.
- Her bones are too strong. - Weird.
That's good.
- Anyways. - Is it good? - I couldn't hear any sound.
So I was chopping casually,
but she surprised me a lot.
Sowon unnie said she didn't mean it.
- It's my habit. - I came to the fridge
and she was standing there. I casually touched her back.
Do you know what I said? I had a lot of thoughts.
Before this, I worried if it'd harm her heart. This time, she was holding a knife.
- Right. - I worried if she hurt herself.
- Right. - I didn't mean to surprise her.
I went there but she didn't notice me. People look around if they hear sound.
She didn't look at me so I said "boo".
She fell down.
- We don't surprise each other when we get out of the bathroom. - It's slippery. - Worrying of an injury.
- Considerate. - Right.
Sure, we need to tease each other considering the situation.
- Considerate. - Right.
Sure, we need to tease each other considering the situation.
For more infomation >> [Gfriend] This is how Leader SOWON Adores Maknae UMJI - Duration: 7:25.-------------------------------------------
How do you describe this?(31) (Vocabulary Building) [ ForB English Lesson ] - Duration: 1:36.
Hi everyone!
Welcome to ForB's English lesson videos.
I'm Rianna and today, we're going to show you another video.
I'd like you to describe what he is doing in the video.
Let's take a look.
What is he doing?
He is blowing his nose.
When we blow, we send out air from our mouth.
Blowing your nose is sending out air through your nose.
Let's practice this sentence together.
Please repeat after me.
He is blowing his nose.
Wonderful.
When you are sick, please try not to blow your nose too hard.
Thank you for watching.
If you enjoyed this video, please like, share and subscribe.
See you.
-------------------------------------------
How does the Honda Clarity Plug-In Hybrid work? Long - Duration: 1:04.
So how does the Clarity Plug-In Hybrid work?
Pretty well actually.
You might have heard of the technology called PHEV.
It stands for Plug-In, Hybrid, Electric, Vehicle,
and it gives you the best of both worlds.
So there's a 17-Kilowatt-Hour Battery Pack that is inside
of the Clarity.
And it helped it receive its
47 Mile All-Electric Range Rating.
But sometimes with EVs you can get range anxiety.
What are you gonna do if you don't have a place to charge?
You don't have to worry about that.
There's also a 1.5 Liter Engine in here,
we can put regular gasoline in.
And that's going to serve as a generator that puts juice back
into that Battery Pack,
or if you're flooring it,
it's also gonna put power to those wheels.
You've got an EV for pure electric driving,
and internal combustion without having to worry about range.
And with a full tank and a full charge it received
a 340 Total Mile Range Rating.
Pretty awesome.
♪
Click here for the long answer.
Click here for a short, little answer.
♪
-------------------------------------------
How Safe Is Facebook | Facebook Cambridge Analytica | Priyank Gada - Duration: 7:42.
So what's up youtube, its me priyank gada and i am back with another video
In today's video, we are going to talk about the facebook scam.
about the facebook cambridge analytica scam
I know i am really late and i am posting this video really late and i was busy with my stuff
Finally its here ! In today's video we are going to talk about the scam, what actually the scam was
How actually facebook reacted with it
With that said, we will also come some tips to protect your privacy
To stay protected and to keep your data safe.
So lets get into it.
[Music -Not for Nothing] [Illumination Production House]
So Lets just start by addressing the
the actual scam and how it all started
Now recently #DeleteFacebook Was up
Wherein users private data was released
and cambridge analytica actually
revealed that they used some APIs
to get access to around 50 million facebook users
User's private data. And they actually used it
and they used it very unethically and for election campaigns
and even donald trump's
and around 50million american's private data was used
misused actually!
and this does not limit to american users
actually facebook's analytics and privacy policies
are world wide !
So indian's are also affected with it
So what i did is I downloaded my copy of facebook data
Facebook has an option called "Download your copy"
wherein you can download all your data that facebook has
has been recording since
you created your account
I tried to download my data
Now lets see what data actually facebook is tracking or using
first of all we get the normal profile page wherein you have all the user's data
Like Date of birth and all the normal stuff that usually
user actually puts.
In case you are creating your facebook account, you will put all of this information
like your date of birth, mobile number and stuff like that
Even your email ID and your work emailIDis also there
Now comes something really interesting, we have
The contact's info tab, which allows you to see
all the contacts that are synced on your phone
For eg, if i have installed facebook on this phone, i.e. OnePlus5
and I have all the contacts synced with this phone
You can actually see all your contacts and facebook can actually share your contacts with
with any third party advertisers
and to my surprise, whatever you have deleted, like your deleted contacts were also synced
I have seen all my contacts from 2013 and back from 2011 as well
so that's really horrifing and scary af
because facebook has all your contacts
even the contacts that you have deleted
Then we have something called the timeline tab, which has all your timeline activities
Obviously these are public and eventhough you can change the privacy
Facebook afterall has access to everything
All your activities, like whatever you share, whatever you upload with date and time
With that said, obviously facebook will have all your photos and videos
-------------------------------------------
Draw FIDGET SPINNER | How To Draw #FIDGET #SPINNER For Kids | Learn Art Coloring Pages for Baby - Duration: 4:12.
How To Draw FIDGET SPINNER For Kids
-------------------------------------------
How to Pre-Register For Harry Potter: Hogwarts Mystery For Free - |Techno View| - Duration: 1:43.
Do like share and subscribe to our channel
-------------------------------------------
How To Use The Audio Clip Mixer In Premiere Pro - Premiere Pro Tutorial - Duration: 10:15.
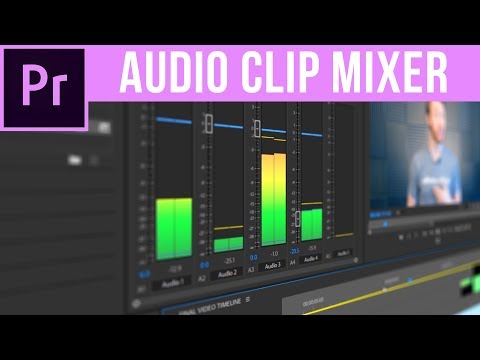
Hi Guys! Jordan with Motion Array and today we're taking an in-depth look at the Audio
Clip Mixer!
So just to clarify off the bat, there are 2 mixers that you can use in Premiere Pro.
The Audio Track Mixer, and the Audio Clip Mixer.
We've actually done a video already on the audio Track Mixer, and it's this one here.
Check that out if you're looking for how that one works, but in this video we look
exclusively at the audio CLIP mixer.
So let's jump into Premiere Pro and take a look!
So here we are in Premiere Pro, and right off the bat, we're just going to take away
any confusion and go over the difference between the audio track and clip mixers.
The audio Track mixer is designed to control the entire track that houses each piece of
audio.
When you edit in the track mixer, you control parameters that influence the entire track
as a whole.
But when you work with the audio clip mixer, you make changes to each specific clip that's
under the playhead at any given time.
So let's take a deeper look specifically at the audio clip mixer.
To start with, it helps to be in the audio workspace tab.
So to get there, go up to your top section here, and make sure that the audio tab is
selected.
Then we can see our new layout looks like this.
From here you should see your audio clip mixer located in this box here.
But if you can't find it, you can go up to window, Audio Clip Mixer.
So one of this first things you should notice is that the number of audio channels in the
clip mixer section directly reflects the number of audio tracks you have on your timeline.
And if we add more tracks of audio in our timeline, then we see more channels appear
in our clip mixer section.
But it's important to note though that the audio clip mixer doesn't control the audio
tracks, but instead the audio clips within those tracks.
It simply uses the tracks to identify which clip you are working with.
So for example here when we start to play our video, we can see the audio levels moving
in conjunction with the clips that are being played on the timeline.
Each audio clip mixer channel here is displaying the results of the specific clip on that track
that the playhead is over at that given time.
So if we stop the playhead here, this audio channel is controlling this specific clip,
while this audio channel is controlling this specific clip.
And so on and so forth.
But as soon as we move the playhead forwards and we end up with the playhead over a different
audio clip, this channel no longer controls this clip, but now this one, because the playhead
is over this section.
So the audio clip mixer is entirely dependent on the position of the playhead to be used
correctly and to even identify which piece of audio you will be interacting with.
But now that you know where the audio clip mixer is looking, let's learn how to use
it to impact your audio.
Like we saw when we started to play our audio, we can notice the audio meters bouncing up
and down displaying how loud or quiet the audio is playing, and whether or not it's
even playing at all.
In this section keep in mind that if your audio enters the red section, you're in
danger of clipping your audio and losing quality as a result.
You can also control the volume of each of your audio clips that your playhead is over
by raising or lowering this slider here.
And we can notice that when we change our audio with this slider, our corresponding
clip on our timeline shows that our audio level has been changed.
If you can't see this keyframe signifier here, make sure that your audio track is tall
enough and then ensure that your audio keyframes are enabled by right clicking on the clip
and going to show clip keyframe, volume, level.
You can also see here that the blue number here changes when we move our audio slider
around.
But you can also change things by manipulating the value of this number here.
Because it's highlighted blue, it signifies that we can click and drag the value to input
a new amount.
Or we can even click and then key in a specific number if we so choose.
So now we can see that we have a basic understanding of how to identify which channel controls
what clip, and how to change simple clip volume.
But keeping things organized and quickly identifiable can be easier said than done.
What can really help is by keeping similar items on similar tracks.
So for example, we have only music on this track.
So we can actually go down here to the corresponding channel in our audio clip mixer, and change
the name from audio 3, to Music.
And this will help us to remember when we see our audio changing up and down, that this
channel controls the music.
And as long as your tracks are organized together properly, we can do this for each of our channel
labels.
So now we have a really clear understanding of where things are when we need to change
them.
But there's a lot more flexibility you have in controlling your audio clips than just
changing the audio volume.
Let's go to the top here and look at three symbols we have here.
We have M, S, and a diamond.
The M stand for mute, and when you click it, it highlights green, and that entire track
will be muted.
Next we have S which stands for solo.
Highlighting this will turn it yellow and this will cause everything except for that
track to be muted, leaving it as the only thing that's playing.
And finally we have the diamond, which denotes the ability to write keyframes.
Unlike normal keyframes, clicking this button doesn't create a new keyframe, but simply
activates writing keyframes for the clip under the playhead for that track.
Let's look at a quick example.
Here we can see that when we highlight the write keyframes marker, and then make a change
to the audio meter, a keyframe pops up on our clip down here.
If we move the playhead forward and make another change, a new keyframe is added and the volume
of the clip changes over time.
Let's quickly erase these keyframes by selecting our pen tool, highlighting the keyframes,
and then hitting backspace or delete.
Now let's try that same idea, but let's move the slider live as the clip is playing.
The result is that we get a slew of keyframes all adding up to the final effect of making
our audio change over time.
Let's get rid of these now and let's just make a simple lowering of our volume with
two keyframes again.
But if we move forwards to a point where the playhead is now over a new clip, we can see
that when we make a change, it only affects the new clip that is under the playhead, and
it doesn't impact at all the previous clip we were making changes to before.
This is one of the most significant differences between the audio clip mixer and the audio
track mixer.
The audio clip mixer respects the unique identity of each clip on it's own.
And guys that's the basics of the audio clip mixer but we're going to go through
one more feature that you have control over with the audio clip mixer.
You can actually control the panning, or how much the audio is being output from either
the left or right direction.
You can do this one of two ways.
And the first way, is you can control it from the top here by dragging this knob either
to the left side, or right side.
This will influence the balance of where it sounds like the audio is coming from.
So here for example we have sound effects of the water and waves to aid the visuals
of the waves in our clip.
But the waves are on the right hand side of our footage, so we can make the wave sound
effects feel like they're coming from that side by turning our nob so that the sound
is coming more from the right.
Take a listen.
And also keep in mind, that as long as the write keyframe button is active on that channel,
you can tell that audio clip to change the left and right orientation over time.
If you right click on any of the channels of your clip mixer, you can change a few parameters.
You can show the peaks and valleys which are simply the high and low points of your audio
given with marker.
You can make those markers static or dynamic.
Dynamic meaning that they will re-adjust every few moments to reflect the current state of
the audio, and static meaning that they will remain where they are unless they are either
forced higher or lower by the audio itself.
Enabling color gradient will simply control whether or not your audio levels are displayed
as either solid green, yellow, or red, or displayed as a slow gradient of the vast range
in between those three colors.
And finally we have the second way you can control the left and right channels of your
audio.
Right click and make sure that show channel volume is selected.
This will bring up two sliders that can independently control the volume coming from either the
left or right channel of the entire audio channel itself.
So if we play the clip and play around with the left slider here, we can hear that we
raise or lower only the audio coming from the left side speaker or headphone.
And keep in mind that this too is subject to be keyframed as long as the write keyframe
parameter is checked.
And guys That's the audio clip mixer in a nutshell.
I hope you found this video helpful.
If you did, check our our other video on using the audio track mixer.
Knowing how to use BOTH these tools will greatly help your ability to work with audio inside
of Premiere Pro.
Also be sure to check out all of our other premiere pro tutorials here at motionarray.com.
And for those of you here on YouTube, don't forget to subscribe and click the bell icon
to always be ready for when we post next!
Thanks so much for watching, and I can't wait to see you in the next video!
-------------------------------------------
How To Adjust the Choke and Fast Idle on Holley Carburetors - Duration: 3:06.
Today I'm going to give you some tips and tricks on setting the choke adjustments as
well as the fast idle on a Holley carburetor.
If you need to set the choke, maybe because you don't have the original settings or somebodies
had it pinned open or had it out of adjustment, one of the ways to get a good starting point
is simply to be to loosen up the choke housing screws on the retainer, loosen them up just
enough to allow you to rotate the choke cap but not enough to allow it to freewheel, slightly
crack the throttle open, unload the fast idle cam, and turn the choke cap clockwise until
you see the choke plate open.
Then rotate it back slowly until the choke plate just comes closed.
At that point, you can go ahead and snug those screws back up, and that's going to give you
a good starting point to make adjustments from.
If you look at the top of the choke housing you'll see some witness marks or register
marks that you can use to reference if you are making adjustments with more or less tension.
Depending on the engine combination or the climate, the vehicle's going to need that
choke to stay on a little bit longer or come off a little bit quicker and you are going
to make those changes by just increasing or decreasing the tension by rotating this cap
on the bottom metal choke spring.
Now that you've got your basic choke settings correct, we're going to talk about the fast
idle.
This can be frustrating sometimes because you generally have one shot in the morning
when the engine is cold to get this adjustment right so you may find it takes several days
to get it adjusted.
The reason for that is if you start the engine and it's not right you need to shut the engine
off and while you are making adjustments it changes the engine's heat soaking and it's
changing the overall dynamic of the engine.
The little trick I'm going to give you is going to allow you to generally get it set
pretty close to where it needs to be in one attempt, and here's my method of doing it,
with the engine completely cold, I'll open up the throttle and I'll back my fast idle
speed screw off to where the throttle is shut, choke is closed, it's not catching the cam.
At that point, I'll get a buddy of mine to start the car and when he starts it I'm going
to take a screwdriver on my curb idle speed screw and I'm just going to crank that up
real quick to get to my desired fast idle speed.
If I'm satisfied with the operation then I'm going to let it warm up, the choke comes all
the way open, and if I'm happy with it, at that point I can shut the car off, manually
close the choke, and look at the relationship of my fast idle screw to the cam, I can roll
my throttle open and make adjustments to the fast idle screw until it comes up and it contacts
the fast idle cam.
Now that we have our fast idle adjustments set correctly we can go ahead, start the engine
up, get it back up to operating temperature, make sure that the choke is open, and back
the curb idle speed screw down to our desired curb idle speed.
This method is going to generally allow you to get it dialed in to where you need it to
be in one setting and possibly you just have to make a couple of little small adjustments
accordingly.
For more helpful Holley tech tips and videos, go to Holley.com
-------------------------------------------
How to Wash Handmade Delicate Baby Blankets Sweaters - Duration: 2:54.
how to wash hand made delicate baby blankets sweaters items how to wash baby clothes preparing for baby baby laundry routines
hi it's AlaskaGranny are you wondering how to wash the most delicate handmade
baby blankets you may have family heirlooms or blankets that were specially
made for your special baby well these are delicate and require a little bit of
special care the first thing you want to do is figure out what is your blanket
made from whether it's polyester cotton wool or maybe a blend try to determine
what's the fabric content of your blanket before you try to wash it it's
probably washable because most people wouldn't give you a blanket that needed
to be dry cleaned because we all know how messy babies can be my favorite way to wash baby blankets delicate items thing to
place a baby blanket or any other delicate item for laundering is a zip-up
laundry bag washing bag for delicates try to find the largest one you can but you want your garments or
blankets to be loose-fitting in the laundry mesh bag so the blankets have room to slosh around in the
washing machine if you don't have one of these or you don't have one that's large
enough then you can use a pillowcase find a nice clean pillowcase you can
have a standard size or a king size pillow case depending on if your delicate baby blanket is extra
large if you're using a pillow case insert your blanket and then make a knot tie
at the top to hold the blanket inside the pillowcase when you're laundering
anything for your baby you need to use very gentle detergent you can make your
own laundry detergent there are also gentle baby laundry
detergents that you can buy once you're ready to launder your blanket place it
into the Machine set the water level so there's plenty of water for your blanket
to agitate you want to add the detergent to make sure it's completely dissolved
before you put your blanket into the machine then you want to set your washing machine on the
gentle cycle I always use a cold water and the most gentle cycle ever if you
don't have a gentle cycle just turn the Machine off and let
your blanket soak for a few minutes and then adjust the machine so that it'll spin and
rinse then you can place your baby blanket into the dryer but just for a
few minutes you just want to fluff up the fabric fluff up the threads and the
texture of it so that's going to be extra nice and then hang it or lay it
flat to dry your baby blanket is now soft and clean ready to use while you
preserve the beauty of your garment
learn more at alaskagranny.com and please subscribe to the Alaskagranny channel
-------------------------------------------
Miley Cyrus Shares How Her Life Has Changed Since She Quit Smoking Weed - Duration: 2:10.
Miley Cyrus Shares How Her Life Has Changed Since She Quit Smoking Weed
-------------------------------------------
HOW TO MAKE A SUPER EASY BOW - Duration: 1:57.
-------------------------------------------
How to be a bookie - How bookmakers make money from your betting - Duration: 8:56.
so an age-old expression is only the bookmaker wins that's the only way that
you could ever win with betting is by being the bookmaker so how could you be
the bookmaker and how does a bookmaker make money that's what we're gonna talk
about in this video please like and comment on the video below that will
allow me to produce better quality videos and more of them in the future if
you're interested in learning to trade successfully in sports then why not
visit the bet angel' Academy where we have more detailed videos so in order to
be a bookmaker you need to create a market you need to create a betting
market and the reason that you would do that is you're gonna lay odds into that
market that people will bet against they're gonna bet against you you create
the market you create the odds so let's take a really simple example of creating
a set of odds and for that what we're gonna do is use a coin so you know that
if I toss a coin barring any oddities the market of the coin rather in this
case but it is the market that were going to be talking about will actually
end up on heads 50% of the time and tails 50% of the time so we know that
there's a 50/50 chance that it's going to end up head or tails so how do we
price that in a set of odds but what we're going to do here is we're going to
use decimal odds because that's how the exchanges are priced the price that the
exchanges are priced in decimal odds so let's do that we know that there's a
50-50 chance of that coin being a heads or a tails so if we do 1 divided by 0.5
the 0.5 represents the 50-50 chance of being heads or tails what do we get if
we do that 1 divided by 0.5 equals 2 bingo there you go we have a market we
can say that the market for heads is 2 and the market for tails is 2 and the
way to assess how efficient and how good a market is from a betting perspective
is to do the opposite calculation so if you see a market price
that's - if you do 1/2 then it adds up to 0.5 so if we had a
market with two runners in it priced at odds of two on the exchange if we do 1/2
1/2 and add those two up it equals 1 or a 100% chance that either of those
selections is going to on is going to win this particular market so in the
case of our coin toss what's actually going to happen is we have heads priced
it's 2 and we have tails priced it - and if we add them both together that equals
100% and what that tells us is that there's a 100% chance of the coin being
heads or tails so in those terms there's no margin loss
to either side of the book the backers can back something with a 100% chance
and the layer in this case the bookmaker who's making the market in the book can
lay into the market at odds of to 100% he's not making any money either so
that's a perfect market there's no margin on either side now if we're a
bookmaker one of the things that we're going to do is we want to make money
from the backers so you are the backer so if we were looking at our coin toss
market if I go into the market and offer you odds of two on a heads or two on a
tail then basically I'm never going to make any money
because over the very very long term we would expect heads and tails to equal
out and I'm going to pay out a hundred percent of my money for a hundred
percent probability so in fact there's no advantage in me doing that however I
could say to you okay you know we've had five heads in a row therefore the chance
of a head is going to occur more frequently on the next toss I could
convince you that that is the case that's complete rubbish but I could
convince you that that is the case and now form only gonna offer you odds of
1.5 what happens if I offer you ads of 1.5 what am I actually offering you when
I'm offering odds of 1.5 well if we go and do that little bit of maths again we
do 1 divided by 1.5 it comes out as zero point six six six six six six six six
six recurring in other words what I'm saying more or less is that it's got a
67% occurring now that's nonsense because a
coin has a 50% chance of being a heads or a tails so if I a few odds of 1.5
there's absolutely no reason that you would choose to take those odds because
I'm offering you odds of 66% chance of something
occurring when it's only got a 50% chance it makes no sense it makes
absolutely no sense whatsoever but people do this all of the time in
betting markets people will back something despite the fact that the odds
just don't stack up so when you're backing in a market you want to get the
highest odds that you possibly can and when you're laying you want to get the
lowest possible odds to lay out because doing either of those two things is how
you make money in the long term on a betting market if we went into a market
we could back heads or tails at 1.5 we would lose money hand-over-fist stew the
person that's pricing that market however if we go into the market and
back heads or tails at odds of 3 then we could effectively buy the chance of the
coin being heads or tails for a 66% chance giving us 30 odd percent margin
if we back it at odds of 1.5 the margin goes in the other direction it's
actually the layer that has the margin within that particular market so when
you look at a market and you see the odds that's effectively telling you the
chance that something is likely to occur the layers want you to take the lowest
odds possible but as a backer you want to be able to take the highest odds
possible so let me show you a practical example of this and if you go into bet
angel fire up the bookmaking tab and I've chosen a market here at the weekend
Newcastle free Huddersfield you can see the market is super efficient here
it's priced at 100 point 1 that means if you're backing into this market you're
only losing 0.1% to the other side of the book traditionally a bookmaker but
in this market the layers on the other side of the market you can see it's
super super efficient there's almost no edge to a layer in this particular
market at these particular odds so if I was a bookmaker that would obviously be
completely unacceptable to me and the best way of creating margin is to change
the pricing so if I go over to the manual area here I can actually reduce
the on each one of these and you can see the
book percentage starts to rise so that's how I would make margin on this
particular game so what I did was I nipped out quickly and went to my local
bookmaker to find out what odds they were offering within this particular
market and according to the odds that I picked up on the coupon they were
offering four to five on Newcastle which is decimal odds of 1.8 on the draw they
were offering 12 to 5 which is decimal odds of three point four zero and on
Huddersfield they were offering 13 to five which is decimal odds of three
point six so can you see their slight difference between the margin that you
lose at the bookmaker and the amount that you lose on the exchange you can
see here that if you bet on the exchange you almost lose nothing to the other
side of the book because you've got a very competitive market but if we went
into our local bookmaker and placed a bet there you can see that
they're asking for nearly thirteen percent margin on this particular game
now they are actually given credit they are fairly competitive on Newcastle so
it's not a ridiculous proposition on Newcastle you suspect because you think
that probably the exchange is full of smart money and they probably have that
price right but it's undoubted that these prices will change as we head into
the weekend and the market adjusts for new information but you can see they're
pretty uncompetitive on the remaining selections and very uncompetitive when
we go for the away win so there's absolutely no way that you would back an
away win here but maybe you would be able to get a decent price of the
bookmaker if you were backing just Newcastle so yeah anyway there's a
practical example of what a book looks like on an exchange and how a bookmaker
prices their margin into the market
you
-------------------------------------------
How to make invisibal name Id on Fb in (2mint) - Duration: 1:31.
-------------------------------------------
HOW TO BUILD AN AFFORDABLE SPRINGER FORKS (2018) - Duration: 5:51.
Hi there!
In this video I will give more details about the springer fork building process
This is how I did it for my bike, it doesn't mean that it is right or not, it has just
served my needs
I am sure it can be done in many ways
The goal of this video is to show deeper the suspension building process, as well, all
used parts on it, than, you may design your own springer forks
I wanted a very stylish, functional and lightweight forks spending around $150
To match the bicycle's style, I inspired myself in the classics Harleys Davidsons springers
forks
It had to be simple and with all parts visible
I also needed to use the fork to raise about 10cm the bicycle's front
To keep the budget, as I had installed a brand new double crowns forks, I've decided that
the suspension would be added and adapted to the original forks
I started the project, drawing all necessary parts in Adobe Illustrator and then I transferred
the parts to a 3D software to see all parts working together
The project was very similar to the designed concept and its features
Next step, print all moving parts and use a PVC pipe as a prototype
(unfortunately I have no pictures for that)
Since I knew that all parts would be made of aluminum and cut with water jet (CNC),
I had to make sure that all parts were well designed and working as they should
Any error at this stage, would increase the final production value
After few attempts, I finally found all necessary measures
I finalized all parts that would be cut using a 3D software and sent them to the CNC cutting
company
The front arch and the springs guide are made of stainless steel
The distance between each leg is calculated according to the rim size and it is parallel
to the original forks
For the chrome appearance, all parts are made of stainless steel and very well polished
In the initial design I used two old springs of an conventional bicycle front suspension
I'll talk more about the springs functions soon
This is the 3D model used in development stage, I'll use it to illustrate all parts in detail.
Here we can see all elements created for the suspension that will be added to the original
fork
These are the parts designed and made especially for this project
These are the parts I bought ready or recycled from old bicycles
I'll start with the top base
This part must fit perfectly on the existing fork and offer full support for the springs
As it receives all impacts in both directions (up and down) it's made of a thick hard aluminum
sheet
To enhance the stability and eliminate any slack, I added a 4mm bolt in the backside
Springs supports
They are turned in the lathe to offer the perfect support for all springs and keep
the guide rail stability
Springs: I originally used two old springs
The lower springs are left in the original size and the upper rebound springs are cut
shorter
With the project ready and after testing around six months I had to make all springs again
with higher tension
To help the rebounding springs and reduce the noise, I added two pieces of very stiff
rubber
The rockers
These two parts have the very important function of moving and connecting all parts together,
plus raise the bicycles front up to 10cm higher
They must have the exact size to keep the suspension and the fork aligned with the very
same angle, otherwise the suspension wouldn't work well
Any inclination will impair the spring rails movement
The left side is break disks ready
The parts were lowered using a milling machine
Finally, the binder bolts
I bought four sit binder bolts, they are essential for the joints because the
threads are hidden reducing the friction between the connected parts
I had to add some washers to give the correct grip
The connection of all parts should be stable, but not too tight to guarantee the movements
Grease is required in all joints and moving parts
In the springers guides I placed two nuts to close the system
All parts are assembled under pressure, the springs are constantly pushing the base
All aluminum parts were very well sanded and polished to give the perfect chrome appearance
So, the total investment with man work, material and CNCs: is about $160
I hope this video will inspire and help you to create your own springers fork
Please let me know your opinion about this project!
Sharing ideas is always good
Thanks for watching and see you soon!
-------------------------------------------
Naruto Online - How to get Hokage Minato EASY OR ANY NINJA - Duration: 3:12.
READ THE DESCRIPTION
-------------------------------------------
Fumari | How To Troubleshoot Your Hookah | Official Video - Duration: 2:41.
What's up, Fumari fam! We're excited
to show you all the ways you can troubleshoot
your hookah if any problems arise during your session
so you can spend less time fixing your hookah
and more time smoking it.
Let's get started.
Starting with a freshly cleaned hookah,
let's first check the water level in the base.
Make sure the water sits between
1 and 1 ½ inches above the bottom of the downstem
which is about the height
of two to three fingers.
Not having enough water will make
your session hot and harsh.
If you put too much water in the base, you'll get a
heavy drag and you risk getting
water in your hose.
Nobody wants to turn their hose into a giant straw.
Next, we're going to make sure all
connective parts are tightly sealed.
Check that you have grommets secured
to your base, hose, and bowl.
Not all grommets are created equal, so be sure you have the
right variety of grommets that fit
each part of your own unique setup.
Now it's time to give your hose some attention.
Whether you're using a modern silicone hose or
something more traditional, it's important to check
your connective parts to make sure they're secure
while also scanning for any rips or tears.
Let's use our hose to test that our
connections have been fastened securely.
Blow into the hose, and if smoke escapes
from your purge, and only your purge,
you're good to go.
Remember to open up your purge and
check your ball bearing, to make sure there's
no residue buildup preventing your smoke
from making an exit.
If you've tried all of these things, and your
hookah still isn't smoking right,
start by checking on your coals.
If your coals aren't fully glowing when they
come off the burner, they will black out quickly
and add a bad taste to your bowl.
We're fans of all sorts of innovative flavors
but charcoal definitely isn't one of them.
Flipping and rotating your coals every now and then
will help you maintain a desirable
heat throughout your session.
If you're still having issues
getting your hookah to smoke right,
you may have under or
over-packed your bowl and will most likely
have to re-pack it.
If you need some tips on
how to pack the perfect bowl of Fumari,
check out our "How To Pack Fumari" tutorial
Congrats! Your hard work has
paid off, and it's time to smoke.
For more hookah tips and tricks,
subscribe to our channel.
And don't forget to fol low us on Instagram,
Facebook, and Twitter for
all the latest Fumari updates.
Thanks for watching, and happy smoking!
-------------------------------------------
How to Build Your Own R2-D2 - Issue 64 deagostini - Duration: 8:38.
hello youtube and welcome back to the Robbie Robbie channel i am your host
Robbie Bobbie and today i've got something awesome to show you guys which
is issue 64 " watch it prat face" is issue 64 of build your own r2d2 if you new to the
channel welcome please consider subscribing to the channel if you like
my builds of my boxing's I am currently working on a two-year project of
building your very own r2d2 with working chemical light sounds and rejecters of
Princess Leia and Han Solo not Han Solo Luke Skywalker that's the other one I am
a Star Wars fan a little duster a c4 we've got the completed panel with flak
that actually moves while you get the extended lightsaber coming out of his
head next week we've got issue 65 of build you are an r2d2 which consists of
and it would be helpful if I looked at it which consists of the front projector
face thing for art you I'm very technical more screws to hold in the
panels in place to little black dots that go at the back of r2d2 s head right
there if you're building the r2d2 yourself you'll need these parts
hopefully that you have collected these and kept them somewhere says you will
need okay so let's get into the build firstly we need to take the dome which
is lovely crafted by myself hey remove the light flipping fudge I've pushed the
panels off just lift off the dome area you can remove that it's not important
at the moment they're there as you can see that's where the lightsaber is gonna
pop out of so you need to
you need to get your issue 64 which is here sorry about the lighting I do
apologize for that I don't really because there's no 64 you
just take this paneling piece right here and you just take the hinge you know I
think at this time I think it's best if I show you guys on a table okay and
we're back hello the issue 64 paneling right here and we got this hinge that
will connect to the panel like so and then you take this piece here which is
the longer screw that comes in the pack screw into the hinge the hinge working
like that very therapeutic you so you just place that over the peg
and there you go
the hinge fixed to the skeleton and it should move like that okay so you bring
back the frame microphone there you go the lovely microphone which you just
slide that through that hole and just put that in place you can just leave it
like that it's not gonna go anywhere you put the frame back on which you find the
hole on top of the frame and just put that on so now you have this PT got the
arrow on top and you got a peg which is most shallower than the others shallower
you have to do is find the shallow peg there which is staring you right in from
the screen and you don't drop it there now you turn this over and just goes out
there I don't know if that's gonna be a problem for me I don't know again that's
therapeutic I don't know why it just is you take the five spacers that you coat
from the frame and just place them across there you don't need to do
anything with the shallow one which is at the top there put the spacers in the
loop peg okay so there are the Peggle to take
these little screws here I'm gonna show you what the screws you use here's that
you need the ones with a flatter head there you go
who's here with a flat head you have got one which is shorter than the others so
you want to make sure that that goes in the shallower peg
there you go did it first time you have not got the the foam dome as I like to
call it it is called a phone bill mesh no that is loose there just extend it
and place it on the table and you should have a rest at my brilliant or what
probably not now these screws did come for the Millennium Falcon so I've got a
box full of them so but I actually used the metallic ones but I don't think it
matters with a million you Falken it was displayed outwards so I wanted to match
the metallic look for it but with these screws here I think we can get away with
the plastic ones because you're not gonna see these ever again the allen key
what the heck is wrong with me we take the allen key okay and we take one of
the plastic screws that we have unscrewed really focused with the camera
there so what I'm gonna do is I'm gonna come back and show you where exactly
where I put these pegs okay and wallah just like magic they can see the screw
set is actually holding up the plates they're doing a job if I just push down
on the plate it's yeah it's a lot stronger a lot more sturdier the last
two Allen screws that I had to put in right here they were a pain to get in I
had to you really use this and get a good grip on it yeah I did try a metal
screw which is in this one heck of a lot easier I will put a
description down below don't know how heavy it's gonna make the dome if it's
gonna resort in the motor of the head not moving well I don't know I don't
want to make it too heavy I don't know I'm not technical maybe it's somebody in
the comments down below will let me know if it's actually going to increase the
weight to make it more difficult for the motor to turn or if I'm just making it
up and being a plonker and in so much easier
did like this one did like it we put that down for a minute okay so the next
exciting piece yes it is exciting is you take this put plastic lens here and you
just hold it in place you don't need to glue it or anything
apparently there's nothing there's nothing in a magazine say that you need
to glue that in take the front there you go
I marked it there the front lighting make sure it is the blue and red make
sure it's a blue red I can't stress that enough
and make sure the cable is facing on the left-hand side and all you have to do is
place that in the holes easier said in them
hey so I apologize for that I didn't show you that because I had to place it
on my lap it was tricky black screws in and I secured that in making sure that
this wire of course is going at the left that way you have a little bit of a gap
I don't know if it's because I am an idiot but there you go that's not that
too bad I mean of course there's gonna be a little gap there so the next piece
of kit is of course this was it called the logic the logic device yes it's a
logic device I don't know if it's supposed to go one way or the other I
don't think it matters over the two pegs like so make sure that they're all in
and secure and it should look something like that you can see that is fixed in
finally in place woohoo is this LED lighting as you can
see here you got this in previous issues and hopefully you've stored it in nice
place like I have not there you go you could just put that in so the next part
is the back projector here which again again I think it is a decorational piece
I don't think there's anything significant about it just it completes
the Moldy that there's kind of like an outline for a little limb what you call
it a wedge or something like that there is a pattern on the actual mold so that
just goes in at the top there if you're stuck
that is in and if we just pop it over that is the back of r2d2 there we go
that is his injector there we go the completed r2d2 464 d2 build of this
week I hope you enjoyed it I certainly have the next video guys Robbie Bobbie
signing out
-------------------------------------------
IQ Option how to use - Duration: 2:25.
to sign in and start trading at the IQ option platform you must specify your
personal information and your email after that you should select the type of
account you want to use in the main window you will see a chart that
displays the price movement of the selective assets in real-time mode you
can buy options all the way before the time to buy moment arrives expiration
time indicates the moment when the option expires you will find available
trading currency pairs commodities indices and equities in the menu of
assets your expected profit is indicated as a percentage on the technical
analysis panel you will find various tools of analysis you will also find an
option to choose the type of chart and the indicator called traders choice on
the trading panel you will find the time at which the option will be expired and
the total amount of your investment buy a call option means that at the time of
completing the transaction the price of the asset will be higher than at the
moment of purchase by a put option means the reverse that at the time of
expiration the price of the asset will be lower than at the moment of purchase
profit shows the amount which is to be transferred to the balance in the case
of successful prediction on the Left panel you will find opened options their
expiration time hasn't yet come expired options selection menu of
possible trading assets top traders stats and best deals future price
movement prediction based on technical analysis and relevant financial news in
the account management menu you can change personal information make a
deposit withdraw funds and new transaction history for real money
trading you must select the payment method and enter the desired amount
which is instantly credited to your balance
we wish you successful trading with IQ option
you
-------------------------------------------
How To Create An Energy Particles Logo Reveal, After Effects Tutorial & Template - Duration: 7:07.
-------------------------------------------
How will driving the Honda Clarity Plug-In Hybrid affect my commute? Short - Duration: 0:16.
How will this affect my commute?
Well, it's like rolling out the red carpet.
Fewer stops for gas. It's roomy.
Has instant power and carpool lane access.
Makes you look like a real fancy person
like someone that orders escargot.
Click here for the long answer.
Click here for a short little answer.
Không có nhận xét nào:
Đăng nhận xét