Thứ Bảy, 4 tháng 11, 2017

Youtube daily how Nov 4 2017

your friend Michael Unks here and today we will be discussing five ways on how

to become happier and have more energy these ways will be presented in a

manner you have never heard before and stay tuned for the last one I have a

prop that I'll show you was an impulse buy but it's going to blow your mind

stay tuned for that but for now let's discuss the first way on how to be

happier and have more energy

the first way no strings it'd be amazing if lifeless fair if the most qualified

person got the job if you got thanks for everything you did my friend I'm here to

tell you that light doesn't work that way but maybe it's not because of our

circumstances or the way the world is it's just the expectations we have I'm

sure you've heard the saying that if you stop expecting from other people that

you'll never be disappointed a very cynical approach to life at first but

I've come to realize that when you're not disappointed and when they don't

have strings attached to things that you're much happier let's think of

something small like giving a gift to a friend I remember years ago I was in an

extremely generous mood for a wedding I got an expensive gift for the bride

and groom all I was expecting it was just the little thank you I kept waiting

for my thank-you note kept waving and waiting and they didn't

get it I was so unhappy and I even said that's the last time I do something nice

for someone because I won't be appreciated

I had strings attached so that year a few years ago I was down in the dumps I

felt life wasn't fair I wasn't receiving in life what I expected so I let go of

the strings I did this on Facebook I would go on Facebook and I would see

people's birthdays I'd want to say happy birthday but I had this thought in the

back of my mind saying they won't say happy birthday back it's not worth it

don't do it I said no strange I just want to say

happy birthday I don't care if they say it back for one entire year every single

day I would go on Facebook I would send a birthday wish not expecting anything

in return a year went body was now my birthday I had seven times as many

birthday wishes than the year before needless to say I was overwhelmed but

how much people cared about me but I know in my heart that was because I

remove the strings I believe those promotions will come that special

someone will come all that appreciation will come when you remove the strings to

fully be happy you need to give fully and the only way to do that is with no

strangers wait number two stop trying to build the tallest building it may be

time to stop competing and start cooperating I think we all have a need

to be big shots to be somebodies that have people look at us and tell us how

wonderful one to be the tallest building in town maybe this comes from someone

who loses a lot but I felt competing to be very unfulfilling and maybe unhappy

I've come to realize that you'd be much happier if you stopped focusing on being

the tallest building and start focusing on building an empire

what I mean by this is building people up around you leaving us with a kind

work a word of encouragement a compliment to lend a helping hand to

paraphrase President Harry S Truman when you stop seeking credit for what you do

it's amazing what you can accomplish I'm here to say you'll be happier when you

start focusing on building other's life instead of yourself way number three

make time for play play isn't just for kids it's for adults too and we need it

and that may be why you're unhappy you think everything's so serious for

example for me I did this book fantasy football it's supposed to be a game but

I had the win I had to cross the competition I'd spend 30 40 hours a week

researching and I would lose you need time for play especially something

creative maybe you like the beat maybe like to write maybe you want to make

videos like I'm doing don't have any goals don't have any objectives just do

it because you love it just do it to creatively express yourself and watch

how happy it makes you feel as you watch this video you look at my subscriber

count it's pitiful there may be no views on this thing but I love it it's the

greatest thing I'm doing I get up early in the morning and it energizes me

I'm so excited throughout the day because I make time for play

next way be like a spider did you know that if a spider has extra prey in its

web that it'll let it go and what if we had that in our lives if we just

accepted the bare minimum that we needed all the experiences good bad and ugly

just took them as they were just enough to make it through the day that's the

mistake I've been making in my life is I was one life to be better I was wanting

more out of life and I failed to realize that I had everything I needed to equip

me for the day and to face the challenges that lay ahead of me and so

do you but be like a spider don't take more than you need take only what you in

the last way embrace being unfinished as promised

here's the problem I was telling you about

can you believe how big this cube is I'm oh man this might be the greatest lesson

I've ever learned I've always looked at your happiness like a puzzle that was

almost impossible to solve then everything needed to be complete

you needed to be with that special someone you needed to have that job of

your dreams you needed to be happy but life just doesn't make sense sometimes

sometimes you achieve what you want and when you do you're still not happy

you're always looking for what's missing in it you might waste your life waiting

for your circumstances the Chamber's waiting for that person to come into

your life waiting for that opportunity they'll likely pass you by to look back

at your life I think I've wasted my life what if you stop believing that this

puzzle had to be complete to be happy and started looking at this incomplete

puzzle has a reason to get up in a more as a reason to strive does the reason to

improve in all areas of your life my friend I'm starting to believe that this

incomplete puzzle is your greatest potential it's not your job to complete

it today it's your job to make turns in the right direction I believe you'll

have so much more happiness so much more energy when you embrace being incomplete

I have a feeling that our journey is incomplete I have so many fun exciting

ideas to share with you and subscribe today if you'd like to see them if you

like this video please share this with a loved one someone who needs it someone

you care for this is your friend Dr. Michael Unks inspiring you to learn

laugh and love I hope you enjoyed this video and I'll see you in the next one

For more infomation >> 5 Ways How to Be Happier and More Positive - Duration: 7:36.

-------------------------------------------

Chicken Egg Roll || Indian Recipe || How To Make Chicken Egg Roll || Chicken Egg Frankie - Duration: 16:59.

All purpose flour or maida (100 gms for two rolls)

boiled potato

Sugar(1/4 tsp)

Egg(2)

black pepper powder(1/4 tsp)

Dry Roasted Peanut(1 tbsp)

Black Salt (Pinch)

Roasted Masala Powder(Cumin, Dry Chilli, Cloves, Cardamom, cinnamon, Black Peppercorn, Salt)

Sliced Onion (2 medium)

Red chili powder

Lemon (1/2)

Cornflour (1 tsp)

Soya Sauce (1 tsp)

Mustard Sauce

Tomato Ketchup

Chicken(75 gms) marinated with red chili powder, soya sauce, black pepper powder, ginger-garlic paste, salt, Cornflour and lime juice

Mix together flour, boiled potato, sugar, salt and oil

Add Water little by little and knead gently until it turns into a soft dough

The dough is ready

Coat the dough with oil, cover and rest for 20 minutes

The oil is moderately hot add the marinated chicken

Stir fry this

when the chicken is half cooked add the onions slice

Give it a gentle mix, and then allow this to cook for around two to three minutes covering with a lid

This is the dough that has been resting for around 20 minutes

Roll the balls in circular disc shape

Put the Paratha on tawa

Flip the roti once it appears brown spot on the side it is facing the tawa

Continue the same process with all the rotis

Hit some oil on a tawa on moderate flame

Beat a egg with salt and pepper powder

Now put the paratha over the egg and press

Flip this over and allow this to cook

Brown spots indicates that it is done

so in a plate take the egg paratha

Over to this add the fried chicken onion pieces in a line

Adding in some peanuts

Sprinkle Black salt and roasted masala powder

Squeeze a lemon

Also add mustard sauce

Add tomato ketchup

Roll this tightly. Wrap two-third the roll in a paper.Tuck excess paper at the bottom.

For more infomation >> Chicken Egg Roll || Indian Recipe || How To Make Chicken Egg Roll || Chicken Egg Frankie - Duration: 16:59.

-------------------------------------------

How to do crochet for beginners ✔️ - Duration: 3:52.

hey guys and today I'm gonna be showing you how to do crochet and it's very

simple so all you need is a hook which I have over here and it's a big hook and

you'll need some so let's get started to the video okay so you're gonna begin

your hook and need to get your yarn and tie the yarn around the hook and then

like just like your tying a rope to something like a stick or anything like

a dowel it's actually kind hard to do on camera but I'm trying

I thought and then you just want to double tie it and make sure it's a little bit

loose so it'll be easier to do the crochet and make the chain so I'm just

gonna tie it again so once we've got that you want to get some the yarn

here at background make sure it's a little bit and pull the hook make sure

I'm this part is like stuck there and then you want to get the this one to go

over it and pull and then do that again and then just um pull it up with my

fingers

and then you'll see that your some chains or you form and you can just do

that again and again and you have something like this

so how it's making it I'm gonna teach you how to end this so okay um there has

to be some access um yarn to end this soap emails um the loop off of the hook

I just and then and then you just need to UM put this yarn through the loop and

pull it as hard as you can and then get some scissors and then just cut the

excess off and then you're all done so I hope you found the video helpful and see

you in the next video bye

For more infomation >> How to do crochet for beginners ✔️ - Duration: 3:52.

-------------------------------------------

How To Make Money Selling Rodan And Fields - Duration: 2:00.

For more infomation >> How To Make Money Selling Rodan And Fields - Duration: 2:00.

-------------------------------------------

How to Make Paper Bags & Purses | Handmade DIY - Do It Yourself | 紙袋 | 纸袋 | 종이 봉투 - Duration: 15:56.

Enjoy our new video about "how to make paper bags & paper purses" with DIY - Do it your self!

For more infomation >> How to Make Paper Bags & Purses | Handmade DIY - Do It Yourself | 紙袋 | 纸袋 | 종이 봉투 - Duration: 15:56.

-------------------------------------------

Survival Lets Play - Episode 5 - How many heads?! - Duration: 19:08.

hello hello hello and welcome back to another episode here on our survival lets play world

it's episode 5 if I can count which I think I can well I hope I can

and we are here on our new island which I showed off its a lot at the end of

last episode and this was a big surprise that we've been working on and I'm oh I

know I love the color of the blue the grass I love that no mobs can spawn here

I think it's awesome I really really like it and I'm so in today's episode we

aren't going to be helping Dan crack on with the building of the house which is

going to go down here I say house it's going to be more of a mansion than

anything else lets shove our armor back on there we go

I feel a bit more safe now I can jump up and down a bit more so I have over the

me and Dan I've got testing well we've been messing around with designs and

this is roughly what we've come up with this will be the the grand entrance here

and the steps run up here is it's gonna be really really cool and then you'll

walk down some steps over here and it'll go down into a massive storage system

yeah which we're gonna that'd be our job and we've been gettin down a load of

resources as you can see we've got quite a bit of orange glass here sandstone and

nether brick which we are currently smelting tons of up here I've made one

of these smell to simple smelters things which Auto ones but um it's very very

slow so I think what I might do instead of wasting all our coal and you have we

have tons off we have ridiculous amounts of I might go and get some lava buckets

and swap over for love buckets for a bit as you can see these whole chest were

full all this was full everything was full so we we've had quite a bit

smelting up and I'm slowly getting these together so in today's episode we're

gonna deal a lot of resolves gathering and I think in the next few minutes

meant to be meeting hopefully meeting up with Dan and we're gonna crack home with

some of the house building and give him a hand and yeah so it's it's going

really well and I'd like to say that live streaming I've done over the past

couple of days I've done two live streams they've been my first of live

streams I've really enjoyed them so if you were

one of the two new subscribers on the livestream thank you very very very much

for subscribing as it really helps such a lot and it's

nice to see some new faces around here we've got the we've got some really nice

people subscribed not so me I've got nice people but it's nice nicely some

more people who enjoy my work okay so I've just been killing some mobs

and I've just been over at spawn jokes come we've got a spider head so I've

just been running around small chunks because I was coming over to check out

how much I and we have and we almost have to stacked the vine blocks which is

quite cool so I'm I'm running around killing all these mobs and I check I

thought oh let's try get our whoops shouldn't done that and I'm hungry

already that's not great yeah it's run away someone luckily this spider head-on

so if you remember they call some villas over ello goodbye oh they're sad because

I I'm wearing their friends head probably I'm very sorry but it is I

think it looks good on me looks ridiculous oh I love these heads I think

a great great addition to him to the server so I'm gonna keep hunting some

mobs oh and I was running through the nether when I got a bit carried away

gathering resources so I got a ton of soul sand ton of quartz and glowstone

that go stones gonna be the most useful thing for the and can eat some food and

then we just go oh yeah

how did I miss that shot so opps fine is not yes I don't have my am I supposed

quite powerful I don't have I've completely forgotten most my train of

thought as usual because I always end up doing that I don't have the zoom key and

some of my textures might look a bit different to usual because Optifine

modify some of my textures so yeah i'ma run around murdering creepers creepers

don't drop the heads a zombies and skeletons wouldn't drop their heads they

have to do it the normal way for that to work so with the charged creeper killing

them and a creeper blow up behind me I'm just gonna leave that whole let's just

run away is my advice for life as long as they

for him no never get mean dad never get over here okay so it is raining and we

are going to do a bit of brewing so we have to brew a cup of tea so what we are

going to do is we're going to go to that anvil there and we're gonna go and name

t-nut shirt there we go we are the agency so that is I think a

reference to season 3 of hermitcraft I'm just going to try that on the floor we

don't we don't need it we got we've got quite a bit of glass and this one we

need to call it I believe English breakfast tea oh dear

is it that's instant instant health I'm just gonna chug on an instant healthier

oh oh you had to drink it okay oh that that's good so we have completed all of

Biff s challenges so it's peppers and mumbos we've completed oh and they're

right next to each other so who else we could we do some of these involve plant

all the flowers we can look for a flower forest

why is your horsey I think you have to name tag a horse name tag I'm not 100%

sure so I think we could try falses challenge that one there we could find a

flower forest and I believe we can do is scale 85 a noobs death right I'm just

going to prepare myself for the noobs death which will be our 52nd death okay

so um we have been busy over the past few days and we have constructed this

this is the new house so what I'm doing now is I'm just gathering some more

nether brick to take down just the time being and if anyone knows what these

black particle effects are I don't know why they keep appearing but Daniel is

having the same thing I don't know if this realms or what what it is but I'm

I'm gonna show you around what what the main plan is for the base am I'll show

you what this this is gonna be our mansion it's gonna be that high they

don't like the same high I will make sure they're the same height and this is

the entrance here okay so I just realized the sound was down for my last

clip so I'm very sorry about that and I just went down to where we're going to

be mining out the place I've just started moving some blocks around and um

there was a bat so I killed it I mean it dropped about head I think music so cool

I'm just gonna walk around with this on and this will suit Danskin so much he's

just a pure black skin but these white eyes I think will look hilarious on him

but funnily enough went by about two minutes later there was

another bat killed him and got another bat head so I've got two bat heads which

is really cool so yeah I had Batman and Optifine is released but I haven't

installed it so I'm gonna go and do that now and then I have to zoom my glass

texture back and I actually be curious to see how different the house looks and

I won't mess around with some of the settings so it's been different but yeah

that's why we up to at the moment I've no clue what to do next I'll come up

with some sort plan and filet no you might guess but I had not planned this

episode at all and because I'm really clever like that and we got to add the

bat head to our collection up there so I'm going to get an armed stand and put

it on the collection this is clearly my lucky day about five minutes ago I

recorded the get in the bat head clip and I just reacted because we've got

mobs off me I was over checking at the iron farm which we've got about two

stacks of iron blocks which is awesome and I just killed a husk and it dropped

a husk head so we now have a husk head don't don't hit the husk yes curtain

wait you were rubbish Oh get it right and that's my phone going and so but I'm

not going to real call the clip if what I said little secret I can let you into

and during the season of awesome Villa I am almost every clip was re-recorded I

have so many bloopers at some point I want to put together a bloopers video

because I think it should be hello so slow to me which is going oh phone's

gone off and is it's really quite funny oh it went off yeah I am this is this is

the place to fight mobs here because we've got quite we've got pretty Opie

armor so I'm it I mean it mends all your tools and everything so we can write

this on mini XP farm for the time being and we look absolutely ridiculous that's

another head for the collection okay so just been wandering around the

fortress killing some mobs are killing some wither skeletons just kill one and

he's got to wear this go head wow this is seriously my lucky day for heads what

can we get rid of well can we get

yes spooky scary skeleton so let's go to another yes so we need to get two more

so we can fight the wither which will be really awesome we can get some beacons

which we certainly certainly need for haste she let's put some light down here

well blaze with a skeleton and Pigman don't want to hit the Pigman come on No

hello right let's get there pretty sure I saw skeleton oh there's loads of them

right come on skeleton we'll get rid of you first right the blaze are angry

let's go round the corner alright it's just low you down to my hole come in so

we just have to smack him we go right now we've got to deal with these blaze

three blaze just be interesting but don't hit the Pigman don't want to hit

don't hit the Pigman don't hit the pigment yeah Oh run right this one place

down I think I might just run through

yes bleh said oh this is seriously my lucky

day I am so happy for heads in about 15 minutes

Wow Chuck way to posish whoa wow I've never had such luck and I mean last

season no not last season and the awesome Villa season I played for

absolute hours and hours and hours on there and never got one

where are we this is my lucky day this is seriously my lucky day

okay so we're gonna sleep through the night I'm going to show you what I have

been up to so nothing's changed out at the front

and what I'm going to show you is underground where are our storage

systems going to be going and I thought sleeping that bed there I run the whole

way past oh I'm an idiot aren't I so I've extended the staircase going

down as you can see this how far it goes down how many sections is it six six of

these sections down and then we end up in this area so it's this is how wide it

is and it will go a bit forbid wider for the storage like mechanics behind it so

it's gonna it's gonna be the space itself could be a bit bigger than this

I'm not sure but we have the ocean right next to here which is our only problem

and if this is how long so for this we're gonna get absolute tons and tons

of storage we should be really really good this will be the back end and we

can always extend that way and this takes a long time it's gonna need to go

up sort of about four or five blocks and down another two blocks so that's what

I'm going to do next so I'm going to grab some ladders and I'm gonna work out

how high you need to take upwards just so there's a bit of a plan and we can

work I'm gonna move that torch so we can put some ladders there and it's gonna

need to cover another two three we'll leave a platform there so you can dig

different levels I'm sorry I'm gonna go and get some ladders and I work out all

the different levels for the digging okay so I've been really really quite

busy so down here I think I remember I've shown this off enough I think I

have but I'm showing everything off so just some stuff we've dug out here not

too much but it's killing my pickaxe so this is the length of the dig I guess

you could say it's from here to the other room we'll pick up that torch and

it is from down here up to there that is the height so I've cordoned it off in

layers so you just do a layer at a time then you remove the floor so this the

top layer it's got three blocks here and the ocean is right above here so I've

had to make some modification so it looks a bit weird that's why you've got

gravel like that oh and I shouldn't have done that should I

how many torch you broken no you're okay there and that so yeah this is the

length and I've got the same thing on each side and it's just now the thing of

we just got to dig a whole area out so I'm going to start from the top I think

and I'm just gonna slowly dig down so it's not the most interesting type of

project because well it really isn't but everything seems to go no okay we've

come with we've ended up with any problem so what I'm gonna do is I will

bring on the spectator account and I will show you what it looks like because

it looks quite cool and you can see that you can start to get an idea of the

scale of this storage storage system okay so here we are in the spectator

account and I think it looks really quite cool we can seal the three layers

and then this space it's absolute gigantic but when there's the surface

we've got a little cave there that's not going to cause any problems which is

good and we run into like a mini ravine here and it did have a few hostile mobs

in so we'll light up that because this is here might be classified as an ocean

biome let's say mushroom island sha ocean so mobs could spawn on a couple of

these blocks that block that block and all these they can't spawn so and these

are all valid spawning spots otherwise and that's if we run around the edge

here we can see if any of this I'm hoping that all this stays this mushroom

I'll ensure good mushroom mushroom mushroom mushroom mushroom yep so we

shouldn't have any hostile mobs spawning in this area just run across this wall

here as well just to make sure good so there is no hostile mob spawning spots

in this area at all it means no crow creepers croppers

creepers can come and blow it blow off all the redstone so for doing so next of

all I'm just going to start clearing out some of the area okay so I have

this whole top layer complete just picking up some of the last blocks I

want to salvage all these blocks because I'm oh I do like have a good enough

getting loser items I just love it I'm starting to see these were all our

layers to complete and that was the the biggest layer because they preserve

three blocks high so we've got two blocks and another two blocks and then

at the very end we'll remove all the floors so down here we have all of our

items we've gathered and I think you've got a double chest there and filling up

this double chest here so we're gonna need to get some more chests down here

for the next levels and what I really wanna show you is a daniel has been busy

and he's been at work building the inside rooms so I'm gonna walk in here

and these are the rooms if I can if I can walk through the door here we go

so I'm I'm guessing this is gonna be the kitchen this is carpet so as you can see

I can just break that like that and I need to install Optifine I just

remember that right now so I'm going to go and do that right now because it will

and you know boots the quality of the video so I assume this goes out to the

next room and it looks really cool got like a nice someone's cool it but um one

thing I notice is not centralized I I might go and get you can move it over by

one because that might wobble but there's cool features it's nice levels

in it and I'm in here I don't know this is gonna be but there's this look

features and I think this place it's absolutely awesome okay so that is going

to be it for today's episode if you enjoyed please do leave over like on the

videos it really helps out a lot and I will see you in the next one

I'm just let you know my pic is nearly dead - which I will show you there I've

got the vanilla tweak so it looks like it's destroyed it's got four uses left

so I'm gonna go man up at the skeleton grinder mini skeleton where I know we've

got over at the starter base and so I can continue mining so in the next

episode we will finish off the down says bit get that completely mined out and

then we will move on to designing and probably you're a lot on the testing rod

also I've got Optifine on that's why I'm spinning around

in circles let's put cinematic camera on there we go

beautiful and so yeah I will if you draw please you leave Ike in on the video and

I will see you in the next one make sure to check out daniel's channel it's

linked up can be found down in the description and I would say I completely

live just forgot my intro I've my outro I've just completed got it haven't

recorded one for a very long time so I'm good bye

For more infomation >> Survival Lets Play - Episode 5 - How many heads?! - Duration: 19:08.

-------------------------------------------

How to Lose Weight in 3 Weeks just follow these steps - Duration: 4:20.

How to Lose Weight in 3 Weeks ! Everyone who sets out to lose weight wants

to see an immediate result, but the weight didn't appear overnight, and it won't

disappear that way either.

Patience is the key, but if you follow a strict regimen regarding your diet and exercise routine,

you can safely expect to lose an average of between one and three pounds per week during

the first three weeks of your weight-loss efforts.

Skip fad diets ! Fad diets may lead to some immediate results,

but they're rarely healthy, and the results never last.

Fad diets typically mean a gimmick that doesn't include a well-balanced diet.

You miss out on key nutrients over the course of the diet.

Most people immediately put the weight back on after concluding the fad diet as well.

Cut calories ! The simple act of burning roughly 500 more

calories per day that you take in can lead to a loss of 1-2 pounds over the course of

a week.

By counting calories, you can more accurately compare how many you take in on a daily basis

versus how many you burn while exercising.

Focus on healthier dining options ! To see quick results in a healthy manner,

focus on foods like veggies, eggs, soy products, skinless poultry breasts, fish, shellfish,

seeds, nuts, pulses, legumes, low fat dairy foods, and 95% lean meat.

Choose healthy carbs like long-grain rice, quinoa, oats, and barley.

Eat fruit as a treat.

Control portion sizes ! Some people mistakenly believe that eating

too much of healthy options is still healthy.

Even when eating well, you still need to control portion sizes.

To get a better idea of correct portion sizes when talking about a "serving size" of

healthy options, consider the following.

A portion size of a complex carb such as vegetables, grains, and fruit should be the size of your

fist.

A portion size of protein should fit in the palm of your hand.

A portion size of nuts fits in the palm of your hand.

Cut out snacks and sweets ! Unnecessary snacking and sugary drinks are

the sources of more daily calories than most people realize.

Cut out as many of these as possible.

Sadly, this also means desserts.

Drink lots of water ! You can cut out plenty of calories each day

by replacing caloric drinks with water.

In addition to keeping you hydrated, drinking lots of water can also help you feel full,

which will cut down on snacking and other habits that way curb your weight-loss progress.

This includes alcoholic beverages as well, which often average even more calories than

soft drinks.

Drink at least eight glasses of water each day, preferably cold water.

Exercise for an hour per day ! The type of exercise you do and how hard you

push yourself will depend upon how active you are before beginning your efforts.

However, you should aim to exercise for an hour per day.

For more infomation >> How to Lose Weight in 3 Weeks just follow these steps - Duration: 4:20.

-------------------------------------------

How to Get Started as a Coach? - Duration: 6:43.

Hi it's Kadidja Yansane, your Business Mentor Coach at www.BloomIntoYou.com and in

today's video, I'm answering the question "how do I start my coaching business?" So

one of the most frequently asked questions that I get is "how do I start a

coaching business?" and in today's video, I'm gonna give you some practical action

steps that you could take right away to start and grow your coaching business

and if you want more tools and resources, I highly encourage you to check out my

video library that is gonna address the gamut of questions that new coaches

ask. But before I start getting into this topic, I kind of want to address this

elephant in the room about this question. "How do I start my coaching business?" and

the reason that I say it's an elephant in the room because sometimes for some

clients it shows up as a limitation or a block and this may or may not apply to

you but I want you to just hear me out and see if you can see yourself inside

of this question. So during my experience working with clients growing their

coaching practice I've found that sometimes I've actually given someone

the tools to start and grow their practice yet somehow I can be met with

you know there's a reason why they can't do it, there's an excuse that they have

or somehow there's still a way that it's like I don't know how to start my

coaching business and this is really really important because coaching

starting your coaching business is something big right like starting any

kind of business but for this video we're talking about coaching. It's really

big! So fear can come up, apprehension can come up, resistance can come up and a lot

of times its unconscious right and so that's what we're doing as

coaches is helping clients move through fear and so one of the ways that that

fear apprehension shows up is getting lost in the question of well I know I

want to be a coach I just don't know how to get started. And I have to tell you, I

got to be honest. For me I was trained as a coach about ten years ago and it took

me years I was stuck inside of this question "how do I get started as a coach?"

and you know how to get started as a coach drum roll. The way to get started

as a coach is to start coaching and I know for some of you you're like well

how do I coach I don't know how to coach so for those of you that aren't already

certified and don't know how to coach there are some skills that you need to

acquire and there are tons of ways to do it you can read books on coaching, you

could actually work with a one-on-one coach which I highly recommend because

you can model what they do and get the visceral experience for yourself as to

how coaching works. There are tons of training programs out there that you can

sign up for to learn about different coaching models to practice coaching and

feel like a competent coach so you really just have to do your research and

decide where you're at in terms of your coaching skill competency so you're

trained now right so if you're at the place of like I'm already trained as a

coach and I just don't know how to get started the thing that you want to think

about is who is your target market and audience? What's the problem that you

want to help people with? Once you're clear about what that is go out and find

those people and offer them free consultations right so that's what you

have to do that's what we do as coaches is we invite people into consultations

and to see if it'll be a fit for us to work together. So you might be having a

question of where do I find people. People are everywhere, at your gym at

your children's school, on social media. So one of the things that I see are a

lot of coaches who want to be coaches or want to be working as coaches but

nothing on their social media profile states that that's what they are so you

kind of have this free real estate that's available for you to share what

you do. Who in your life do you know already that you

could make your services available for. And if it's the actual process that you

don't get how to do I have another video called the 9 Step Client Creation

Process that actually walks you through step by step how you turn a conversation

into a client so definitely go and check that out. So make yourself visible on all

of your social media profiles by stating what you do which is that you're coach

there's that and at least on Facebook and like LinkedIn like you can say what

your job is and link it to your Facebook page or to your website. You can ask

people for referrals, you can host events you can go to events but the point is to

start talking to people that are in the niche that you want to serve. So the big

idea here is not to get stuck in the how do I get started, its to decide to choose

one thing and to take the first step. What do I need to do to get my first

client? Have that be your first assignment and follow through on it and

then come back and look at what the next step is okay so it's not about how do I

create this large large business it's how do I get my first paying client? How

do I get my second paying client? How do I get the first few and get really clear

that this is what I actually want to do and then from there you decide what the

next step is. So if after this video you're still like how do I get my first

paying client or how do I get my next client I want to invite you into a

Business Clarity Call with me where we can dissolve that question and break it

down for you once and for all We're going to look at where you're at

in your business and what's holding you back from from moving forward with

getting your work out into the world and helping all the people that you want to

help. You can do that by going to www.BloomIntoYou.com/now again

that's www.BloomIntoYou.com/now and if you have any questions that you'd

like me to address in future videos feel free to post them in the comments below

and until next time. Alright get started. TODAY!

For more infomation >> How to Get Started as a Coach? - Duration: 6:43.

-------------------------------------------

How to Contour a Big Nose | Avoid the Appearance of Large Nose | Youtube 2017 - Duration: 8:02.

Hi this video is about how to contour a big nose my name is Melissa Van Dijk and

I'm a professional makeup artist and you can join me every Sunday on my Facebook

page because I'm doing life makeup tutorials the link for my facebook page

is down below in the description box but now without further ado let's get right

into this video before I'm going to jump right into the contouring part I like to

mention a few points which are really important when it comes to contour your

nose so at first you will need to look into the mirror and just watch out where

your natural shade and highlight is falling because this will shape your

nose and this will tell you if you have a big nose small nose large nose short

nose and with that said you also need to find out if you have a longer nose or if

you have a shorter nose so I'm going to show you how you can contour your nose

that it looks a little bit thin and also shorter and for example my tip of the

nose is really nice highlighted and this will give the appearance that I have a

longer nose because of the highlighted tip and I also will show you how you can

just ignore this highlighter and just put some contour underneath and I also

like to show you and tell you that I have a little bump right here and I'm

going to demonstrate you how you can go over this bump so that it isn't that

obvious anymore and you will need to remember that contour will take back and

highlight moving forward but now we will move on to the application for

contouring I'm going to use the liquid foundation by makeup studio which is a

little bit darker than my actual skin tone which will also give me a natural

contouring finish and then I like to use the Tarte shape tape concealer as a

highlighter. For application I'm going to use a lip brush as my highlighting brush so

that I can get between the contouring lines later on and for my contouring

brush I'm going to use a thin angled brush which is actually a brow brush and

with these two brushes I can get a precise application now I just like to

give you a close-up from my nose and turning around you will see the bump

which I'm having because when you're looking straight then you might not see

that and it's also not that obvious but I still can't see it and it's annoying

so when I'm turning to the side you will see that I have a bump right here and

it's just on one side so I'm going to show you how you can also contour this a

way that it isn't that obvious anymore and I'm also going to show you the

opposite when you have an indentation when it comes to contour a big nose then

you will need to know that the highlighting part right here on the

bridge of the nose gives you the appearance that you have a big nose so

we want to opposite we want to contour on the bridge of the nose that the

appearance of a thinner nose is obvious and also with the bump right here now

it's highlighted its naturally highlighted so I'm going to contour over

my bump that this is less obvious and now I'm going to drag down two lines

from the top of my nose to the tip of my nose and it's also on the bridge of my

nose so I'm not going to contour next to the bridge of my nose I'm going to

contour on the top of the bridge of my nose and now I'm going to show you how

you can do it taking the angled brush with a little

bit of product on it to drag down two lines from the top of my nose to the tip

I'm going over my bum

like this and later on I'm going to blend it out with the beauty blender and

on the other side tool there I have no bumps I'm going to do a straight line

down

and now I can blend it out with the beauty blender now I'm going to blend it

out with a damp Beauty Blender and when I'm blending it out I'm going to drag it

down to the side of my nose so that it has a natural contouring finish so I'm

just going to dab it at first into the skin and then I'm just taking it down to

the side of my nose

and now on the other side the same

and I'm dragging it down to the side of my nose

and now we will move on to contouring the tip of my nose if you want that your

tip will look shorter and as your nose will look shorter

then you need to contour underneath the tip of the nose because then it will

give you the appearance that you have a short nose so what I'm going to do is

with the same brush with the contouring brush I'm going to apply it a little bit

underneath so that the tip of my nose will look shorter and now I like to

blend it out with the Beauty Blender so with the damp Beauty Blender I'm just

going to dab it into the skin

that looks nicely blended out and now we will move on to highlighting the bridge

of our nose now I'm going to highlight the bridge of my nose but I just keep it

very thin and just a little bit because we don't want that you have a bigger

nose again we just want to keep it very closely in the middle of the bridge of

the nose so that it has a natural appearance like this and now we can

blend it out with the damp Beauty Blender so I'm just taking the damp

beauty blender and I'm taking the flat side on the damp Beauty blender to blend

it into the contour and it's nicely blended in and that it looks natural

I'm going to add a little bit more right here

I'm going to blend it out with the damp Beauty blender but I still keep the

focus in the middle so I'm not going to the left or to the right like this and

this is how you can contour a big nose because it's all about playing around

with highlighting shades and contouring shades and because the big nose has

normally a lot of highlighting areas you just need to reduce these areas and

replace it with contouring products and then you can get a shorter and also

thinner nose and now with the indentation so I told you about the bump

that if you have a bump then you need to use some contouring products to get it

less obvious but if you have an indentation then you need to do the

opposite so for example if you have an indentation right here then you need to

counter above this indentation and also underneath this indentation but where

the indentation is you need to highlight this part so that it looks lifted and it

matches with the rest of the nose and it is less obvious and this is how you can

also contour and highlight your nose with an indentation thank you so much

for watching and I hope that you could learn something from this video and I

know that everyone has their imperfections and we are always a little

bit kind of unsatisfied with our body but this is just part of our life and if

you have any other problems with the nose its makeup and makeup is all about

creating an illusion so we always can solve the problem and I also have a

really nice video about how to apply false lashes and this is right here and

you can also subscribe to my channel which is right in the corner

thank you so much for watching and I will see you soon bye

For more infomation >> How to Contour a Big Nose | Avoid the Appearance of Large Nose | Youtube 2017 - Duration: 8:02.

-------------------------------------------

GR funeral home explains how it handles cremains - Duration: 2:42.

For more infomation >> GR funeral home explains how it handles cremains - Duration: 2:42.

-------------------------------------------

How To Make The Tree Of Life On The Locks 02 - Duration: 13:47.

In the previous video tutorial, I explained how to create a bonsai branch

The link of the old video is in the description

and I will plant the tree on the locks. ^^

After locating the tree. I fixed the root of the tree to the lock.

Styling for more beautiful tree roots.

I cut off the excess and hid them inside.

Edit for tree balance

Use the excess copper wire to fix the leaves to the lock.

Choose a location that can hide the copper wire to lock.

Twist the copper wire tightly with a length of 1cm

Use wires gauge 20 with a length of 20cm.

Twist them together tightly. use length 6cm

Use a rounded nose pliers at both ends.

That's a swing. We use copper wire to fix it to the branches.

Note the length of the chain hanging swing equally.

Twist the coils tightly and hide them.

Do the same for the rest.

So we have finished.

For more infomation >> How To Make The Tree Of Life On The Locks 02 - Duration: 13:47.

-------------------------------------------

Web Design Tutorial, How To Make A Website For Awesome Band using the Divi theme - Duration: 37:51.

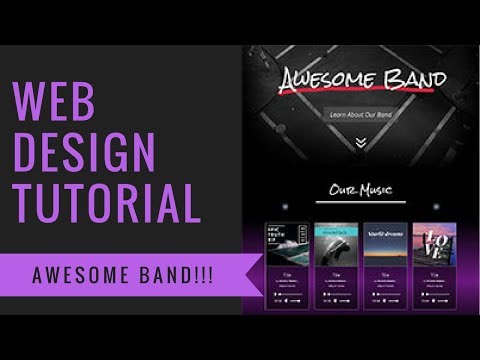
Hey there, what's going on I'm Tim Martin and this is Real Website Hints.

This is a web design tutorial all about this

awesome band page that I made. And I want to show you guys how I did it, so you can

maybe use some of these design ideas in your next website. So the first thing

that I've put into this webpage was this full height header area here. So we got

this entire background image filling up the whole screen with one clear message

about what our website's all about. Then as you scroll down we've got some media

files here. So we've got some audio clips that your viewers can play with. Then as you

scroll down a little bit farther, we've got this video background section where I've got

a countdown timer. I'll show you how to build that section and then down here

near to the very bottom, I've got this bio section where I put the bio text

above the images of the different people. So a lot of fun things we're gonna learn

and I also offer this as a free template that you can download through my website

so I'll link to that down below. If you're excited about this and you want

to learn how I made this website maybe incorporate some of these things in your

website, let's go ahead and do it!

Okay so this tutorial assumes that you already have your website set up. That

you've got WordPress installed and I'm using the Divi theme. Now if you don't

have those things set up yet, I've got a free tutorial series where I'll walk you

through exactly how I did that. And I'll link to it right up here. It's a really

easy to follow tutorial series, because it's my mission to help people find the

best and easiest ways of building websites. So I'll show you guys

step-by-step exactly how to get your website set up so you can start building

a page just like this. Now one other thing is that I use the Divi theme for

almost all of my tutorials, because I definitely believe the Divi theme is one

of the easiest ways to build a great looking website. So you don't have the

Divi theme yet go ahead and check out my affiliate link down below. It'll connect

you up with the Divi theme, and if you decide to buy it it provides me with a

small commission which I use to make tutorials like this and then to provide

free Divi website templates on my website. So let's go ahead and get started

and I'll show you guys exactly how I built this website. Let's do it! Okay so

let's go ahead and get started. So the first thing we need to do is go over the

dashboard and create a new page. You go to pages add new. So now I already know

that I want this page to not have a menu at the top of it. So in order to

accomplish that we need to use the blank setting. So go over here to page

attributes, and then template. Right here. And then we'll select blank page. That's

gonna take the menu away from the page, so we won't have that on this page. And

then let's give this page a title. Alright, and then let's go ahead and use

the Divi builder. Click on use builder. And so the very first thing we already

have a section set up here. And what I like to do when I have a section

especially if I already know what the background is gonna be or at least what

the colors gonna be so I just go ahead and put that background in. So as I'm

designing that section I can see whether the text and the elements are working,

and whether they're visible or not. Just go ahead and add in that first

background image. Okay so I'm go to the section settings here this gear icon the

blue bar around it. The blue is the sections the green is the rows and the gray are

the modules. Go ahead and add a background in. Now I've already added in

the images for this, and I've already optimized them. It's really important

when you're building your website to have optimized images. So I've got a little video

on how I up my images. You just wanna make sure the

images are the right size for your website and that they've been compressed

down as much as possible a load as quickly as possible. That's kind of one

of the main things that's gonna help your site load faster, is making sure that

the images are optimized properly. Okay so I'm gonna click on the little picture

icon here, and then the plus icon. I'm using this sort of dark grey

intersection as the background. I'm going to upload image. You can see the sort of that some

of the text here's a little bit crazy. That's because on this site here I

already know that I want to use the rocksalt font as the main header font.

so I've already changed a lot of the settings in Divi to sort of match the

things I already know I want for this site. So I changed the header font to

rock salt, because I know I want to use that and I've also changed some of the

colors and the color palette so it's all automatically load for me. T hat's

something that I talked about in my full tutorial on how to make a website and

how to get started with Divi. Is how to sort of set things up so it helps you

build your pages faster. If you already have your color palette, and I have a

video on how to make a color palette I'll link to that at the top of the

screen. And so using Divi and setting it up ahead

of time if you already know what your colors are and you know what the fonts

you want, can really be a time-saver in building your website. Okay there we go.

So first row here I'm just going to use a single column. And we're gonna use an

image. And that image is gonna be the logo for our band. There it is right

there. And then we want to make sure that it' s centered. So we've got the image

alignment here. Just click on centered. And there we go. And then down below that

we're gonna add a button which is basically just gonna link down below

farther on our website, but it's just... we're going to encourage people to link down

so we'll make this top section here full height section. I'm going to show you how

to do that. All right so let's just throw in a button here real quick. And as you

can see here the button color I've changed the default color to show up as

this red which is the same red here that's part of the logo. And in this case

I don't want it to be red I want it to be white, but it's kind of nice to have

it automatically default to a color that you might want to use. Change the

alignment here to center. Change the text color to light. And then for this button

here I'm going to use custom style. So you click on button and then

custom styles. Text size, let's make it a little bit better... bigger. And the

button text color is already good. Button background color, just want to make this

sort of a translucent ish dark grey. I'm gonna go with a dark grey and then,

I'm gonna drive the translucent slider here tell us a little bit translucent

but you can still see it. Let me get rid of the border altogether. Just go here to

the border width and just make that zero. That takes that outta there. And now if you

want to adjust the curve that you have on the corner of the button you can

scroll down here to the border radius. As you can see there it's making it sort of

more rounded or less rounded. I'm gonna go with the default which is two. There something

like that there we go. And just for fun let's make the text design it's like the

text italicized. There we go. All right and now below this I want to add a

couple of arrows. I'm gonna use the Divi blurb module for that, because it already

has access to a bunch of different icons. You can just type in blurb and then

we're not gonna use any text because I just want the image. We're gonna use an

icon and use the double down arrow right here. And then the only thing I really

want to do with this is make it white. And now for this button and for the

button and for this icon here I want them both to link it down to the next

section. So under content here, I'm gonna change the

the link and I'm gonna make it #ourmusic because I already know the next

section I'm going to call our music. And this is how we link it down to the next

section. I'll show you how to set that up. Let me just make sure I do that with the

button here too. Just change the link to #ourmusic. Okay so now let's make this a

full height section. And you can and you can vary this up we can have it either

be full height half height three-quarters height whatever you want.

And I'll show you how to set that up. So we can go over here to the settings for

this section. And then I go over to advanced. Now we do need to use a little

bit of code here it's really pretty simple. And one thing I'm gonna make

really clear I am NOT a code genius. I just look stuff up and I figure it out.

So I'll show you where I learned about this code. And I don't

remember this stuff usually I always just have to look it up when I want to

use it. And that's how I sort of get around some of the things that Divi

might not offer natively. It's still pretty easy to do by just pasting in the

code right in these code sections. So for this. The code's really simple here it's

just height and then colon and then 100 VH. And you wanna make sure it's in the

main elements section if you do it before or after it's not gonna work. And

then you need to put a semicolon at the end of it, and now that's gonna make this

section take up the full height here. And then to get this awesome band logo a

little bit closer down to the middle... So what what options me you could just drag

it in like this, but I want to be a little bit more precise and make it a

little bit more flexible for different devices. So I'm gonna do is going to go

over to the settings here and then under design, spacing. I'm going to change this

padding here to 10%. Let's make it 15%. 15% there we go, and then

the bottom don't really need any so I'm just gonna leave that alone.

One thing I already know from doing testing, is that need to have different

spacing for mobile devices and tablets, and so to do that you just need to click

on the little phone icon over here and then you can set up the different

padding for the different devices. So let's make this 20 for tablets just just get

it down a little bit farther. And then for smart phones let's make it 30. And

then you want to just keep testing this and make sure that it looks right and

works right. And you might want to change like for example, the text size here on

this button, and you can do it exactly the same way just by using the little

phone icon. Okay so let's go ahead and work on the next section down here. We're

going to do + to add a new section. A regular section and I'd start out with a

single row. And the first thing is gonna be actually the first thing I like to do

is just put in my background image. What I want to have is I want to have a

gradient. Divi has a built in gradient feature I'm going to show you how that

works, but I actually want to do a slightly

different designed gradient feature. So let's go ahead to content, background and

then this little button here allows you to create a gradient. See? You can just

do gradient plus you can select a color can

see here I've already got my color palette in here already. So I'm gonna go

with dark purple to black. I actually want to go the other way around

black to dark purple whoops black to dark purple, but what I want

this gradient to do is I want it to go from black to purple to black again and

that's something that you can't do in Divi, but I'll show you a really easy way

to get the code on how to do that. So let's go ahead and do that right now.

So again as I said I am NOT a code genius, but I am pretty good at finding

ways of figuring out how to do the code. So I found this cool gradient tool right

here. It's a gradient generator, and so you just pick your colors so on the

outsides here, and you can... You've got all sorts of different settings here.

We've got orientation you can show the size the. Size just gives you an idea so

you can see an idea of a preview of what it's going to look like, and then you can

move these sliders around and all sorts of things and you've got all these

custom designs that you can do. I sort of already like the default designs. I'm

going to go with that. So I'm going to start here by making this color black,

and then I'm going to do the same on the outside here. And the code for black is

zero. And in the middle I want to be the purple from my from my color palette so

I've got my color palette here so I'm gonna copy this color over here. Alright,

it's gonna make the first middle that color make the second middle that color

also. I might need to adjust that as I bumped it over a little bit, there we go.

And then you can sort of adjust these things and I'm gonna drag these into the

black so it starts a little bit sooner. It might be a little bit hard to tell but

the black sort of move as you move these sliders in it makes the purple section

shorter and the black section bigger. And then I also already know, because I've

already built this page that I'm gonna slide these sliders downs that are a

little bit more down towards the bottom of the section here. Then all you got to

do is just copy this code here, and then we're gonna paste it into the background

code here. So go back to the section settings and then under advanced custom

CSS and then main element and then just paste that in.

And I think I actually I have to get rid of that background they added here. So

just click the trash icon there we go. So, now you can see that it's got that code

that I entered in. Now as you're working on it you see that the code doesn't

quite match what you want... You'll see under the advanced section here custom

CSS that you've got a link right here. Just highlight it right there and that

link, links right back to that page so you can sort of just adjust that

settings without today without having to go back and enter everything back in

again. So it's really convenient. Okay so there we go! We've got that let's go

ahead and start adding in our modules. Text module here,

gonna make this an h1 tag, as you can see the font is already defaulting to the

default font that I set it up as which is the rock salt font. I think I want this

lowercase. Alright, and then we'll go over here to design. We'll change the text

color to light, because we want it to be light and then it's a header text so we

need to use the header text thing. Set the alignment to center, and let's just

change the size. Someplace right around there, and then underneath this we just want

to add a divider module. Just to give it sort of an underline. You do show

visibility, yes, and then under design we've got sizing so we can change the divider

weight, or how thick it is. And make it three px, and then the width want to

bring it down a little bit, and then we want to center it. Let's bring it down

something like that like 50 - 51 % something like that. So it's the

percentage on either side that it's going to be. Now let's just clean up the

spacing a little bit so the margin doesn't and the spacing doesn't really

do much on the divider, but on the text it does so just gonna go over here to

spacing. I'm gonna make the margin on the bottom a little bit less, maybe just go

with 5, and let's go with 10 so it's 10 px. There, and there we go. For the next

part I'm going to add some album covers that I've created, and I use created those

using a really cool tool which is called canva. It's a great way of getting design

ideas and if quickly designing graphic

elements, because basically they give you a bunch of different layouts for all

sorts of different kinds of formats. And then you can just enter in your own text

modify it. Add the images that you want, it's really easy and really love using

it, because it makes it look like I'm really good at designing when actually

just really good at finding cheats and hacks. Okay so for this next section I

know I've got four music files and four album covers that I want to use. This is

one of the things with Divi that I really love is the fact that you can see

what you're doing as you're doing it. Sometimes these little bubble modules,

like this one here , it gets like right on top of the other one. Usually for me what

works is sort of just fidgeting with it until it gets... There or you can always

click on this three dot icon here, and then use the wireframe view and then you

can just add a new section. This way it sort of alleviates all of that. It's

really easy to go back, and you just click back here and there you go. So

these album covers I made, are images, so just add an image module. It's got a

scroll back down here and I've already uploaded them and optimize them. So the

first one is this one here and then, let's go with the design. Put a border on it,

just like that. It's cool. And then I want these to be a little bit bigger I want

to kind of spread it out a little bit. So in the row sections here, I'm gonna go to

the settings for the row section your design and then sizing. And then you use

custom width set this to percent and 80% is what I liked and that's kind of the default.

Let's just go ahead and set that. So you can see it allowed this image to get a

little bit bigger because it's got a little bit more space around it, and sort

of spread everything out. And now let's go ahead and add the player module below

this. So we've got an audio player module, it's part of Divi. You can see it's

defaulting here to the default color I have. We're gonna change that in just a

minute. We're actually gonna make it a little bit transparent just to add um a

nice element here. And you'd obviously want to put in... you obviously want to

put in the actual title name and artist name, but just for this demo I'm going to do it like

this. And then you need to put in an audio file so the player shows up

so I've already got an audio file here. There we go.

Okay let's go ahead and change the background of this, and I just want to

use dark gray, gray color again. Let's go with, let's try black actually, and then I

want to use the transparency slider just sort of make it slightly transparent. So

you can see it's make it a little bit lighter. No, let's go with black and then

use the transparency slider. So you can kind of see some of the gradient behind

there. And then let's add a border around it. And I'm going to put these two

together so that it looks like there one thing. I'll show you how to do that right

now. So here we're gonna get a border you can add a white border, BAM, automatically

happens. And then on the image module here let's just change the spacing below

it to zero, and there we go. Now it looks like it's all one piece even though it's

two. And then the one thing you might want to do just to make this easier to

read since it's kind of small font. Is just in the design here the title text

you might want to change the font to a more uh, easier font to read. That's sort of

that's sort of up to you there and then since we have four of these the easiest

thing I find to do is to just copy them drag them over them because everybody's

gonna retain all the settings that you set the border just all the different

settings that you have and then you just I'm just going to do this real quick

okay now all we've got to do is just change the images so that matches the

other album covers that we've got

all right there we go sand I've got a cool section here where our band can

show off some of the music that is created and obviously you'd want to

change the tracks down here okay let's go ahead and add in a section that's

gonna show off the events that are coming up for our band gonna add a new

section add a single row here and then again I want to add in my background

first it's gonna close that section settings and the background we're going

to use for this I've got a star background a lot of these images I got i

got from unsplash unsplash is a great resource or you can find free images

i've also got a whole blog post on my website where i talk about different

places you can get free images so on this website actually got some of the

free images from unsplash and then some of them I got from pixabay so those are

some two good resources to add some great-looking images that will help your

website look better all right so for this the background image I'm gonna add

is sort of the star background and now you can see here I've got two different

star background images and there's a little bit hard to see because they're

small thumbnails but one I found was a little bit too bright so in Photoshop I

darkened it just go ahead and upload that and then I'm gonna add in there we

go so I'm gonna add in a header for this

section and I'm going to use the basically the same font and the same

divider here so I'm gonna copy these and drag them down it's one of the great

things about Divi it makes it really easy if you've got something you've

already done to just copy it and drag it down if you find it hard to drag it down

using this method you can always go back over here to the wireframe method and

it's a lot faster and easier to do it that way so there we go so let's go back

to our desktop view here there we go that was nice and easy and then got

three different posters that I made again using canva and I'm going to sort

of highlight those as events that are coming up for our band

all right there we go and then down below this I'm just gonna add a little

heading and I'm gonna make it kind of fun by adding we can use a blurb module

and we're gonna sort of animate these into you have the title I'm gonna give

it the title of the name of the poster and we're gonna deal with this here in a

moment and I also want to change this font but we'll do that in just a moment

here and then for the content I'm gonna put in where these events are happening

okay so there we go and then we want to use a icon here it's going to use this

up arrow icon that's the color that I want it to be but I want it to be on the

left hand side let's go ahead back here to design image an icon icon placement

left and then let's do an icon font size that we can make it bigger something

like that and then the header text let's get a different font here and let's make

this a little bit bigger do a center alignment and let's change the text

color to our sort of hero color here there we go and change the regular text

color to light so it's a little bit easier to read on that dark background

let's change the body text size make that a little bit bigger a little bit

easier to read also and let's just change up the text there's not this big

space here sometimes got a push shift and then enter to get that spacing a

little bit tighter like that this - all I did was just push shift and an enter

and you know what let's center this text here they can't center it here or you

can go to design body text and then center it there either way it works

alright cool and then let's I don't know if I talked

about the animation on this if you over here to design and then animation you

can have the whole thing animate in just like this or we can have the image icon

animate in someone just have it just like that so it just bounces in a little

bit just draw us a little bit of attention - it's kind of fun and then

under this I'm just gonna add a quick description of the events paste this in

right here go and we'll just change the text color to lights again so it's

easier to read and now I want this to line up underneath here so what I'm

gonna do and do that it's gonna go over here to

spacing change the left spacing to 50 just like that all right and there we go

and then to add these to these other posters I'm just gonna do what I've done

before which is just copy it paste it and then just change the text as it

applies I'm just can go ahead and do that now and then just fast-forward

through this real quick

okay there we go and then to add a button down then below this case there's

another page here for a full calendar so just gonna put in a button real simple

real easy and then you can add the link to whatever page that you made just add

that here under link design lineman Center let's just change the button text

color to white there we go all right cool

so the next section I'm gonna highlight the next concert that's coming up so I'm

gonna have countdown timer to it I'm gonna show you guys how to add in a

video background let's go ahead and work on that now the key here with a video

background is you want to make the file as small as possible you wanted to be

really small so that means that your video is gonna be a little bit blocky

it's not gonna you're not trying to make you know the best looking high quality

like cinematic video resolution and it's not what's important what's really

important is sort of the idea of the video and making sure that it loads fast

so your viewers actually get a chance to see it okay so let's go ahead and add

that section in here alright so we're gonna create a new section for this and

one thing that you really need to keep in mind with backgrounds in general but

particularly video backgrounds is that because Divi is a responsive theme and

what responsive means is that as you drag your website around back and forth

the width of the frame is gonna change so whatever is important in your video

or whatever is important in your background or image really needs to be

down in the middle because you your viewers might lose the edges of the

video as depending on which size window they open it up on what size device they

open it up on another thing is that video backgrounds don't tend to work on

mobile devices so that's something to keep in mind if you have a mobile device

you probably want to want to provide just a still image background for mobile

devices okay so we've got just a standard row here

and again I want to put in my background first so we can see it so let's go ahead

and do that so here we're gonna use background and then we're gonna use this

little play button icon to add a video background I've already uploaded this

got a couple of different options here I have an mp4 video but there's

cover a couple of other options let's go ahead and upload this and I so you can

see here we've got the video length is really short it's just 15 seconds and

then the size is also really small it's 971 kilobytes so really small so that

it's gonna load fast and Beall the place that our viewers are gonna be able to

see it go ahead and upload the video there we go and unless you to do a

little preview of it if you want to it's got our video in here now let's go ahead

and add in some texts

okay and the next thing we're gonna do is going to add in this next thing we do

is we're gonna add in this countdown module so it's gonna set a date here at

a time that sounds plausible so go with Saturday the 9th and then make it or

something like that there we go and go back to the front end here

and let's go ahead we think they'd really like about working with the Divi

theme is that on the elegant themes blog it's got a lot of tips and tutorials on

how to style and use their theme and you can see a lot of cool ideas one of the

things that I found was a way of styling the countdown module and so I'll link to

that down below and you get all got to do is just add in a little bit of code

and it gives you a completely different style so let's go ahead and check that

out first thing we want to do though is just

change a couple of things here on the design of this let's air where is it

should be down here background don't want any background color at all so just

click no and then for the number text want to change that fonts here and I

found this font special elite that I like there it is

so I thought that was kind of fun make it a little bit bigger here and you know

what I just before we do anything else make sure it's centered I'm gonna give

us selves a little bit of space between this and one above something like that

okay there we go now so instead of having these colons in here want to have

lines as what this tutorial have found on the elegant themes blog where she's

gonna show us how to do so here's the blog post scroll down here they sort of

explain everything how to do it but basically all you got to do is just

scroll down it's a lot of other things they're talking about here scroll down

find this code here and then just copy it and paste it in so just a couple

things that they're doing here one is that we're gonna set this custom

countdown five is gonna be what we're gonna call this section or what the is

we're gonna change this I think we're gonna change the idea of this so instead

of putting it directly into this section we're actually put it into the

entire page thus custom CSS code so I just add in this CSS ID here and then go

back to that then we're gonna copy the rest of this code here I'm gonna put

this on the main page custom CSS so to do that you just scroll down here to the

bottom click on this click on click on the little gear icon click on advanced

let's just go ahead and add this custom CSS in here then I copy this again there

since we've got that for this module and then I'm gonna change no actually that

should have worked so we got to change the class I put this in the wrong place

this is why I am NOT a coder there we go so put that in the class don't put it in

the ID and then you can see here it's completely changed the colons in two

lines so that's really really handy and kind of fun and then just add a little

bit more spacing below this just it's nice to have a little bit of extra space

around the things we're working on there we go and then the final thing I want to

do is just add a biography section and I just remembered that I did forget to

tell you how to link that button let's do that first how to link this so it

comes down and links to this section here it's really easy all you do is you

go here to the gear icon for this top section go to advanced CSS ID classes

and you give this our music and that's where to CSS ID for this is gonna be and

then if we save it should be able to just click on this button there we go

and you can see how it jumps down like that if we publish this page and we exit

the visual builder and you click on the button it's gonna get kind of a smooth

or roll down so you get that nice sort of smooth roll down there so that's how

you do that sorry I should have mentioned that earlier alright so let's

go back and let's do this last section where we're gonna do a biography of our

band and a fast-forward through a little bit of this you already know how to add

titles and copy and drive things around so it's gonna do that real quick and

I'll just show you the exciting parts

okay so now one of things I want to do is we've got this tech section but

obviously it's really hard to read even if we made it light it would be a little

bit easy to read but there's a lot of distracting aspects to the image that's

behind it so what I want to do is want to make I want to make the background

white just for around the text so it's pretty easy to do we just go to the

settings on the text here okay so I'm gonna go here back to the content area

and background and make the background color white then we need to add some

spacing around it so it doesn't look quite so bad I'm going to add a custom

padding which is gonna give us a space around the text that's gonna maintain

keep it white it's gonna do 3% all the way around and this is something you

know you might have to play with until you find exactly what you what you like

and I'm gonna add a little bit of margin between the section above so we've got

some space between the biography and the sections I'm going to add top margin of

10% just like that there we go okay so the next section we're going to add this

kind of cool effect where we're gonna have the image of the artist and then

the text is gonna sort of like overlay in front of it and I think this is a

really cool feature it is definitely kind of an advanced coding feature it

shouldn't be too hard to do but I have had some times or it doesn't work and I

don't really know why again not a code expert but 90% of the time it works but

if you find it frustrating if it doesn't work you might just want to try a

different technique or a different visual way of doing this let's go ahead

and dive in and I'll show you how I did it on this page all right so to do this

we're gonna add a new row because we need four column width here and the

first thing we're gonna do is add an image module for the first section add a

sort of biopic here's gonna use this one here first image what the pictures to be

a little bit bigger on the easier easiest way to do that is to make this

row a little bit wider so again I'm gonna use that

80% that I like to use let's go over here to settings design sizing custom

width set of pixels use percents automatically you can see the image gets

bigger make this image stand out from the

background I'm gonna use a border turn the border on right there

okay so an ad in a text module here go ahead and paste in this text

okay so again I want to have the background here be white so under

contents backgrounds color whites and then the spacing here is kind of what's

gonna allow this to be in front versus not in front so if I go over to spacing

start out with custom padding to get some white space around this it's gonna

do 10% all the way around and then the margin we're gonna make it 20% on top

just to give us a little bit of space sort of move it down below the top of

the image here and the left we're gonna use - 60% now key thing on this is that

this works great on desktops it doesn't work so good on mobile devices so my

recommendation is that you either make another section or make either make

another section or another row that's designed just for mobile devices I'll

just quickly show you how you turn on and off a section for mobile versus

desktop okay so that that's got us the effect that we want it's gonna be a

little bit different on the other side I'll show you sort of the official

technique that we need to do but first let me show you how you set up either

this I would actually do a whole new section for mobile just so you can

really design it with mobile in mind but what you do is you would make a new

section a duplicate section here and then on this section here click on the

gear icon you go to advanced and then visibility and then you disable it on

phone and tablet and that way it will only show up on desktop and then you'd

create a new section maybe just copy this change it around so that it looks

good on phone and tablet and then disable that on desktop okay so back

here so we've got this sort of overlapped section here and and then

let's do the other side so on the other side do a new text section

when it's put in that background color and all those other things okay and I'm

gonna add the image first before we try to overlap it and we're gonna have to

definitely have to add in some custom code here you might have to add this

custom code in on the other side if it's not working for you I'll show you how to

do that and where I found it and it's just add the border around it's a little

bit easier to see you go okay so to start the overlap we need to use that

negative spacing feature again so this time right over here sign right sizing

spacing top margin we're gonna bump it down again 20% and then this time the

right we're gonna do minus 60 percent so now we've got the overlap but it's going

the wrong way we've got the text behind when we want the text in front so to

make this work what we need to do is add in some custom CSS so you know go ahead

and paste this in here so what we have here we've got position:relative this is

one of the functions that you need to have in order to make this work as this

position function and then underneath that we've got the z-index and so that's

the height so one should work I just put 100 because sometimes the one didn't

work and then we might want to also put in the z-index if it's not working you

might also want to put the z-index on the other side and make it either minus

one or zero just make it a lower number for the

image so you go under design advanced rather custom CSS and then make this one

just another number so that it goes down below now the best thing to do here is

you want to just duplicate this entire row so you don't have to deal with all

those settings again and then just paste in your information for your other band

members I'm just gonna go ahead and do that right now just fast-forward to it

so you can see how that works

okay there we go so that's pretty fun section let's add a little bit of

spacing around it below it can either just drag it here you can go into the

settings and maybe add a percentage if you'd like to do that whoops I don't

know what I didn't mean to do this twice it's just delete that's okay there we go

okay well I hope that you enjoyed this video if you did give it a thumbs up if

you have any questions be sure to leave them down in the comments below and if

you have any suggestions for new videos leave those in the comments below also

and for more tips tricks on how to build your website as easily as possible be

sure to subscribe to my youtube channel and visit me at real website hints.com

thanks for watching

For more infomation >> Web Design Tutorial, How To Make A Website For Awesome Band using the Divi theme - Duration: 37:51.

-------------------------------------------

How to make christmas beginner knit crochet candy cane ENGLISH subtitles Translation Original Video - Duration: 11:44.

this project is going to be a candy cane I will be using a pipe cleaner two

colors of four ply yarn a size i 5.5 millimeter crochet hook we will start by

making a chain of 50 I want to attach a slip knot to the crochet hook take the

loose end wrap it over the main strand now you have a loop take your loop fold

it over the main strand put your hook below back up the opposite side this

creates the slip knot now we want to work a chain of 50 1 2 3 4 5 6 7 8 9 10

11 12 13 14 15 16 17 18 19 20 21 22 23 24 25 26 27 28 29 30 continue on until

you have made a chain of 50 we will have a chain of 50 with both colors I went on

ahead and made the second chain in white I have one in white one in red now in

the second chain from the hook I am going to work three single crochet I

will continue working three single crochet in each chain across and it is

not important to worry about the count

one two three one two three one two

three now you can see that the chain and the single crochet are starting to curl

around and this is what they are supposed to do one two three one two

three one two three you'll do the same thing with the second color working

three single crochet in each chain across one two three one two three

one two three one two three one two three now this one is starting to curl -

you will continue to the opposite side working three single crochet in each

chain across complete both chains this is the progress I have made with each

section and they're just looping around well straighten them up a little bit

later I'm about two-thirds of the way through and I have a little bit more

chain on each segment and I'm going to continue working three single crochet in

each chain one two three next chain one two three next chain one two three next

chain one two three

I have finished both curlicue segments you may find that they're a little

crooked so what you will do is start down here at the end you will continue

winding them around from one end to the other until they are all going in the

same direction you will do that with both of them at this point we will cut

the yarn wrap the yarn over the hook pull it through

now cut give it a tug you'll do the same thing with the other section I'll wrap

the yarn over pull it through give it a tug at this point I'm going to leave the

tails and sew them a little bit later we want to align the two sections together

so I'm going to start slowly because they could end up turning into a big

mess if we go too fast but I want to wind them around each other

and then twisting them together every so often continue winding the two sections

together I have the two pieces together you may find that you have one color a

little bit longer than the other grab a hold of both ends and then give it a tug

like that and it will even the sections across each other kind of easing them in

place like that I'm going to take my pipe cleaner and place it in here and

start winding it through the center

you may find that you will have some extra pipe cleaner so you will need some

really sharp scissors or some metal cutters to cut the extra pipe cleaner

off

continue twisting the pipe cleaner through the center of your curlicue and

I'm twisting it around up here so it stays in place

now I'm adjusting and tightening the curlicues around the pipe cleaner

depending on how you twist your segments together you may find that one end does

not have any leftover tails you may need to secure and attach a six-inch strand

of yarn this will be for sewing the two ends together and keeping them in place

I want to tack the two sections together so it will not come apart and then not

insecure

you will only need to do this a couple of times and then hide the yarn through

the stitches

cut off the extra tail now this other end is where all the tails are at so

we'll have plenty to sew the ends together then we'll need to hide the

rest of them I am hiding this first tail by weaving it between the stitches

now I am stitching the two hands together and this is on the opposite

side

you will sew in the remaining tails now I'm going to cut off the rest of the

pipe cleaner like that now I have some little pliers and I'm going to take and

turn it around push the pipe cleaner between the stitches this is to keep the

end in place and everything secure

now I gave it a little tug from the opposite side that has that insecure now

I'll do the same thing on this end and I'm going to flip it over and then push

the end between the stitches

then now we can shape it into a candy cane

For more infomation >> How to make christmas beginner knit crochet candy cane ENGLISH subtitles Translation Original Video - Duration: 11:44.

-------------------------------------------

Here's How Many "Illegal" Votes MAMA Deleted For Each Category - Duration: 3:01.

Here's How Many "Illegal" Votes MAMA Deleted For Each Category

Mnet Asian Music Awards (MAMA) is under fire for mismanaging its voting system.

Citing findings of illegal votes, MAMA temporarily stopped its international online voting system in order to review and repair its issues.

We found cases of people intentionally increasing the number of their votes and of illegal voting between October 26 and November 1.

— MAMA Official Homepage.

When the voting restarted, there were differences of up to 3.

5 million votes across various categories.

2017 MAMA Voting Changes   Before Illegal Votes and after removal of Illegal Votes Only top 2-4, traffic wont let me load anymore pic.

twitter.

com/rRb2m7sgiQ   — mes #TeamPinky (@OH_mes) November 3, 2017.

One of the most controversial cases centers around EXO and BTS.

EXO replaced BTS in the #1 spot for Best Male Group after around 1 million votes were deducted from BTS.

Another controversial change occurred in the Best Collaboration category in which IU and OHHYUKs Cant Love You Anymore lost around 3.

3 million votes.

MAMA is being criticized for not being transparent with its voting system, its definition of an illegal vote, and its overall failure at ensuring a fair and just process.

PRISTIN lost nearly 1. 5 million votes.

Without a clear explanation from MAMA and Mnet, fans are sharing their theories on social media, trying to make sense of the debacle.

Sm artists loses like 20k while others lose millions and yall say this isnt rigged ??? Wow —.

For more infomation >> Here's How Many "Illegal" Votes MAMA Deleted For Each Category - Duration: 3:01.

-------------------------------------------

How To Straighten Natural Quickly Without Heat Damage | Birthday Edition - Duration: 5:08.

Hello everyone and welcome back to my channel today, I'll be showing you how I get my perfectly straight natural hair

I always make sure to use a polisher or serum. Also heat protectant. I use the Nicky Clarke blow-dryer and a Denman brush

So I'm starting on freshly washed and deep conditioned hair

I make sure to deep condition my hair so that it's strong enough to withold the heat

I brush out every tangle and knots in the hair until the brush can move perfectly through it

I spray the heat protectant all over the section I have just the tangled

especially at the ends. Since the ends are the oldest part of your hair you want to give them some extra care

I blow-dry using the tension method. It's a method where you hold down your hair with some tension

And you just blow dry the length of it

This method makes use of lesser some manipulation which in turn results in lesser breakage

Finally I go over it with a Denman brush, and this just removes every knot and tangles I could not get out earlier

When I am through with a section I put the setting on cold, and just run it through my hair

Before I straighten each section I put the heat protectant and some serum on my hair. The serum is for shine while the heat

protectant is well, for heat protecting, and then I use the fine tooth comb to do the chase method

I am using the go by FH

straighten iron. To get the best result, I make sure the comb is being chased by the straightening iron

This is a gentler method and it reduces the amount of heat that is applied to the hair

I pass the blow-dryer two times over each section

And I also make sure to get the ends really straight

So if I have to, I just comb it out and pass the blow-dryer again

I decided to add soft curls for a little more effect, and I'm using the curling wand for that

Straightening natural hair is not as difficult as it seems, or as people make it look

It's just about having the right tools and knowing the right things to do

Comment down below and tell me how often you straighten your natural hair

I hope you enjoyed the video, thank you very much for watching

Don't forget to like the video if you did.

If you're a new viewer here,

Don't forget to hit the subscribe button and if you are returning, I love you as I always do

Thank you, and see you in my next video. Bye.

For more infomation >> How To Straighten Natural Quickly Without Heat Damage | Birthday Edition - Duration: 5:08.

-------------------------------------------

How to be zen at work? - Duration: 1:07.

For more infomation >> How to be zen at work? - Duration: 1:07.

-------------------------------------------

how to hack wifi on android mobile withuot root - any wifi hack by solution express20 - Duration: 2:54.

solution express20

For more infomation >> how to hack wifi on android mobile withuot root - any wifi hack by solution express20 - Duration: 2:54.

-------------------------------------------

How to replace front wheel bearing MERCEDES-BENZ A W169 TUTORIAL | AUTODOC - Duration: 16:12.

Use a socket №30

Use a socket №18

Use a torx №T30

Use a socket №22

Use a special puller to take the tie rod end out

Use a socket №8

Use an open-end wrench №21

Use a socket №21 and an open-end wrench №21

Using round-nosed plyers, take out the retaining ring of wheel bearing

Press out the the wheel bearing using a hydraulic press

For more infomation >> How to replace front wheel bearing MERCEDES-BENZ A W169 TUTORIAL | AUTODOC - Duration: 16:12.

-------------------------------------------

Lenovo IdeaPad 320-15 320E 320-15ISK how to disassembly, reset BIOS settings, re-install CMOS - Duration: 2:07.

Remove screw that secures optical drive

and remove optical drive

Remove all screws from the bottom case

Open the laptop and pry up bottom case

Remove bottom case

and disconnect battery connector from motherboard

Không có nhận xét nào:

Đăng nhận xét