hi I am Maurice Kok and this is my
daughter I'm the author of the book the
journey of ascended master and in this
video I'm going to tell you what is
allowing and how you can use it so stay tuned
so what is allowing and how can
you use this in your life allowing for
me is putting down all the guards stop
forcing stop trying stop thinking about
the things you're doing allowing for me
it's just being in a now moment and go
with the flow go with whatever I created
go with whatever I need in the now moment
and just stop forcing and stop trying if
I want something I just do it and how
can you use this in a life because you
stop forcing stopped think is the
planning stops everything even thinking
about breathing you stopped with it you
body can take control over your breath
sometimes you have to take a deep breath
good and you're not allowing if you are
caught up in something
now when you allowed
you are just in our moment like I'm
right now I'm just sharing with you what
I want to share and I'm just here like
you you are now here with me so how can
you use this in your life
I can tell you
allowing changed my life it made it so
much easier so much more fun and was
so nice to have the inner peace because
you don't have to think anymore about
getting up early in the morning I did
this morning you don't have to make
plans anymore sometimes you want but you
don't have to if you are allowing and
when you use the allowing you are in the
now moment and being in the now moment if
you are going to use this for your life
you will figure out that everything
you want everything you need and
everything is going on
you'll be there on the right and
proper time for you you just have to
choose and allow
if you want something you choose you
allow your be in that moment and at
the moment that you really really really
want want to have it or you need it will
be there and you trust that process this
changed my whole life
and it's really good so this
was just sharing me something with you I
hope it helped you in a way and if you
want to know how to allow I made a free
gift free guidance you can first watch
the video watch the video about how to
allow because I guide you you to your
state of allowing this is an exercise so
you know how it feels but when you are
living being in our moment and give up
everything you are doing and if every
fight you're fighting and giving up
every struggle you are doing in your in
the state of allowing and then magic
will try to appear so I will put the
download link to the free mp3 for you
up here I know for sure it's up there
so you can download it but I really
recommend to first watch video about how
to allow I will share the link below so
stay tuned share with me in the comments
what allowing means for you
and if you like my video or my whole
YouTube channel subscribe to my youtube
channel and like this video and you will
see me the next time
For more infomation >> Allowing what it means and how you can use it | allowing changed my life! - Duration: 5:52.-------------------------------------------
How to get Japanese on Duolingo Web 2017 - Duration: 1:20.
Inspect element
-------------------------------------------
HOW TO GAIN WEIGHT (100% GUARANTEE!) - Duration: 3:16.
Whastup guys my name is Ivan Ferjo and today I want to tell you how to gain weight if you are ectomorph
So here we go
I know - you train a lot, you sleep a lot, you eat a lot and you can't gain even one kilogram
Personally I've never had this problem because I'm endomorf and when I eat something unhealthy
Or more calories, my weight is going rapidlly up
But I know that lot of you struggling with this problem
So that's why I will today tell you how to gain weight
Ok so firstly you have to realize that if you want to gain a weight it's never fault of your training plan
Yea sometimes it is.. But in most cases you are doing something wrong in your diet
And this problem is always that you don't eat enough calories as your body needs
Ok so what you should do now? Ok so firstly you have to find out your TDEE
It means total daily energy exanditure..And what is TDEE?
So TDEE represent amount of calories that you have to eat to maintain your current weight
So if you will eat more calories than is your TDEE you will gain a weight
And if you will eat less calories than is your TDEE, you will decrease your weight
So all you have to do is find out your TDEE and eat more calories than is your TDEE
If you want to gain a weight
It's really simple and I'm sure that even low intelligent monkey will understand it
So I hope that you are not like monkeys and you are humans
So if you want to find out your TDEE, check describtion of this video, I put there some good websites
But don't quit this video because we have also one problem
You know that you can gain water, fat and muscles
So if you've gained 1kg it doesn't mean that you've gained 1kg of pure muscles
You could gain 1kg of water, 1kg of muscles or 1kg of fat
And if you will gain water, fat or muscles it depends on what macros do you eat
and if you want to gain pure muscles like me, I recommend you guys to eat 2g of proteins/1kg of bodyweight
Carbs only after workout from complex sources like rice, oats, potatoes
And fats depends on your other calories
Of course you have to eat healthy but I believe if 90% of food from your daily calories intake is healthy
I believe that rest 10% of food can be unhealthy and won't happen anything
So for ex. when I eat everyday healthy things like meat, eggs, vegetables
I can eat one snickers bars, and won't happen anything and I will be still ripped
So in overall if you gain weight or if you loose weight it's all about calories
Ok so if you like this video please give me like, share, subscribe also you can follow me on my fb fanpage, instagram, snapcha
and if you want to buy personal trainings you can visit website www.ivanferjo.com .. and if you want to buy epic fitness gym wear beripped you can visit website www.be-ripped.com.. So bye
-------------------------------------------
Slime How To Homemade Part 1 - Duration: 0:35.
-------------------------------------------
How To Be More Social As An Introvert - Confident And Outgoing Tips | Be A Better Conversationalist - Duration: 30:39.
How To Be More Social As An Introvert - Confident And Outgoing Tips | Be A Better Conversationalist
-------------------------------------------
How much Weight should be According to Height - Duration: 1:51.
Namaskaram
I am Yogi Nityanandam
today I'll give you a small formula
by which you will find out whether my weight is normal or more
just in 10 seconds, You can count anyone's weight
Is this weight normal? Or more? is less ?
look out, this is not a long wide game
Its a small formula
what to do
You have to ask the person how much is his height
If its height is 5 feet
There are 60 inches in 5 feet
that means
If one measure per kilogram per inch
So, It should weigh 60 kg
If its height is 6 feet
Then it should weigh up to 72 kg
by 72 inches
So one kg per inch is normal
apart from this, many people have heavy bones
Some is wide
Many have small body frame
due to this, 4-5 kg more or less than normal weight, then it goes
If it is more than that, So you understand that your weight is not normal
Thats it today
Namaskaram
-------------------------------------------
How I organize my bank accounts | Sami Womack - Duration: 17:21.
-------------------------------------------
Stalling a Manual Car :: How to Never Stall a Manual Car | Manual Transmission Smart - Duration: 8:37.
Hi there smart drivers. Rick with Smart Drive Test talking to you today about
stalling a manual transmission vehicle. Yes eventually it's going to happen. Now
before we get started here if you're working towards license or restarting
your career as a truck or bus driver be sure to hit that subscribe button get
all the great videos that will ensure that you pass your license test now
stalling a manual transmission vehicle ID the last video we did Lesson four I
actually stalled the vehicle and actually I was going to edit that bit
out but after in post-production there I thought that I should leave it in so I
did and I got a comment from Todd learned diaper yes that's that's the
username and he said that he didn't feel so bad about himself after I actually
left that in and so what I thought I would do was give you more explanation
about how to actually get the vehicle going it's just a matter of pushing the
clutch into the floor turning the key to the off position turn it back on and
restart the vehicle and just get going again really what is important is
knowing that it's not a matter of if it's going to happen it's a matter when
it's going to happen and just to practice you know a couple of times in
the parking lot dump the clutch push the clutch in turn the key off turn it back
on start the vehicle and get it going again
but don't panic don't get pressured by other vehicles on the roadway because we
all know the pressures of social driving so just take a breath
push the clutch in turn it off turn it back on and get going again as quickly
and expediently as possible so that's what we're going to do today install the
vehicle and get it going again and show you how to get going after you make the
mistake of doing that so stick around we'll be right back with that
information
my driver's welcome back Rick with smart drive test talking to you today about
what you do if you stall the vehicle either by dumping the clutch or having
it in the wrong here when you're driving it's not a huge deal at most people to
push the punch back in turn it start it again or push the button and it will
start on a huge deal now I'm going to take a moment because you're going to
you know it's going to take five to ten seconds and when you're sitting in an
intersection and people are behind you and I stalled it there you go
just start it back up check to make sure we're in first gear always check to make
sure you're in the right gear because a lot of times you might have stalled it
because you were in the wrong gear because you didn't switch back to first
gear you left it in third or whatnot so you just need to
check that you're in the correct year when you stall it because that number
that's the leading cause of those in dumping the budget yeah the other reason
that you may - all the vehicle is because you're going to do vehicle
you're not used to it or you're moved from a diesel engine to
petrol engine and petrol engines are far less forgiving because you got to bring
it up to the friction point give it a bit of throttle and if you don't give it
a bit of throttle you're going to stall it on a small pet - especially the
smaller petrol lane maybe a bit more forgiving if you've got to be create or
whatnot but the most part if you move from a diesel engine that
has a lots and lots of torque to small petrol engines that you can have some
challenges but for the most part it's not a huge deal if you're doing Hill
starts you might be more prone to stall it on hill start I have had students
stall large 500 horsepower diesel engines on a hill which you know takes a
bit of skill to be able to do that but so we're just waiting right here and
then we'll go around here nobody behind us now there's a beautiful coming up
kind of waiting for the gap here
if that move up here a little bit put the front tires on the front cross lock
line right there now we're ready to go into the gap or we can meet the gap
looks like there's a gap coming here so we could meet the gap here and then we
can turn left yep meaning the gap here we go in the second
gear turning the corner
turning a corner and turning the corner
and usually the only time that you're going to stall the vehicle is if you're
starting from a dead stop it's unlikely if the vehicles rolling that you're
going to install it you might have it in there in too high of a gear like if you
put it in fifth gear for example it'll just like you're just like it's going to
rattle and pull and you're like oh wait a minute something's wrong and then you
pick the right gear and it'll take off so I put it in fifth gear and you can
hear it rattling and chunking along there you're like if it's not sort of
running smoothly you know there's something wrong you've got too high of a
gear whatnot so that's another thing if you do stall it make sure that you check
to make sure that you're in the right gear okay so we'll just left it in
second here see and I stalled it so that's pretty common you start back up
make sure you're in first gear and then take off again so so the first thing the
next thing you do when you stall it is make sure that you're in the correct
gear because a lot of times you won't so we're here so we're uphill give it
throttle check the tracks and we continue and again can't shift on
railway crossings if you're driving a manual transmission regardless of flats
lightness so always go all the way over the track with the entire vehicle before
your shift for years on a hill skirt thank so that gives you
some idea some of the reasons why you might stall the vehicle and if you do
stall the vehicle it's not a huge deal just push the clutch in check to make
sure you're in first gear and restart the vehicle quick review of stalling the
vehicle when you're learning to drive a manual transmission or if you're moving
into a different vehicle or you're just not paying attention it will happen as I
said in the introduction it's not a matter of if it's going to happen it's a
matter of when it's going to happen because even veteran drivers like myself
will install a manual transmission at intersections of those types of things
the important part is to take a breath try not to panic just turn the key to
the off position push the clutch in restart the motor and get it going as
quickly as possible and if you are at an intersection make sure you scan the
intersection to look for your gap and get a good space to pull out into if you
did miss your gap because sometimes that three or four seconds it takes you to
get the vehicle going again it's going to cause you to lose your gap and if
other vehicles behind you honk and that type of thing just take a breath try to
relax and don't get too panicked about it because you just want to try and get
the vehicle going again as expediently as possible question for my smart
drivers what is your experience stalling a manual transmission leave a comment
down in the comment section there all of that helps of the new drivers learning
how to drive a manual transmission if you like what you see here share
subscribe leave comment down in the comment section as well hit that thumbs
up button check out all the videos here on the channel if you're working towards
the license or starting your career as a truck or bus driver lots of great
information here as well head over website
awesome information over there and tremendous online courses that you can
purchase later this month we're bringing out air brakes explained simply it's an
air brake manual that updates the 40 year old air brake manuals that are
currently in circulation in North America as well it gives you
step-by-step instructions to pass both your theory and your practical
examination for your air brakes for truck bus or RV unit and as well it
gives you at least 150 air brake questions that you will be asked on a
theory exam I'm Rick with smart drive test thanks very much for watching good
luck on your license and remember pick the best answer not necessarily the
right answer have a great day fine out and aunt have you ever tried to start
the motor when it's already going as I did there and crashes and what to do in
the event of a crash is complement is for not complement you like to be here
care subscribe you
-------------------------------------------
How to Put on Cosplay Wigs While Wearing Braids (Bad audio, watch with CC please!) - Duration: 9:50.
Hey Everybody!
I'm sorry I haven't made a video in a really really long time.
But today I'm...um...basically what happened was over this weekend I went to...
MomoCon!
Oh my god, Momocon was like the best thing ever.
Uh..This is my 3rd time going in a row, 4th time going to Momocon
And like I was saying, I had so much fun
I got to hang out with a lot of cosplayers I had really wanted to meet up with,
Me and my friends got to premiere our own group cosplays
And it went so well...I was just so happy.
And I will definitely put up pictures as we move along from here
But!
Today for my most updated video,
I...
Was at Momocon and basically what happened was I was getting a picture taken,
By a girl with braids in her hair.
And she was like: "Oh! Thank you for letting me take your picture!"
And I was like: "Sure no problem!"
And she was like "I wish I could put on a wig, but I have braids in my hair."
And I told her: "I'm wearing braids right now!"
She was amazed! She was like:
"You can really do that?"
And so..
That inspired me today, to teach you guys,
How to put on a wig with braids in your hair.
Lets get started!
First, you're going to need a wig cap.
With the mesh is my favorite one because it has all the holes where you can put in bobby pins and stuff.
A rubberband, to tie your hair back very very tightly.
And last but not least, your wigs.
I will be demonstrating with a short wig,
Because short wigs are really fun and they are easier to put on...but...
(LOL) Look at me, being silly...
I will also be putting on a long wig for you guys as well.
So first, what you're going to do is
Tie your hair towards the back.
The back of your head is the least amount of weight you have to deal with,
And you also need to make it as flat as possible.
Because you don't really want a giant bump coming out the top of your head with your hair,
Or else it'll make your wig look poofy.
So make sure that you tie your hair in downwards, low ponytail.
As I demonstrate here.
I know what you're thinking,
"The ponytail is gonna get in the way!"
Don't worry about that,
Because we are going to eventually fix the ponytail later, so that way it won't be along your back.
When you're trying to put it up in the wig cap.
But...yup!
That's basically the ponytail.
Now on to the next part!
So, next what you're going to do is
Take your ponytail, and you're going to braid it up.
All the way down your back.
The next thing, I forgot, also add another rubber band to the end of your braid,
So that way your braid doesn't come apart.
And then...basically....
Once this part is done,
All you do is take your braid, and tuck it underneath itself.
Its basically going to go underneath the space
Of where your braid actually is, so its like
You'll have your braid, there's a space underneath and you'll tuck it under.
And then, my friends, we only have a couple more parts to do, YAY!
Next,
Me being silly...
We're going to put on the wig cap.
Make sure that when you put it on that it goes around your neck,
And that the little piece which is the little part with rounded edges,
Goes near your hairline.
So essentially, you put it around your neck,
And pull it upwards.
Like so...
And the...
Perforated edges will stay right up against your hairline.
And, thats it for putting on the wig cap,
So...
Make sure its on properly,
And now...
Get ready...
To put on...
The wig!!
So, when putting on your wig,
Hehe, me being silly again...
The main thing you have to do is start from the back,
And pull it forward.
Over your head.
Back to front.
As I demonstrate here.
Take the wig,
Pull it from the back of your head,
Make sure it covers the little bump at the bottom,
And you pull it straight frontward over your head.
Sorry it looks like I'm in pain, I'm not,
I'm just trying to basically feel my wig and to make sure
that its on correctly.
You should not feel any tugging or anything
And also, if the little bump the back is a hindrance to helping you get your wig on,
don't worry about it,
you can just take it down and lay the braid flat on the back of your hair and it should still come out the same way.
Then, after you put it on your head,
Just straighten it up a little, make sure the fibers look correct, comb it down a little bit more and
straighten it out and after that point
you're...
basically...
done!
I put on my special spectacles, to make sure that I look the most fabulous
when I finish putting on this wig.
And so now, I'll show you again,
With my longer wig. I'll speed it up a little too.
Again, nothing to it.
So yeah, that's it,
That's all there is to it.
I hope you guys enjoyed this video, please come watch me again next time.
Bye Bye! ^_~ <3
-------------------------------------------
How To Choose your Aikido Gi - Classic AS200 vs Slim Cut AS250 | W/Subtitles - Duration: 6:34.
Hi, this is Julie!
Today, we're comparing two of our Aikidogi models, the AS200 and the AS250.
They're manufactured by a workshop in the Aichi region, close to Nagoya, where they
do the weaving, cutting and sewing of the fabric.
To keep it simple, you could say that it's actually the same dogi, available in 2 different cuts.
Both models are designed from the exact same 100% cotton fabric.
The upper part is made from a single weave "Sashiko" or in English "rice grain" weave.
Its strength and quality to absorb sweat makes it the best choice for a fairly light-weight Dogi.
Used for the lower part is a lighter "Hishisashi" weave, describing a diamond shape pattern
that is softer and more comfortable, allowing better freedom of movement.
The cotton is bleached, resulting in a clean white dogi.
These dogi are of high-quality and the detail work also earns to be showed.
Large reinforcements around the shoulders, armpits and the chest, but also on the lateral
vents and on the inside seam of the sleeves, make these jackets durable.
Compared to a double weaved fabric that is commonly used for Judogi jackets - and here
for example for our WA300 model-,
the single weave fabric is significantly softer
and dries a lot faster.
Judo jackets are made from this double weaved rigid fabric to prevent the partner from grabbing.
But since in Aikido or Jujutsu practice, letting the partner grab is
mandatory to execute the techniques,
single weaved and soft fabrics are usually prefered to stiff and rigid
double weave fabrics.
The AS200 model features a "Judo" or "traditional Aikido cut", with long sleeves, covering the
wrists, a short jacket and a rather wide cut, or in other words, this dogi can be worn by
basically anybody and is the "classic" Judo cut dogi.
The AS200 will fit practitioners with a rather strong or large built, for example, 180 cm
/ 80 kg (or 6 feet / 180 pound).
But to achieve that kind of wide cut, and due to limitations in the maximum width of
the fabric rolls, the dogi needs to have a back seam.
Since the fabric is not too thick, the back seam is not a big deal during ukemi, and far
more comfortable than the back seams on thick Judo type jackets.
For many Aikidoka, this "wide cut" based on the general Judogi models, is too large and bulky.
Especially for thin practitioners, this can hinder the movement, and moreover, lead to
pleats on the back, that are uncomfortable during Ukemi.
That's why we've created the "Slim" AS250 model.
Let's recognize it, the average Aikidoka is not as well built as the average Judoka!
And this actually makes this slim cut model popular among women and men alike.
On the AS250 model, the sleeves are shorter for as the wrists are not covered and can
be easily grabbed during practice.
Being thinner also means that your Hakama and belt will slip from your hips to your
waist during practice, and therefore loosen the fit of the belt and hakama.
This causes the jacket to be pulled out easily, that's why we've designed it slightly
longer so it stays in the Hakama.
So the AS250 is cut straight, the lapels are narrower, resulting in a tighter fit.
This also allows to manufacture the jacket without back seam
what makes it even more comfortable.
And there's another reason for the straight cut: it's actually how it's supposed to
fit with Hakama.
If you check out the Kendo or Iaido jackets, as well as traditional Kimono, you will notice
that they feature a fairly straight cut and that lapel is not folded over the opposite hip.
In the West, we've taken this bad habit because Judogi are too wide for most practitioners,
but the right way to wear a Dogi with a Hakama is… to not pull the lapel over the hip.
Try it, you'll see that with a long jacket, the Hakama holds better in place this way.
Since this model is a slim cut, the sizing is a bit smaller than on other models, so
if you have a AS200 jacket size 4 for example you might want to go for a size 4.5 or even
5 for the slim cut AS250 model.
Of course, both jackets can be customized: you can add embroideries, but also chest or
hips cords to hold the jacket in place.
And if the sleeves are too long, we also offer to cut them to the length you wish and our
artisans can even sew these models entirely made to your measures if necessary.
Except for the entire "made to measure", all the customizations can be ordered directly
on the product page and are performed within 2 to 3 working days.
For more information on embroideries, we recommend checking out both, our embroidery workshop
video and a detailed article on our blog.
It's important to note that single weave made in Japan dogi are very rare.
Therefore, they're often considered as lower grade products in the Judo world, but our
products are, of course, 100% made in Japan and of similar quality as the highest quality
double weaved jackets on the market.
We'll present our double weaved models later in another video.
So, no matter your body shape, one of these two jackets will suit you.
You will find an article describing in detail "How to Choose your Aikidogi and Size"
on our blog and an extended measurements table on our website to help you make your choice!
In the meantime, feel free to comment on the video if you have any question, and if you
think our advice may help your Aikido friends, feel free to share !
See you next time!
-------------------------------------------
WordPress LMS Plugin: How To Create Online Courses With LearnPress - Duration: 11:46.
Hi, guys!
Robert here from ThemeIsle.com and in this video I am gonna show you how to start selling
your Online Courses using the free LearnPress plugin for WordPress.
You can implement this feature it in any WordPress website even using the simple Twenty Seventeen
theme that comes preinstalled when you launch your new WordPress website.
For this tutorial, I will use the free Zerif Lite theme which you can install directly
from the WordPress repository.
Are you ready?
Let's start with the plugin installation!
Head to plugins in your dashboard then click on Add new.
Search for LearnPress and Install then activate the first plugin returned.
There are more plugins that can extend your online school functionalities like Course
Wishlist and Course Review.
I encourage you to install and activate both because they will give a huge boost for your
online business.
Feel free to install any other related plugin to enable more functionalities for LearnPress.
The plugin is installed now and ready to use so what's next?
Head to LearnPress/Settings.
First, you need to do the currency settings and tick if you wish to allow instructors
registration.
This option will allow you to build a team of instructors creating online courses for
you.
The next tab in settings is where you choose wich page will be the Course Page, the course
category base, and course tag base.
If your courses need review before publishing tick this and if you want to enable the editing
of published courses, be sure to tick this.
Further down, set the displayed courses limiting number in the archive, turn on and off the
course thumbnail and set image dimensions in Single Course and Courses Pages.
For example, if your dimensions here are set to 600 px tall and wide, like a square image
for the courses page thumbnail here is how it looks after setup.
Continue with the single course permalink structure setting and then, for the final
thing, set the slug for course items like lessons and quizzes.
Save the settings and move to the next tab.
You have three option here.
Profile, Quiz and Become a teacher.
I suggest you leave them as default but feel free to make your own custom settings.
Here is how the "Profile Page"... and "Become a Teacher" page looks like as default.
The only way you can receive payments with this free version of the plugin is through
PayPal.
Head to Add-ons and choose to pay for any extension that will integrate more payment
options as needed.
For now, I stick with the simple PayPal payment because it's easy to setup and requires no
advanced knowledge about payment integrations.
Just enter your primary PayPal email address and you are good to go.
To enable testing Sandbox Mode tick this box and enter your PayPal Sandbox Email Address
then save all settings.
You can use Sandbox Mode to perform the payment process tests without sending any money.
The place where you can set how your checkout process will work is here.
For less manual work, choose to auto enroll a user after they buy a course.
Create a Checkout Page or simply set and edit the default one.
You can view the page by clicking this link and if you wish to get rid of the default
WordPress sidebar, click to edit the page and select the full-width page template, if
it's available, from the drop-down list and hit update.
View the page again and you'll see it in full width without sidebar.
Sure, you can leave the default sidebar on every page and use those fields to create
a custom navigation menu or to promote other courses as well.
The last tab is for communication settings through email and you can personalize messages
using variables below every field and by entering your own kind words.
I leave content as default here for now.
Now that settings are done, let's move to Courses.
You can set course categories and tags here and use the Add New button to create a new
course, of course.
You need to set a title and a detailed description in the text editor below.
This will be the title and description of your course that will be displayed on the
single course page.
After you finish entering all details the next step is to enter as many sections as
needed.
Just set a name and hit the enter button on your keyboard then enter a name for the second
section and so on until the last section of your course.
Adding lessons and quizzes to the course sections is easy.
Keep in mind that you are able to switch every item to be a Quizz or a Lesson as well.
Type in a title for that item then hit the enter button on your keyboard again, and do
the same until the last one.
Before I show you more about settings below, please keep in mind that you are able to drag
and drop lessons and sections around and you can edit any lesson by clicking the pencil
icon right here.
Further down, in the General Settings tab choose the duration of the course, maximum
students allowed and how many students have taken this course.
Set how many times the enrolled user can re-take this course and tick if you wish this course
to be featured.
The external link, for example, can be used to set an affiliate link for courses on udemy.
When pressing the button to "buy this course" your client will be redirected to udemy through
an affiliate link and you will earn commissions for every sale.
You must sign up for the Udemy affiliate program before using this feature.
Furthermore, set the course results and passing condition value in the assessment tab and
you can choose some advanced options too.
Set a price for your course here in the Payment Settings tab and type in a lower sale price
if you wish.
Schedule the sale price start date and end date here or leave the sale price blank to
remove discount.
If you give this course away for free, uncheck the Course Payment box and hit the save button.
The last tab is where you can set the author, admin in this case and this will be the default
author for every new course.
If you have multiple authors you can select them from the drop-down list.
After you finish setting all course details, add the category and related tags then set
a featured image and hit the Save Course blue button above.
Next, head to Lessons in your LearnPress menu.
Finally, we are ready to add content in those lessons and quizzes.
Choose to enable or disable the preview here, to let your future students have an idea about
what's inside.
Now, click to edit your first lesson.
You are free to enter any kind of content you may imagine for that specific lesson like
youtube videos, images, text, audio and more using plugins that will allow you to create
custom content in the text editor.
Before publishing a lesson, remember to set the duration then tick if you wish to allow
the preview.
Again, you can enable or disable that later on using the switch in the lessons list.
Now, let's see how you can add quizzes to the end of each section or to the end of the
course.
This is a good way to let students know if they have reached a new level of knowledge
after finishing a section.
Head to Quizzes in LearnPress then add a new quiz or edit the existing ones.
Enter a description in text editor below the title then move further down and start adding
questions.
After you type in the question, press enter and select answers from the drop-down.
You can choose True or False, Single Choice or Multi Choice.
Let's choose the Single Choice for this one then edit the answer with multiple colors
like yellow, green and blue.
Tick wich answer is correct then hit update.
The final quiz is ready and you will see it in action later on as a student.
The course is done, lessons are filled with content and quizzes are set so, let's take
a preview of this demo course.
Looks great, isn't it?
If you wish to make it look different, I suggest you check out our free and premium themes
in the description box below nd choose your preferred one.
Now you can start selling your first online course.
Before moving on, I suggest you be sure that "anyone can register" as participant function
is enabled in your general settings of your dashboard.
Let's see it in action and how it works as a student.
Head to the course page and hit the enroll button below the description.
Create a new account and check your email for your username and use the link in that
email to set a password.
Now, you are able to log in and enroll in that course for free.
Start with the first lesson and click complete whenever you feel you are ready then move
to the next lesson.
You will see the progress of your learning level in the left upper corner of the screen
represented in percent of the complete course.
The last lesson in this section is actually a quiz, so let's see how it works.
Click Start Quiz and once the loading of questions is finished tick the answer you may consider
correct then click next or Finish Quiz.
Click ok in the popup message then you will be able to see detailed information about
your results.
Once the course is completed, I encourage you to let students know that they can write
a review and look for other courses to be saved to their wish list for further learning.
I hope that this tutorial was helpful enough and I covered every detail about the LearPress
WordPress plugin.
If not, please let me know your questions in comments below this video.
I would be happy to answer them all.
-------------------------------------------
How To Make a Simple Walking Robot? - Duration: 6:31.
Thanks for watching! Don't forget like & subscribe ;)
-------------------------------------------
How to Become a High School Exchange Student from Britain | Wakaran - Duration: 9:40.
-------------------------------------------
Friday the 13th: The Game - How to Escape Jason (Best Methods Ranked) - Duration: 4:16.
If it feels impossible for you to beat Jason, you're not alone.
Several hours of in-game time have yielded very few positive results for the counselors,
with Jason usually killing everyone, or at least mostly everyone, before the counselors
get even one item to help them escape.
Assuming you make it past this step, which method of escape should you go for?
Follow the tips in this video to avoid the death traps and find the best method to get
safely outside of Camp Crystal Lake.
One complex method of victory is to actually kill Jason.
If you hit Jason enough times, his mask will come off.
After that, a female character needs to get Jason's mom's sweater from his shack,
which is in a different spot in each level.
Someone must then have radioed for Tommy Jarvis, and someone must have already died and came
back as him.
Then, sweater girl and Tommy need to team up, stun Jason with the sweater powers, and
then Tommy needs to finish him off.
At this point, the stunned, maskless Jason will die.
Near as we can figure, the cars are just death traps.
You put in a ton of effort clamoring around for a battery, a gas can and keys, and it's
all for naught once Jason gets to you.
His Morph ability lets him teleport to any point.
So, once Jason is aware that you have a car, he can teleport to the middle of the road
and just stand there, stopping the vehicle's movement.
If there are a lot of counselors still alive, it's possible to escape in a car while Jason
is distracted, but if only four counselors are left and all of them go for the car, well
it's GG.
Each level has a 20-minute time-cap.
So, in theory, if you survive for 20 minutes without escaping, you will automatically "win,"
so to speak.
Why is this method of victory so low down on our list?
Well, staying alive for 20 whole minutes is almost impossible, unless you go up against
a truly incompetent Jason player.
The one counselor who has a fighting chance of surviving the round is Jenny Myers, who
with a composure rank of 10/10, is virtually invisible to Jason's sense ability.
So if you're happy foregoing all of your honor and dignity, you *could* play as Jenny
and attempt to hide on the outskirts of the map somewhere, watching the clock tick down.
In levels that don't have a two-seater car, there is instead a two-seater boat, and it's
one of the best ways to escape.
For one thing, you only need two parts to get it ready: gasoline and an engine rotor.
Find those two items, head for the boat, and you can speed out of town, and never look
back.
As the boats are closer to the outskirts of the map, you shouldn't attract too much
attention, so long as you keep the noise and your fear down.
The obvious caveat is that the boat can only hold two people.
And Jason *can* stop the boat, so it's not necessarily smooth sailing as soon as you
get it running.
Just like with the car, he can Morph in front of it underwater.
But it's much more difficult stopping the boat, as the water provides several ways for
players to swerve around Jason, whereas cars have to deal with the narrow roads.
Calling the cops should probably be the first thing you try to do.
In terms of materials you need to collect, it requires the least amount.
All you need is to find the fuse, and install it around the back of the cabin with the phone.
Then, go inside and call the police.
After calling them, they will arrive at one of the two camp entrances in 5 minutes.
However, you have to be careful while doing this, as Jason knows where the phone will
be, but if you find the fuse quickly enough it won't matter.
The highest rate of survival we've seen usually comes when players call the cops in
the first few minutes of any one match.
At that point, it puts Jason in an awkward position where he wants to try to puppy-guard
the exit with the police, but doing so will give the other counselors ample opportunity
to escape via other means.
Once you call the cops, be very careful about simply approaching the exit.
Stay crouched as often as you can, as any noise will present a blip on Jason's radar.
It will also help if you have a counselor with high composure, like Jenny Myers.
You'll want to conserve your stamina so you can make a mad dash once you're in range.
Also, unless Jason is noticeably pre-occupied with other counselors, don't approach the
exit without at least one item to stun or evade Jason.
A pocket knife is ideal, but a flare gun or firecracker will also suffice.
If you have these, you can move toward the exit basically unafraid.
He will likely cut you off at the mouth of the road, but then you can just stun him and
run past.
Got any Friday the 13th tips of your own?
Let us know in the comments down below.
If you enjoyed this video, hit the Like button, and be sure to subscribe if you haven't
already.
This has been Mack, for GameRevolution, goodbye.
-------------------------------------------
How Twitter Is Being Gamed to Feed Misinformation - Duration: 9:57.
How Twitter Is Being Gamed to Feed Misinformation.
After last year's election, Facebook came in for a drubbing for its role in propagating
misinformation — or "fake news," as we called it back then, before the term became
a catchall designation for any news you don't like.
The criticism was well placed: Facebook is the world's most popular social network,
and millions of people look to it daily for news.
But the focus on Facebook let another social network off the hook.
I speak of my daily addiction, Twitter.
Though the 140-character network favored by President Trump is far smaller than Facebook,
it is used heavily by people in media and thus exerts perhaps an even greater sway on
the news business.
That's an issue because Twitter is making the news dumber.
The service is insidery and clubby.
It exacerbates groupthink.
It prizes pundit-ready quips over substantive debate, and it tends to elevate the silly
over the serious — for several sleepless hours this week it was captivated by "covfefe,"
which was essentially a brouhaha over a typo.
But the biggest problem with Twitter's place in the news is its role in the production
and dissemination of propaganda and misinformation.
It keeps pushing conspiracy theories — and because lots of people in the media, not to
mention many news consumers, don't quite understand how it works, the precise mechanism
is worth digging into.
We recently saw the mechanism in action when another baseless conspiracy theory rose to
the top of the news: The idea that the murder last year of Seth Rich, a staff member at
the Democratic National Committee, was linked, somehow, to the leaking of Clinton campaign
emails.
The Fox News host Sean Hannity pushed the theory the loudest, but it was groups on Twitter
— or, more specifically, bots on Twitter — that were first to the story and helped
make it huge.
Here's how.
The guts of the news business.
One way to think of today's disinformation ecosystem is to picture it as a kind of gastrointestinal
tract.
At the top end — the mouth, let's call it — enter the raw materials of propaganda:
the memes cooked up by anyone who wants to manipulate what the media covers, whether
political campaigns, terrorist groups, state-sponsored trolls or the homegrown provocateurs who hang
out at extremist online communities.
Then, way down at what we will politely call the "other end," emerge the packaged narratives
primed for widespread dissemination to you and everyone you know.
These are the hot takes that dominate talk radio and prime-time cable news, as well as
the viral Facebook posts warning you about this or that latest outrage committed by Hillary
Clinton.
How do the raw materials become the culturewide narratives and conspiracy theories?
The path is variegated and flexible and often stretches across multiple media platforms.
Yet in many of the biggest misinformation campaigns of the past year, Twitter played
a key role.
Specifically, Twitter often acts as the small bowel of digital news.
It's where political messaging and disinformation get digested, packaged and widely picked up
for mass distribution to cable, Facebook and the rest of the world.
This role for Twitter has seemed to grow more intense during (and since) the 2016 campaign.
Twitter now functions as a clubhouse for much of the news.
It's where journalists pick up stories, meet sources, promote their work, criticize
competitors' work and workshop takes.
In a more subtle way, Twitter has become a place where many journalists unconsciously
build and gut-check a worldview — where they develop a sense of what's important
and merits coverage, and what doesn't.
This makes Twitter a prime target for manipulators: If you can get something big on Twitter, you're
almost guaranteed coverage everywhere.
"When journalists see a story getting big on Twitter, they consider it a kind of responsibility
to cover it, even if the story may be an alternate frame or a conspiracy theory," said Alice
Marwick, who was co-author of a recent report on the mechanics of media manipulation for
the Data & Society Research Institute.
"That's because if they don't, they may get accused of bias."
Twitter is clogged with fake people.
For determined media manipulators, getting something big on Twitter isn't all that
difficult.
Unlike Facebook, which requires people to use their real names, Twitter offers users
essentially full anonymity, and it makes many of its functions accessible to outside programmers,
allowing people to automate their actions on the service.
As a result, numerous cheap and easy-to-use online tools let people quickly create thousands
of Twitter bots — accounts that look real, but that are controlled by a puppet master.
Twitter's design also promotes a slavish devotion to metrics: Every tweet comes with
a counter of Likes and Retweets, and users come to internalize these metrics as proxies
for real-world popularity.
Yet these metrics can be gamed.
Because a single Twitter user can create lots of accounts and run them all in a coordinated
way, Twitter lets relatively small groups masquerade as far larger ones.
If Facebook's primary danger is its dissemination of fake stories, then Twitter's is a ginning
up of fake people.
"Bots allow groups to speak much more loudly than they would be able to on any other social
media platforms — it lets them use Twitter as a megaphone," said Samuel Woolley, the
director for research at Oxford University's Computational Propaganda Project.
"It's doing something that I call 'manufacturing consensus,' or building the illusion of
popularity for a candidate or a particular idea."
How this works for conspiracy theories is relatively straightforward.
Outside of Twitter — in message boards or Facebook groups — a group will decide on
a particular message to push.
Then the deluge begins.
Bots flood the network, tweeting and retweeting thousands or hundreds of thousands of messages
in support of the story, often accompanied by a branding hashtag — #pizzagate, or,
a few weeks ago, #sethrich.
The initial aim isn't to convince or persuade, but simply to overwhelm — to so completely
saturate the network that it seems as if people are talking about a particular story.
The biggest prize is to get on Twitter's Trending Topics list, which is often used
as an assignment sheet for the rest of the internet.
I witnessed this in mid-May, just after the Fox affiliate in Washington reported that
a private investigator for Mr. Rich's family had bombshell evidence in the case.
The story later fell apart, but that night, Twitter bots went with it.
Hundreds of accounts with few or no followers began tweeting links to the story.
By the next morning, #SethRich was trending nationally on Twitter — and the conspiracy
theory was getting wide coverage across the right, including, in time, Mr. Hannity.
They may ruin democracy.
A Twitter spokesman said the company took bots seriously; it has a dedicated spam-detection
team that looks out for bot-based manipulation, and it is constantly improving its tools to
spot and shut down bots.
What's more, because the media is large and chaotic, it is often unclear what role,
exactly, bots play in ginning up interest in a story.
Conspiracy theories went big long before Twitter was around.
If you removed Twitter from the equation, wouldn't Sean Hannity have picked up the
Seth Rich rumor anyway?
Yet the more I spoke to experts, the more convinced I became that propaganda bots on
Twitter might be a growing and terrifying scourge on democracy.
Research suggests that bots are ubiquitous on Twitter.
Emilio Ferrara and Alessandro Bessi, researchers at the University of Southern California,
found that about a fifth of the election-related conversation on Twitter last year was generated
by bots.
Most users were blind to them; they treated the bots the same way they treated other users.
"Human users didn't do a good job of separating bots from other humans," Mr. Ferrara said.
Because they operate unseen, bots catalyze the news: They speed up the process of discovery
and dissemination of particular stories, turning an unknown hashtag into the next big thing.
A trending hashtag creates a trap for journalists who cover the internet: Even if they cover
a conspiracy theory only to debunk it, they're most likely playing into what the propagandists'
want.
Finally, in a more pernicious way, bots give us an easy way to doubt everything we see
online.
In the same way that the rise of "fake news" gives the president cover to label everything
"fake news," the rise of bots might soon allow us to dismiss any online enthusiasm
as driven by automation.
Anyone you don't like could be a bot; any highly retweeted post could be puffed up by
bots.
"If you can make something trend, you can almost make it come true," said Renee DiResta,
a technologist who studies bots.
And if that's the case, why believe anything?
-------------------------------------------
How to Create a Real Estate Open House Green Screen Video - Duration: 19:18.
In this tutorial, I'm going to show you how to create a simple green screen video such
as the one that's playing right now.
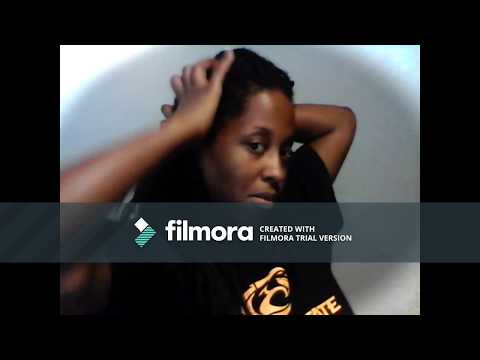
We created this for Paul and posted it on his Facebook page and it did quite well and
you can see that he is just talking (I have the sound turned down for that), but he is
just talking about the images that are coming up behind him.
And we filmed him talking and then we went and got the images from the MLS and inserted
those behind him when we were editing the video.
So I'm also going to show you, briefly, our video set up and talk about the equipment
that we use to shoot the video.
And then I'm going to show you how to actually edit the video in Adobe Premiere Pro CC and
insert the images and put it all together.
So here you can see our video set up where we record and shoot all the videos.
You can see Paul talking to the camera and you can see the green screen cloth behind
him.
There's 2 box lights that we use to light the scene.
We also have a tripod with a camera and a teleprompt system and we also use a microphone
with a boom pole.
The reason we do that is because the sound you get directly from the camera is not always
great quality.
So we have a separate sound system - because that's one of the most important features
in video.
I've put links to all the equipment that we use in the box below.
So, I'd thought it would be useful to see this which is what Paul sees when he's filming.
This is the teleprompter showing Paul his script for the video.
Okay, so let's get down to talking about how we actually go about editing a green screen
video.
So at this point, we're going to assume that you have all the images gathered together
and that you have the video file.
So, you've filmed your green screen footage against your green screen and you've imported
that video file from your camera onto your computer.
And so you should have something like this.
You can see I've got a video file and I've got an audio file and then I've got my folder
which has all my images that I'm going to put behind Paul once I've actually removed
the green screen.
So, just to recap - we've got a video file and if you've taken this directly from a camera,
it's usually an MTS file, but it could be something like an MP4 file or something like
that.
But again, it's just directly from your camera and you may have had to take your SD card
from the camera and put it into your computer to get hold of that.
And the audio file - we have separate audio files as I mentioned before.
We record directly into our computer and we don't use the audio that comes from the camera.
So we just have one extra step to go through.
You can use the video file that is directly from you camera that will also have audio
on it, but we just decided that we wanted something that was a little bit better quality.
So, let me go and show you how I pull all that into Adobe Premiere Pro CC.Okay, so here
I am in Adobe Premiere Pro, I've just opened up the software and this is the welcome screen.
I'm going to go ahead and click on 'New Project'.
I'm going to call the file something that makes sense and I'm saving it in my GreenScreen
Tutorial folder.
That's the correct folder - I'm going to select that.
And the rest of these settings are default, so I'm going to go ahead and click ok.
And, the next thing I'm going to do is look at this Project window over here and I'm going
to import my audio and video files.
You may just have a video file, but we record our audio separately, so we have 2 files.
If you do decide to record audio separately, I'm going to show you what we do, but you
would skip this step.
Well, you wouldn't skip this step, you would import some files - so I'm right clicking
and clicking import.
Or you can also go to File, Import.
I'm going to import my video and audio files.
Now you can see they're here.
This is the step that you would skip if you only have a video file.
This video file has a video and audio - you can see those little icons.
There's video icon and an audio icon.
Whereas this only has an audio icon.
So I'm going to just go ahead and merge these clips.
And it's very simple in Adobe Premiere Pro CC - you just select both the files, click
merge clips.
Call it something intuitive and then click ok.
And you'll see it processes quite quickly.
Well, it's taking a little bit of time today - it's usually quicker than this.
There it goes.
So now you'll see I have 3 files - I have the audio and the video that I imported and
now I have the audio/video merged.
And this is the file I need to edit because it's got the better sound on it.
So, I'm going to double click on that and it opens up here in the Editing window.
And then I'm going to scrub through it and find out where the beginning of the clip is
that I actually need.
Paul's dancing there.
So, you find the beginning of the clip and then you're going to use these 2 little buttons
here to mark, you're going to use this one to mark the beginning of the clip that you
want.
So if you're playing it, the minute he says hi, I'm Paul Brelin, I'm just going to click
the Mark In and then I'm going to scroll through to the end.
Right there.
So, this is the clip that I want - this is him talking about the open house.
And you can literally drag that onto your timeline.
So this is the timeline over here and you'll see it's just the clip and I'm going to move
it all the way to the beginning.
So now if I start playing it.
So this is the video file with basically the beginning and ending clipped out where we
were just getting set up and closing down.
You've got video and audio tracks here and it says V1 and A1 and because we need to put
images behind Paul, I'm just going to move up the video part of the folder onto this
layer up so that I can put images in here.
And then what I'm going to do next is, I'm going to import the images.
So I'm going to create a new bucket or bin and I'm going to call that images.
And then I'm going to right click on that, click import and go to the folder where I
keep all my images for the open house video.
You can click control a or if you're on a Mac, I think it's command a and hit open.
And now it's importing all those images into that image folder.
I've labelled these images so that I can see what they are.
So I'm going to look for the front and then I've pulled an image over and you can see
it's this thin pink slice.
You can just pull this bar a little bit at the bottom and to the right and it makes these
chunks a little bit bigger and easier to work with.
So now I'm going to pull over another chunk and you can use this little red toggle that
appears and pull these blocks larger.
I'm just going to continue to pull some of these images and I'm not going to do this
in such detail as I usually do, I'm just going to pull a few images in.
But you'll probably want to pull in a whole load more images - I'm just doing this for
brevity's sake.
So now if I just click on this toggle, the eye icon, it basically just gets rid of Paul
for the moment.
And now we can see if we scrub through, all the different images are there.
They're just selected on the video.
So those are a little bit small.
And you can see all this area of black around the outside.
Now, these images are not quite high resolution, but they will be fine for the video, but the
video images you import may be too big and they may cover this screen or they may be
smaller.
So you don't want any images smaller than this.
So, what I'm going to do with this one is I'm going to select the image.
And you can see if turns a paler color.
And I'm going to come up here to click on Effect Controls and you can see there's a
Scale option here, and you can just drag over to the right and it will enlarge the image.
And really what you want is no black within this viewer window here and then come back
to the timeline and move the scrub head over to the next image and you can see the image
is small again.
I'm just going to click on the image until it becomes this pale color and now that image
is selected, come up to the Effect Controls, to the Scale and just pull the scale up to
about 189%, which is this figure here.
And again, move the scrub head over to next image, click on the image and do the same
thing.
So I'll just show you that with the last 2 - and again, you'd have more images than this
in an actual video.
Then again, move the scrub head to the next one, click on the image that you want to manipulate
and enlarge it.
Okay, so now if I play the video through, you can hear Paul talking, you can see the
images changing as the scrub head's moving along.
But now what I want to do is put Paul back and remove that green screen so that we can
see the images behind him.
So what I'm going to do for that is come over here to Effects and I;m going to type into
the little search box there Ultra, because what I'm looking for is a function called
Ultra Key.
And you literally click on that and drag it and drop it onto the video that you want to
manipulate.
So now this has the Ultra Key and you'll see this appeared in the Effects window.
So it's over here.
So, I'll just undo that and show you again.
If you look over here, I;m pulling the Ultra Key onto my video file and Ultra Key functions
appear over here.
So what I'm going to do is, I'm going to click on the eye dropper that's on the key color.
So basically the key color is the color that you want to remove.
And just as an aside, in making these videos, you should make sure that you're not wearing
any green or whatever the color of your background screen is.
Some people use blue screens, but in this one, it's green.
So if Paul was wearing a green shirt or a shirt with green in it, that would be bad.
So, I'm going to click on the little icon.
And what I do is to try to get the best results, I click on the darkest place of green because
we don't have the most optimal lighting we get shadows on the green screen.
So you click always on the darkest.
And now you can see that the green has disappeared, it's as easy as that, but there's still a
grey areas.
So you can clean that up a little bit more.
You come back over to your Effect Controls and you enlarge the Matt Generation menu and
you can see there's all these different options.
So the 2 that I use are the Highlight and the Pedestal.
So with the Highlight, again it's like the Scale on the image size, you just bring it
down all the way to 0.
And on the Pedestal, you can take it all the way up until that cloudiness disappears.
And if I go back and forth, you can see it come and go.
So I take it up until its gone away.
So the next thing I'm going to do is to move back up to the scale over here and I'm going
to take Paul down in scale until I think he's about the right size.
And then move him in Position to the right hand side of the screen and then down so he
doesn't look like he's floating.
And that's it.
So let's just go ahead and look at the beginning of the video and play it.
So the video's a bit jerky when you view it in Premiere or it can be jerky depending on
the processing power of your computer.
Our computer isn't t great, so it looks a bit jerky, but once you export it, it will
be fine.
So I'm just going to play with the positioning a little bit, just move him.
And check that out.
Maybe just make him a little bit bigger.
Just by using the Position and the Scale in the Video Effects.
And that's essentially it.
That is my open house video.
So once you get all these images in the position you want and you're happy with what it looks
like and there's no shadows left from the green screen, you can go ahead and export
your video file because you're going to want to upload this to YouTube or Facebook.
So to do that, you go up here to file, export, and click on media..
And here we have and export settings dialog box.
So you want to make sure that your format is on H.264 and you want the output name to
be something that makes sense, so I'm just going to call this OpenHouseDemoFacebook.mp4
and it's going to make an mp4 file which is a very usual video file.
And then you click save.
So, there's all kinds of settings here and I just use all the defaults settings and then
I click on export.
And I'm not going to wait because it takes quite a while to export, sometimes for us
longer videos can take 20 or 30 minutes.
But it's rendering the files and it'll tell you approximately how long you have to wait.
This is going to take about 22 minutes.
So once that has done, I'll come back and show you the finished file.
Okay, so Premiere has finished exporting the video and here is the mp4 file that is created.
So if you click on that, you can play it within file explorer and you can see the video is
not jerky at all.
It looks pretty good.
So this is the video file you are going to upload to Facebook or to YouTube or to wherever
it is that you share your videos.
So hope this has been helpful and if you need any help, I'm going to put my email address
in the comment section below.
As well with links to the equipment we use and the software that we use.
So, good luck!
-------------------------------------------
How to Repair Software Damaged Android Phone||Fix In Few Step - Duration: 2:42.
CLICK ON SUBSCRIBE BUTTON
-------------------------------------------
How Much Is My House Worth - Duration: 6:21.
Kris Krohn here with Limitless TV. And today, we're going to be talking about
how you can know what your house is actually worth and I'm going to be
sharing with you the three best free ways of getting that information
Alright so what really is the value of a home?
You've probably heard that a home
is worth what someone is willing to what? What someone is willing to pay. So today
in Limitless TV, I'm going to be walking you through your best guess on knowing
what something is really worth before someone is actually willing to buy it
because that's really the caps 22 of the game is. I've got a house I want to sell
it and I can't really know what it's worth until someone else actually buys
it. So how I get enough hindsight to figure that out.
So to the dive deep into this, first you have to understand the difference
between the actual value of the home and the perceived value of the home. If it's
your home and you live there for example, you're probably super attached to your
home and you're probably thinking most people do that their home is maybe even
worth more than it might actually be.
Our emotions tend to get in the way and
distort reality. The perceived value of the home however doesn't change the
actual value. And so for example, you might have taken your own home and done
a lot of upgrades, done some things to make it look nicer and give it a greater
appearance but in actuality, this is this, these are the hard facts of life. A home
isn't only just worth what someone else is willing to pay but the base value of
a home really comes down to, how big is the lot that your home is sitting on? and
how much square feet it is. So for example if you filled your homes with
significantly higher furnishings, that doesn't necessarily bring up the value
of your home. If for example you decided to put in a gold toilet in your bathroom,
because you're thinking this is my home, this is my throne room, I'm going to have
my my toilet painted with gold leaf and I spent ten thousand dollars doing it
hence the whole must be worth ten thousand dollars more.
I got news for you,
I'm going to Home Depot and pick up a a piece of porcelain for $79 and your
$10,000 toilet does not elevate the house is value ten thousand dollars, what
it can do, is increase a perceived value and per increased perceived value at
best will only make sure that your home gets under
contract faster and you can fetch top dollar. But top dollar compared to low
dollar is a really small margin.
So the next question is,
How do I actually then
get my best guess on what what my home might be worth if I can't really take
into account my home furnishings? There are three free ways to get a concept of
what your house is worth and I'm going to share all three of these with you in
order of importance. Let's start with the least important. The first one is what's
called a tax evaluation. Alright? So your local county is going to do in a
value assessment of your property and they're going to get slow because if
they push that number too high all the residents get upset because your
local taxes on your property is going to be based on that tax evaluation. So your
home might actually be worth $200,000 and your tax evaluation might be for 130 or
150 or 160 thousand, it's guaranteed to be low but it starts giving you a basic
concept.
Next from there, look at the insurance you pay for on the house.
The insurance company they want to know that if the house burnt down and they had to
rebuild it, how much money are they going to have to put in?
Again it won't tell you
what your home is worth but at least tell you what the replacement cost is. This is
actually, this little bonus content? is that if the home is worth a lot more
than the replacement value, guess what? you're in a bubble and sometimes people
want to know, are we in a market trough? or a bubble? Because bubbles what? bubbles
burst. Alright. But this is by far the third and most powerful technique for
figuring out what your home is worth and it's doing what's called a comparable
market analysis. And a realtor has access to your local MLS, your Multiple Listing
Service. And they can basically take other homes like yours that have sold or
that are listed and do a comparable and basically average them against each
other. This one has one more bedroom, this one has one less bedroom.
This is a slightly bigger lot, slightly older lot, slightly newer home, slightly older house.
Make some adjustments and basically try to best guess what your home is worth so
you know what to list it for. Here you need to watch out. Realtors in general, I
don't want to call them a dishonest lot, they're powerful and they're
useful group of people. But a realtor is also hankering for a commission which
means they have to secure your listing. And if they want to get your listing,
they tend to tell you that your home is potentially worth more than it might
actually be.
Why would they do this?
Because if you're talking to another
realtor,
generally you're going to like the price that sounds bigger.
So your
realtor sometimes gives a little bit. I don't think they're walking around
trying to lie. They're just trying to score some business. That's why it's
important for me to work with honest Realtors that know how to be accurate
and precise. Because I'm doing thousands of homes. Thousands! which means that I
can't afford to work with people that use hyperbole and exaggerate up or down.
But a comparable market analysis by far is going to get your your most accurate
representation. So how do you find one of those? Well first of all, you can comment
below in the video space. Click a link and get in touch with my team. And my
team will do a free game plan and a free analysis to help you know what your home
is worth and whether you can refinance it to buy more investment properties,
sell it to buy more investment properties, or just give you an upper
hand and tell you what they think that it's worth.
Friends, thanks for watching
this. Get in touch with my team. Click the link below. We'll help you out with your
evaluation and otherwise subscribe so we can bring you more value packed
information on real estate.
-------------------------------------------
How to be a good sniper in Phantom Forces | Roblox - Duration: 2:45.
So like.
Here's how to be a good sniper :
ALWAYS
Keep your head down.
Head down. scope up.
Try finding a small gap where you can snipe through
Or crouch and then snipe through a cover
NUMBER 2:
Bullet drops.
Bullets don't travel that far
So try getting your scope a little above the target so you can hit them
The further the target. the higher the scope has to go.
Not too high up though, just a little bit
NUMBER 3 :
Camping isn't necessary
Even though snipers in real life actually camp
Try getting a good vantage point and snipe there
But after a few seconds, stay on the move again
You don't want anybody spotting you and going towards your location
NUMBER 4 :
The maps
You gotta know the maps
If you like the METRO Map
Try not to use the sniper loadout there
I find the Crane maps good for sniping
The cranes are great bait for when people are trying to get a vantage point
Then, you can take them out ( not to mention how if you wan't to shoot people on the crane, remember about bullet drops)
NUMBER 4:
The right loadout
Get the right loadout
I find the REMINGTON 700 with the DEAGLE 44 a good combination
Just get the right weapon modifications and you're good to go
NUMBER 5:
Combat
Use the sniper for far ranges
Use your sidearm for close range
And the knife for when you find an enemy too close for a sidearm
( ALSO HERE'S A FUN TRICK)
( WHEN YOU SEE A GROUP OF SNIPERS COOK UP A GRENADE ON YOUR HAND AND THEN RUN TO THE MIDDLE OF THEM)
( AND WATCH THEM RAGE)
NUMBER 6
Movement is important
Try to go zig zag while aiming
HOWEVER
I don't recommend doing it
When going into a building or a room and you know someone's trying to get you
Then dive ( HOLD SHIFT + Z)
And thats really all i know
ALSO
GETGOOD
Không có nhận xét nào:
Đăng nhận xét