hi I'd like to show you today how to do
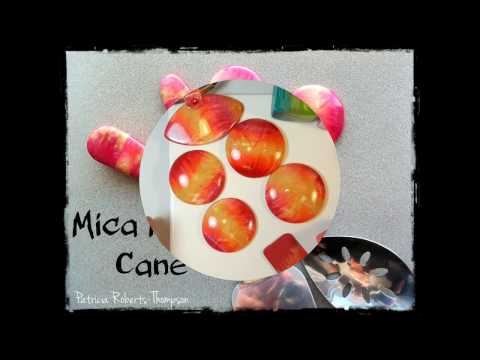
a cane that I'm calling Mica Mash and it's
very simple to do and it uses mica clays
I'm using Premo Clay I would
imagine it would work just as well with
other brands, makes beautiful beautiful
jewelry and you can do it in lots of
different colors. this one was done with
gold 18 karat gold and bright green
pearl and this one is done like we do
today with regular gold 18 karat gold
magenta pearl and sunset pearl the new
premo pearl color. so it makes beautiful
jewelry, makes a nice for tableware
barrettes whatever you want to make with
it it's it's just gorgeous cane.
so here are some other examples that
I've done this one with with the sunset
pearl magenta pearl and the regular
pearl and this one was done with a
turquoise pearl the regular gold and the
bright green pearl and this one is done
simply with the 18 carat and the magenta
and the sunset so here's some discs that
i'm going to make into three disc
necklace later on and i'm going to show
you how to assemble all these parts
probably with Sari ribbon since I've
been meaning to do that- so let's get
started so I'm going to use four colors
today and just one section of each color
so this is the 18 karat gold I'll cut
off one section and slice it into
manageable size pieces for my pasta
machine. so that will get mixed up
this is Sunset pearl - gorgeous new
color that one is gold The last
cane I made I didn't put the regular
gold not the 18 Karat- but the regular
gold in it and I felt like the gold was
getting a little bit lost
so this will help with that and the
magenta pearl so now I'll just take a
moment and mix up all those colors so
here are my colors mixed and the first
thing I'm going to do is cut the regular
gold in half. I'll take them off the plastic here so
you want roughly the same size pieces
this cane is really forgiving so it
doesn't it doesn't matter a whole lot
you know how irregular your pieces are
so I'm just going to add the gold in
between on both sides of the 18 karat
gold a little roll together to make it
stick
then fold it directly in half roll it
again and then put it through the pasta
Machine- and maybe scrunch it up so
it doesn't get too big to put it put
through the pasta machine 20- 25 times
until you got a nice blend - so I'll be
back with my blend is finished
ok so that's about 20 times so now
you're going to cut it into slices and
i'm going to go more or less a quarter
of an inch and you want your slices to
contain all three of those colors or
four colors whatever number of colors
used in the cane
and doesn't have to be precise, some can
be thicker or some can be thinner
ok and now we do the mash part. so you're
going to take your slice and you're
going to begin to twist it and fold it
and on top of itself
scrunch it up and then place it down and
each slice you're going to do like that
and you're going to keep the orientation
of the colors the same
so I'm going to fast-forward through
this part
the property of mica clay is that has
little Mica particles and
they line up as you're putting it
through the past machine so that they're
all on the top surface and you get that
shiner when you turn it this way you
have a very dull so by twisting and
turning this you're encouraging the
micros to some of them to be quite shiny
some of them to be quite dark and that's
what gives us cane its unique look
so then you take a big long mess of
clay that actually you could probably stack
it but I usually don't
and then I'm just going to start
pressing it all together and again you
don't have to be precise
so my aim is to turn it into a square
block - a cane
these colors are just gorgeous together
ok so that's pretty much done so now
when I go to slice it I'm going to slice
it in this direction so that I have all
of those three colors that got that gold
color running through the center here
and we can make whatever we want out of
it so I'm going to let that rest of it
and that's how you make the cane, and
then next we'll make something with it
ok the cane is rested so it's cool and
should be easier to slice so I'm going
to take a few slices off of it
that's four slices. That one is too thick
so I'll take another one
so just kind of squish them together
I'll put a piece of Patty paper on top
and with these are stainless steel
odor-neutralizer i guess you can buy
them on amazon different places they're
usually in the kitchen section. they're used for getting
rid of odors like onions and stuff like
that on your hands
so I'm going to apply quite a bit of
pressure and burnish those pieces
together. Clean that thing off there.Re-apply my
paper
So after it's well stuck, I'm gonna
take it to my pasta machine and I'm
going to put it through this direction
and then I'm going to turn it and put it
through this direction so I'll start on
it on my thickest that setting -move down
to a two or three possibly a four until
you get a pattern that you like and then
that's going to be put onto the thickest
setting of a light colored clay so i'll
go and do that and I'll be right back
so I've actually taken that down to five
out of nine settings so it's quite thin,
I'll put my prepared thick white down and I'll try
to save as much of this as we can. I picked
up a little bit of white from the pasta
machine - so I'll get rid of that
ok
now I'm gonna put that piece of Patty paper
then back on top and I'm gonna burnish
these two layers together. the burnishing
really helps eliminate those pesky
little bubbles that sometimes will work their way up
after you bake. so make sure there's no
trapped air in here
so that looks pretty good so now I've
got two cutters I'm going to make a
three-disc necklace so I'm using one
cutter that is a diameter of 2 inches
and the other one is slightly over
inch-and-a-half so inch and
three-quarter something like that so
I'll find a pattern that I like, - I know I
want one with gold and all three colors
in there before I do that I'll put this
plastic over top it so I get the rounded
edges
lift your plastic before you cut your
second piece so we can get one out of
the side here
this one here I'll save the rest of that
veneer for another project so then I'll
just take a moment with my fingers just
smooth out those edges- They are pretty good
after cutting it with the plastic. though
and then I'm going to put them on the
bottom of soda can, that I cut to make
my dome shape
so center it as best I can over the dome
and start pressing it trying to give
equal attention to the four quarters of
it and then I can sort of press
everything in-between. I want to press
those edges down as best I can
and then to get a smoother surface as
you can sometimes I'll use the heel of
my hand and just kind of stroke over
lightly this will eliminate a lot of
sanding more time you spend on smoothing
these out before they're baked the last
time you're gonna spend finishing
these beads really really do well with a
high gloss finish on it so use your
favorite method if it's a like a Varathane
gloss or liquid clay like Kato clay
or hand sanding and polishing on a
buffer which is the method I usually use
for this type of bead they look really
the best with the with a high gloss
on it - so that one is pretty much done
I see little tiny bubble there so I'll
take my paper again and apply a little
pressure to that spot. I see that's a big
bubble that has to be pierced
and when you pierce a spot with mica it
takes a little bit of playing with it to
get it to totally disappear. I'll put the paper back
over there and burnish it again. now when
I do these I usually will do more pieces
than I want for my necklace, so if I'm
wanting like a 3 disc necklace, I'm
probably going to do three of the
small ones and two of the large ones so
that I've got some options and say
something like that happens it's a
bubble that you missed and sometimes you
can press them out a little bit when
it's still hot but with Mica, I
find they really show. - so it's good to get those
before. - so that that looks pretty good
little spot there
so that looks pretty good so I'm i won't
bore you and show you the same process
over on the other desk so i'm gonna go
ahead and bake those- I like baking things
longer than what's recommended, just make
sure you have the right temperature so
I'll bake mine for an hour at 275F and when
it's done I'll be sanding and buffing
these. I don't have the equipment to show
you my station it's not very well
organized but I'll leave that part up to
you guys and then after this we'll
assemble the necklace so that's it I
hope you enjoyed that and stay tuned and
join me for the second part of this and
see you next time - Bye!


 For more infomation >> 一千訂閱!問與答活動資訊 Will Walker 英國留學生活 |VLOG 22 - Duration: 2:59.
  For more infomation >> How Reading Will Change Your Life • Fundamental Benefits of Personal Development Books - Duration: 3:22.

 For more infomation >> Meu bebê vai ter fissura?/ Will my baby have a cleft? (English subtitles) - Duration: 5:57.
  For more infomation >> The 100 4. évad 6. rész előzetes magyar felirattal - We Will Rise | Felemelkedünk - Duration: 0:47.


 For more infomation >> Top 5 HARDEST ALLY POKEMON TO OBTAIN In Pokemon Sun And Moon - Duration: 8:30.
  For more infomation >> 5 RIDDLES THAT WILL BLOW YOUR MIND - Duration: 3:13.

Không có nhận xét nào:
Đăng nhận xét