How To Make Juice Fruit Decorating | Summer Juice Fruit Recipe | Easy Dessert Ideas
Thank you for watching! Hope you enjoy & like it!
-------------------------------------------
Solved : Google Play Store Error Code 501 [2019] | How to fix error code 501,910 google play store - Duration: 11:53.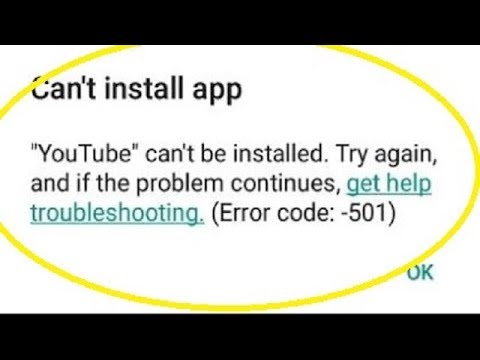
Open Google play store
I am trying to download Youtube App
Click on Update
Accept
Downloading the App
its giving Error code 501
Let's Fix error code 501
Go to Chrome Browser
Open Google
Download Youtube App
Downloading Youtube.apk
Install it on mobile
Go to settings
allow Unknown source
Now try to install Youtube.apk
Click on install
Installing Youtube.apk
Hope this will fix your problem
If not fixed follow the next steps
Open the Google Play Store
Try to download Youtube
It's giving another code 910?
Open settings ...
Go to Google Play Service
Clear Cashe
Disable the app , Google play service
Click Ok
Click on Clear All DATA
Do the same for Google Play Store
do the same for Google also
-------------------------------------------
APPNANA HACK 2019 - HOW TO GET NANAs FOR FREE! (iOS AND ANDROID) 2019 - Duration: 5:25.
hey guys welcome back to the channel in today's video we'll be showing you an
awesome appnana hack 2019 so first of all head over the appnana site
so this
just a regular happen on site icing ceases login a register here
that's okay I'll just make it round the McCain so just go and type in around the
me meal you don't have to you can just use your original I'm just gonna prove
this isn't hacked so register yes
alright so soon as you join you know you get your daily now as you're starting
off now so we get ten thousand four hundred that's okay so as you can see
here there's many things you get a stinky farts NBA games playstation xbox
fifa grand theft auto itunes no it's pretty simple obviously mine are all in
starting pine sterling cause I'm in the UK but of course Stefan from wherever
you live that is fine so you want to go over to our site s and
be
don't this is our site here SNB up Lana got co-star II there you go
so over to the site chicken Big Poppa hog will you know just type in your
invite code here you can once you type that in your head pop this code secure
site you know you can trust it alright so let's go get her invite code well I'm
not too sure where you have to get your in Lake oh here we go
so here's your invite code you know copy and paste it I'm gonna guess the code
yes so just like I said before here's just a few key steps you through you
know most fastest free we keep our servers updated so hablan come pots and
you know that's pretty good we're always one step ahead you know where it is so
let's pop this code alright so once you get past this once you get past that you
get to the problem is string we're still here that I knew to apps continue that's
pretty simple let's do this
I'm gonna turn this up cause it seems pretty simple just go ahead and burn
anything up
open the app you know it's just the VP hang up guys you don't have to do
anything you know you don't have to subscribe to
the 7-day trial you just sit here for 30 to 45 seconds make sure you do nothing
else so it doesn't live it up the hike
so yeah guys you have to do anything is sitting with pretty simple proof that's
just sitting we do times up
all right guys has to be long enough so what you want to do is come back over to
Safari and go back to our planner like droplets will help it instantly but
that's okay so I just want to wait here it should take about five minutes or so
so I'll be back with you guys whenever they back all right guys I'm just back I
just went and got some water as you see here nice fresh water locally whenever I
came back there's any way for roughly about two minutes
I think see success you've just received a hundred twenty 3987 nons you know
that's quite a good amount for the money time of the way that's what this number
will people up you guys yeah engage yourself a certain way and you know it's
it's just it's a bob who doesn't say tears it's a braw you're sitting we're
so it should go up every so often you know it's pretty simple but you can see
234,000 I can get quite a few things here and you know guys will still keep
going up and going up and going up so you'll have more and more by the time
they are booze on you can end up with roughly about ten million by the end of
the day I suppose I suppose but you know but you guys guys have to keep on top of
the game you guys I hope you enjoyed the video please leave a like subscribe to
the channel I'm content below what you think of the hag it's pretty simple as
you say in a matter of two minutes everyone two hundred thousand dollars so
guys I hope you enjoyed p-side
-------------------------------------------
How to Use Cortana in Windows 10 (Official Dell Tech Support) - Duration: 2:31.
Cortana can do much more than answer questions and help with searches.
Here's a quick setup guide and a quick summary about what it can do for you.
First thing to know is that Cortana needs your permission to help.
By default, Cortana doesn't listen to your commands.
Click inside the search box and then open settings.
Check your mic to make sure Cortana can hear you
by clicking on "Check the microphone" and follow the steps.
Next, enable the "Hey Cortana" option;
this will allow Cortana to respond when you say "Hey Cortana."
You can also have Cortana respond when your device is locked;
just turn this option ON.
Here you can also enable Cortana to access your calendar, email, messages, and
Power BI data when your device is locked by ticking the box.
You should also assist Cortana by choosing the proper language for your region.
To go even further, use the other options and decide
on features to enable within Permissions & History
and Across my Devices, in which you can sync phone notifications and texts.
Take advantage of Cortana's full potential by customizing many other features.
Click on the search box and then click on the notebook icon.
If necessary, you may need to sign in, or sign in again.
Now click the Manage Skills tab to access an array of customization options.
Connect your accounts, apps and other services to Cortana.
Get more personalized experiences from the likes of LinkedIn, Skype, and Gmail.
Link to your favorite music provider to listen to your favorite tunes.
Control your home appliances from Cortana
by linking to a provider, such as Xbox, SmartThings, among others.
Use Cortana to see which family members and friends
you can create and share events with.
Set up Cortana to be your personal secretary.
Set reminders, make lists & create tasks.
Use the Calendar to help organize your busy schedule.
Get quick updates on what's next in your day.
Let Cortana keep you abreast of whatever your interests are.
Add topics to narrow your focus and set up trackers for most anything;
From Finance to Travel, from Sports to Weather and all the latest News.
Whatever it is you want, Cortana can be set up to deliver almost anything.
But remember, whenever you need help with your PC or have technical questions
you can always reach out to us through social media on
Facebook or Twitter or join in a chat on the Dell Community Forum.
Be sure to check out our other helpful videos on this channel
and if you liked this video, give it a LIKE and don't forget to SUBSCRIBE.
Thanks for watching!
-------------------------------------------
대바늘 원피스 뜨기 How to knit a dress for a girl (2~3years) , knitting dress [Part1/2] - Duration: 6:12. For more infomation >> 대바늘 원피스 뜨기 How to knit a dress for a girl (2~3years) , knitting dress [Part1/2] - Duration: 6:12.
 -------------------------------------------
jimin & v coming to life on my lock screen?!!// live wallpaper tutorial - Duration: 2:45. For more infomation >> jimin & v coming to life on my lock screen?!!// live wallpaper tutorial - Duration: 2:45.
 -------------------------------------------
How to create an ebook for school and make it interactive - Duration: 3:05.
In this video, you're going to learn how to create an eBook and how to make it interactive
as well.
You don't just want a book behind glass, you want an ebook that engages your students.
I'll show you some handy ebook creation tools and show you how exactly to make one.
Here we go: Create eBooks for free from a pdf, a Word
Document or from a PowerPoint.
These ways to make an eBook are great, but they have a few disadvantages as well.
You can't make them really interactive.
You can insert links, but that's basically it.
Another disadvantage is that you have to format your eBook completely yourself.
You have to be very creative to make it visually appealing to your students.
That requires a lot of extra work.
I'll put the link to extra resources about these options in the description below.
There are two eBook creation tools that offer you much more options:
Create an eBook with iBooks Author for Mac
or Create one with Kotobee.
Creating an eBook is in all cases basically the same.
There are 5 basic steps you have to follow: Choose the right template for your ebook design.
This will be your guideline throughout the complete eBook course.
Create a compelling eBook cover.
In education this is most of the time the title of your course and, if needed, a specific
part of that course.
Add text and media to your book.
Make it interactive as well.
Add a table of contents.
Preview your eBook course and publish your ebook when finished.
Be careful when publishing your ebook as a teacher.
If you're selling your eBook on Amazon or somewhere else, you have to make sure everything
in it obeys by the rules of copyright!
When you've create your ebook and added some texts, you probably want to make it more
interactive.
That's where BookWidgets comes in.
With Bookwidgets, you can choose between over 40 interactive exercise templates
such as quizzes, crossword puzzles, flashcards, timelines, WebQuests and much more.
BookWidgets offers you the template, and you adapt it with your own content.
The exercises are generated in minutes, and are very intuitive and interactive for your
students.
Download the widget you created with BookWidgets.
Then drag and drop it into your iBook, and that's it!
When students read your iBook, they can instantly make the BookWidgets exercises you made for
them.
They can even submit their work for you to grade it and to give feedback.
So, let me summarise this real quick: Create an interactive widget on bookwidgets.com
Download your widget Drag and drop the widget into iBooks Author
or import a popup widget in Kotobee.
I've put some extra info on how to use BookWidgets with iBooks Author below in the description.
Hope this video helps you out.
Make sure to give it a thumbs up or subscribe.
Thanks!
-------------------------------------------
10 Infallible Tips That A Man Must Follow To Make His Girl Madly In Love - Duration: 3:24. For more infomation >> 10 Infallible Tips That A Man Must Follow To Make His Girl Madly In Love - Duration: 3:24.
 -------------------------------------------
How to draw ALADDIN easy - Duration: 5:45.
How to draw ALADDIN easy
-------------------------------------------
How to download Tamil movies,2019,tamilrockers Padam download, movies download,GSM boys - Duration: 7:21. For more infomation >> How to download Tamil movies,2019,tamilrockers Padam download, movies download,GSM boys - Duration: 7:21.
 -------------------------------------------
How to Draw a Turkey Step by Step | Turkey Drawing for Kids | Turkey Coloring Pages for Children - Duration: 12:09.
Hello guys.
welcome to my brand new video Here Learn How to Draw a Turkey with This Step by Step Turkey
Drawing Instructions.This Video Is a Thanksgiving Project with Your Kids.
So let get Start.
-------------------------------------------
Primitive technology:How to make a rope in winter - Duration: 6:04.
Dry reed breaks easily
Good building materials for a roof
Young grass
It is suitable for making rope
А stone with sharp edges
It is suitable for cutting high grass
Тall grass, sharp at the edges
That's why I cut it
Can be used for roofing and rope weaving
I take young grass and separate a small bunch
I divide it into three parts
I will tie a knot to hold better
Аdd the third part now
I'm starting to weave
Right side to the center
Left side to the right
Center part to the left
All over again
Мeasure three more parts
Weave into the common part
Just put in the center
To start over
Repeat as necessary
To create the desired length
Get rid of unnecessary parts
Simply apply coal
Аnd the fire itself will do everything
Тhe main thing is not to hook the weave
In this case the rope will break in this place
Сan also be cut with sharp stone
But I prefer the breath of Muspelheim
We got a solid rope for home use
-------------------------------------------
How To Build A Bar Stool Step Ladder - Duration: 9:31.
- I made this stool for when I'm sitting at my work bench
but then when I flip it over,
it turns in to a small stepladder.
Hey everybody, this is Justin from Remodelaholic,
welcome back to the channel.
I need a stool in my shop and I need a stepladder.
So, I was gonna combine the two in to a stepladder/stool,
just like you see right here in my little
sketch-up model that I created.
It's gonna be 24 inches tall,
it's gonna be about 17 and a half inches wide,
kind of wider on top,
but I just wanted a nice, wide base,
so when I flip it over it supports me.
It's simple design that I'm gonna use
with two by fours and two by twos.
So, I decided to see how much scrap wood I could find
around the shop to build this bench
without having to go to the store.
So, I'm gonna start by cutting my seat boards,
five of 'em, at 17 and a half inches.
(saw buzzes)
Next, I'm going to cut five boards at 13 and a half inches.
These will be the boards for the steps.
Set that up there.
Put my stop over here so I can cut 'em real fast.
(saw buzzes)
Now, I'm gonna cut out the legs at 22 and a half inches.
We have another video right here on our channel
that is pretty popular,
it's a Benjamin Franklin chair,
so it's got a little bit more advanced build to it,
but it flips over and you can step right up
and you reach high things.
I took the inspiration of that video
and I wanted to create something where you just
flip over the stool and
you don't have to have any additional hardware,
it's just two by fours, two by twos and some screws.
(saw buzzes)
I ran out of two by twos, so I'm just gonna rip this down
on the table saw
and make a two by two out of it.
I'll get four pieces.
(saw buzzes)
So, now with these last three two by twos,
I'm gonna cut six pieces out of them
at 13 and a half inches long.
(saw buzzes)
And these'll be the last six pieces that I need
for the sides.
(saw buzzing)
So here I have the seat,
the board for the steps,
the boards for the side rails,
and the legs.
I'm gonna build these steps first,
and then I'll assemble the seat with these two little
braces here,
and then I'll assemble all the legs.
Be sure to subscribe and ring the notification bell
so you don't miss any videos.
We have videos coming every week.
Give this video a thumbs up if you find it helpful.
(bouncy music)
So grab these two and half inch construction screws
that I'm gonna use, this one has the kind of star bit to it.
(drilling)
This is what I use the most around the shop,
so I'm just gonna use that.
I'm just gonna drill it together with screws,
it shouldn't take too long to make.
It's something that's gonna be in the shop,
and it doesn't have to look beautiful,
I just want it to function really well.
If you do want to see a nicer version of this that you
can put inside your kitchen, under a bar,
let us know in the comments below,
and if we get enough people that wanna see another version,
we'll put that video together.
(bouncy music)
(drilling)
'Kay, so there's the first step,
and the second step.
The seat is going to have a half an inch offset from the
sides,
and then I'm setting it one and three quarters of an inch
from the edge, and then I'll screw that in place.
(bouncy music)
(drilling)
So, this is the bottom of the leg here,
I'm gonna mark up four inches,
this'll be a step,
and then from this four inches,
I actually need to go 10 inches to the next step
which is 14.
So not that one, but here and here.
(clattering)
then this will be up against the seat.
Got the legs on the table,
I've got the steps right here.
The small one, the large one,
and then right here will be the seat.
So I set up a fence on the table so that when I'm
drilling, it'll be easier just to drill in this way,
and have something to push up against.
I'm using my impact driver to be able to drive this
really long screw in so it'll hold real tight.
(drilling)
(bouncy music)
Alright, so here's the stool,
the design that I modeled and sketch up,
and I realized there's a problem with it.
'Cuz I went to sit on it and the sides were starting to
buckle.
So you can see,
there's not enough support to keep this from
swaying back and forth.
So what I'm gonna do to fix that is just put a two by four
right here, in this area.
So that should be enough to keep the stool from
wanting to buckle.
So, if I could add thirteen and a half inch two by four,
screw it in in four spots,
two on each side, I think that'll keep it from moving.
(drilling)
So, looks like that added piece,
that's what it needed to give it some more support
so it didn't get out of square.
So it fits really nice underneath the bench there,
just take it out when I need it.
Now I can get to the top shelf.
Took me only a couple of hours to build,
I didn't have to buy anything because I had all this lumber
in my shop just waiting for a project.
So, here it is.
Make sure you check out this video here,
about how I'm organizing the shop.
Thanks for watching and we'll see you in the next video.
-------------------------------------------
How To Grate New Song This Year 2019 - Duration: 1:46. For more infomation >> How To Grate New Song This Year 2019 - Duration: 1:46.
 -------------------------------------------
Blackened Alligator Recipe - How To Cook Alligator - Cajun Seasoning - Duration: 5:37.
what is up everybody this is lyle with no hippie BBQ and I'm coming at you with
something a little on the exotic side today I had a subscriber of mine a while
back asked me if I would do some alligator didn't ask me how to cook it so
what I'm gonna do is I'm gonna be doing is a blackened alligator recipe and part of the
reason I'm going with the blackened alligator as opposed to a fried
alligator is I have this new seasoning from sweet Smokey Joe seasoning it's
Cajun black I've tried this on shrimp this is all that so we're gonna hook
this alligator up with it now I've eaten alligator before but I have never cooked
it so this is going to be my first time I did get a little inspiration online as
to how I'm gonna do this anyway here's the brand that I got I got this just at
a local butcher butcher shop this is one pound and it costs about $16 so a little
on the expensive side let's open up this pack and see what it looks like okay so
it looks like this might already be I was expecting it to be one big chunk
that looks like it's already kind of cut down into pieces so I'm not gonna have
to do that I could put my knife away what I'm gonna do is I'm going to rinse
this off kind of Pat it dry and then we'll be back we got that alligator
rinsed off drained off and patted dry a little bit and that's not a lot of
alligator for sixteen dollars let me tell you anyway let's go ahead and get
our blackened seasoning in here
and I want to make sure it's thoroughly coated and one thing I did notice when I
cook with this the last time is this really not too salty so you can't afford
to go kind of heavy on this I'm going to leave a link to where you can buy this
stuff in the description below they have a lot of good stuff that I've
used in a few different recipes and then I have my skillet over here getting
heated up I'm using avocado oil but any high temperature oil would work I would
shy away from something like olive oil or something like that you could go with
canola oil vegetable oil or a clarified butter all right I think that's good to
go my pan is starting to smoke which is what we want and I just have a real thin
layer down here okay let's throw in a test piece make sure we're hot enough
and we're gonna cook this for about two to three minutes or until it starts
releasing from the skillet
okay let's go ahead and test them all right so they're releasing from the
skillet that took about three minutes we'll flip
and I'm gonna go about two minutes on this side or until it lifts up so that's
another two and a half minutes let's set them aside just let them sit on a paper
towel to drain off now let the skillet come up the temperature a little bit
more I'll start my second batch then we'll plate up see we think about these
so that is a wrap this is going to be the first time I've ever had alligator
non fried as a matter of fact I've only had it fried so me and Teddy Pendergrass
are gonna go ahead and get into this I made a little sauce to go along with it
just grab a little piece you need to get in there too busy oh good
hmmm that is surprisingly tender mm-hmm there's some good stuff now here's I'm I
tell you if you live in Colorado or someplace like me where this isn't
something that you could just go to the grocery store and buy this is good but
it's not sixteen dollars good per pound so I will leave you with that anyway it
is tasty though I will mmm-hmm be more than happy to knock out
a few one of these anyway me and Teddy Pendergrass does that what
I called you earlier mm-hmm where did that call you like hid Roosevelt anyway
I'd like to thank you guys stop by no hippie BBQ I appreciate check out the
Alligator Recipe by the bbq pit boys
-------------------------------------------
How To Know How You Should Hold & Record With Your Phone ~Horizontal or Vertical - Duration: 1:35.
Using your phone to record videos?
Should it be horizontally held or vertically held?
The answer depends on where you're planning on posting your videos.
Hi Taylor here with Financial Potion where video is your Financial Potion.
To never miss out on a video, please make sure you're subscribed to our channel and
click on the bell to get notified when a new video is uploaded.
Of course if you want one to one training, click above for our Patreon page.
For the most part when you're recording video with your phone you're going to want
to hold it or have it be held on a tripod or gimbal horizontally.
This will give you the full 16:9 aspect ratio and won't give you the black lines on the
sides of the video.
However if you're posting the video on InstagramTV then you need to hold you phone vertically
as that's the aspect ratio it wants to receive.
Just like anything in business, you need to think with the end in mind.
Are you going to be posting your videos to YouTube, Facebook and Linkedin?
Then you'll want to have your phone held horizontally.
Do you want to post your video to InstagramTV, then you want the phone held vertically.
If you want to post on Facebook and InstagramTV I would advise recording with your phone horizontally
and then exporting a version to work for InstagramTV.
I hope this alleviates some confusion about whether your phone should be held horizontally
or vertically when recording.
If you have any questions please leave them in the comments below and until next week,
stay engaging!
-------------------------------------------
How To Make A Long Crystal Necklace - Duration: 8:36.
To make the long crystal pendant necklace you'll need a crystal and this is a faceted rectangle crystal
that's 12 millimeters by 17 millimeters.
It's kind of a smoke color. And
then you'll need a pearl and we chose sort of a smoky blue pearl to go with our smoky crystal and the pearl is five
millimeters.
We've got gunmetal findings here. We've got a gunmetal daisy spacer. That's five millimeters. A gunmetal bead cap
that's four millimeters by six millimeters.
And we've got a gun metal clasp and our clasp is about 12 millimeters across the diameter of the toggle.
We have chain and you can make the chain any length you want ours is about 30 inches.
And then we've got two gunmetal jump rings to attach the clasp to the chain.
We've got a head pin and we've got silver wire in 24 gauge.
For tools we've got chain-nose pliers, round-nose pliers, and wire cutters.
To get started making the necklace we're gonna feed the daisy spacer onto the head pin and
then we're going to feed on this beautiful faceted crystal and
then the bead cap. And this is going to be our pendant part of the necklace and
To make this into the pendant what we want to do is make a wrapped loop in the top of this head pin wire
To do that. I've got my round nose pliers
I'm gonna pinch the wire right above the last bead. I'm pushing those beads together at the daisy spacer the crystal and the bead cap
nice and tight and I'm going to bend a 90 degree bend in the wire right above the last bead the bead cap and
Then I'm gonna reposition my pliers to the top of that bend
I'm gonna push the wire over in the other direction to
Make a partial loop and I can't complete the loop because the bottom jaw
The pliers is in the way. So I'm going to reposition the pliers
into the bottom
So I can pull that wire the rest of the way around
Like that, and then I want to wrap that loop to secure it and to do that. I'm going to hold
the
Ring the loop
I just made across and I'm gonna pull this tail around
two times and this wires a little bit hard and
What you can do if that's the case you can use your chain nose pliers to give you a better grip on
The wire so that you can pull this wire around a little bit
Tighter I'm just making two reps there
sometimes headpin wire is a
Little thicker or stronger and sometimes it's not but that's how we want to do our to wrap loops there
I'm going to reach in with my wire cutters and I'm gonna cut that little tail that we just made
I'll hold on to it. So it doesn't fly off
And just reach in there you give it a good snip
and
That is our pendant part. That's so pretty got a little tail sticking out there
And I'm gonna press that down with my chain nose pliers
and
That looks great
And now we want to attach this to our toggle. This is going to hang from the toggle
The round part of the toggle clasp and we're going to attach it with another little piece of wire work that features our purl
What we're going to do is we're going to cut a piece of wire. This is our 24 gauge wire
I cut a piece about four or five inches long and
I'm going to start by making a wrapped loop in the end of this wire
to do that
I'm going to use my round nose pliers just like we did before
I'm gonna come about a third of the way down on that wire and I'm gonna make a 90 degree bend in the wire
reposition to the top of that Bend and
Push the wire over the top jaw
reposition the pliers to the bottom jaw in that loop and then I can pull the wire all the way around like that and
Before I pull this wrap around and secure that I want to connect it. It's acting as a connector
so we need to connect our pendant that we just made I
slide it in there, and I want to just Nestle past the crisscross and
into the loop
Now I can secure this
By holding that loop across with the pliers and then pulling the tail around two times
Like that and then reach in there and trim
That wire be careful not to cut the project
and
there's our
Connector on there another little piece of wire sticking out. I'm just gonna mash that down. I
Don't want to cut too close to the project because I don't want to cut the project
So then I sometimes find up with the little tail like that. That's fine. You can just push it down and
Now we want to feed the pearl
onto the wire and
That's part of our connector. And then we're going to connect this to the toggle with another wrapped loop
So I'm going to take my round nose pliers again
I'm going to make a 90-degree Bend and
Then I'm going to make a loop here
By positioning my pliers in the top of that Bend, but if I make the loop at the top part here
It'll be very narrow of narrow part of the pliers would be a very small loop if I go here on the pliers
I'll make a big loop. I want a medium-size loop because I want it to fit over this toggle
So I'm gonna go there in the middle and push the wire over
And then pull it around
so I switched to the bottom just so I could pull it around and then before I do my two raps on that I
want to remember to attach it to
The round part of my toggle clasp. I'm just gonna
Kind of I just slide it past the crisscross I made there it is
Now that's attached and then to secure it. I do my two wraps again. It's the same technique
one two, I like to use a long piece of wire because it's easier to pull it around and
You can save your scraps, but this wire is not expensive. So don't worry about it. And
Let me wear this necklace. The toggle is going to have this cute little pendant hanging from it
But we need to attach the toggle to the chain really do that with a jump ring
This is one of our jump rings and it has a little split right here
So what I like to do to open a jump ring is hold the jump ring on one side of that split with one pair
of pliers and
Then with the other pair of pliers grab the other side of this jump ring on the other side of split
Push one side down towards the table
While you're holding the other side up towards the ceiling and that keeps the jump ring round. It's still around shape
It just has a little opening in it like a door and then that gives us room to slide on our clasp
And then we can slide on the end of our chain
so where's the end there it is and
Then to close this I'm actually going to use my chain nose pliers, which of these flat pliers are called chain nose
And you can press it back together like this. You could also use the two pairs of pliers and
Just do the reverse of how you opened it in order to close it
So this is on one end of our chain now and then we have the taco part of our clasp
We want to put on the other end of the chain. So this is our last
Jump ring. I'm going to open it again the way I use two pliers
What you don't want to do is open it like sideways. You don't want to just pull it apart
It won't be round. You'll never make it round again
This keeps it nice and round. So I'm pushing one side down towards the table
and I have a little opening that I can slide that toggle in there and
Then I have to find the other end of my chain. Here it is and
slide that into the jump ring and then press that closed and
Then to wear this necklace
I'm going to
take the toggle end and we'll slide it into the circle part of the clasp like that and
Then when you wear it, you have this beautiful long crystal pendant
on your necklace so pretty
-------------------------------------------
How to Create Classic Car Vector in Adobe Illustrator - Duration: 9:30. For more infomation >> How to Create Classic Car Vector in Adobe Illustrator - Duration: 9:30.
 -------------------------------------------
how to increase watch minutes views and subscribers in 1 click, 100% profe ke sath apna channel grow - Duration: 6:02. For more infomation >> how to increase watch minutes views and subscribers in 1 click, 100% profe ke sath apna channel grow - Duration: 6:02.
 -------------------------------------------
How To Create A High Converting Landing Page In WordPress In 15 Minutes 2019 (Step By Step Tutorial) - Duration: 15:24.
Hey, this is Giorgio and in this video, I'm going to show you how to
Create a high converting landing page on wordpress step-by-step
So just let's check it out
So basically everybody needs a landing page if you're serious about
Doing stuff online if you are selling something online if you have a blog and
want to get more subscribers on to your email list or
Whatever you do online. You basically need a landing page. So I
Use elementor. Elementor is in my opinion the best page builder
If you're using WordPress, so you head over to plugins add new
Elementor and you click on Install Now and you activate it. So that's the first step
Once you're done you go to pages
Add new and let's say that we're going to build a landing page in the weight loss niche. So
how to lose weight
Within two weeks
Without blah blah blah
So, this is your headline you click on edit with Elementor to just edit it and to build a nice-looking landing page
as you can see, this is not a
Landing page so you go down click on settings page layout
landing page
Alright, so click on this one this icon
I'd like to have a little bit of space on top
so I click on spacer and I drag it down basically over here and I
enter 20 and
Next up we need a headline, of course, so I click on heading drag it down
And this is my headline. I want to align it to the center and
Maybe a little bit bigger
the font so
Click on... I want
45 so this is nice and maybe a different color as well. Maybe green
So this looks great in my opinion
This looks great
Next up we need well, I like to have a little bit of text maybe
three benefits that they will discover in the e-book or whatever just a couple of benefits or
Yeah elements that they will learn in the e-book. So
you click on the icon again and
you click on intersection and
Drag it over here
Next I
Want a little bit of text
over here, so I click on text editor and drag it over here and
I want an image
Let's enter a couple of benefits
So this is what I just made up. It's really easy really simple just for demo purposes
of course, you have to just make it much better, but
yeah, this is just for demo purposes and
Just play around with this as well you click on this
Image and just pick an image you like I
Won this eBook over here. And again just play around with it. How big you want it then?
I like to have this a little bit bigger as well. So I click on it and I go to style
Typography, let's say 30 31, no 30 and
I also want to have a
small
Subtitle, so exclusive ebook 25 proven tips. I want to make it a little bit bigger
Maybe more weight as well and I
Want to make it blue, so yeah, I like it. I
like it and maybe
I'm going to underline it. Yeah, it's much better
Just play around with it
Yeah, something something like that. The only thing we need to have now is a
button, of course, so we click on it drag it down and
Yeah, just play around with the size. I
Choose large I want to align it in center
text
nine times out of ten I use download now and
Of course just again. Yeah play around with the size. How big do you want it?
35 or whatever. I also like to use uppercase. So yeah, this is something I like and
The background maybe blue
Yeah blue looks good. So
Now I want to have
one thing
Which is an image
and
I want that people
are looking
to download now as soon as they land on this landing page, so
Now the land on the landing page and I see these arrows
Yeah pointing up. So they see download now and one thing before I forget it
I also like to have a subtitle on top of the headline. So I
Just click on text editor and drag it over here. I
delete it and
100% free ebook so people know exactly what I can expect and what this is
So make it a little bit bigger
style
Typography and just play around with the size
so
This looks clean and simple in my opinion. So if people land on this landing page
they just see exactly where they where they can expect and
it's proven that the more text you have on a landing page the
yeah, the worse it will comfort people like simplicity and people don't like a lot of stuff around it and don't like a lot of
Distraction as well. So it's really clean. It's simple if you're interested in the e-book
you can only click on download now and
These are a couple of benefits that you would discover a couple of elements that you will learn
Etc, etc
So it's really clean in my opinion. So next you click on publish
But if I click on download now nothing happens nothing happens and I
Like to have a pop-up, so people click on it and then a pop-up will appear
so we go back and
We click on
Templates and pop-ups, but I have to say in order to use pop-ups. You need Elementor Pro and
elementor Pro cost about
50 bucks the elementor pro costs about 50 bucks for a completely
full year
So it's really cheap in my opinion and you will get a lot of features a lot of extra
functionalities if you use elementor pro if you're serious about
Designing websites or yeah, just improving you your online visibility. I
definitely recommend Elementor Pro, so
you click on pop-ups and
We want to create a new one
How to lose
weight test
Create template
so you click on this over here and
Full screen I like to have it full screen. Just pick one. Whatever you like. I like this one
Why do I like this one? Because it's really?
Simple I like simplicity like I mentioned
Everybody likes simplicity, so I deleted
that Icon and
I don't like this as well and
I click on join the club and I'm going to edit the title
where
should
Where should we send the ebook because that is what people like
So if they click on download now, yeah, you have to send the ebook to a specific email. So
really basic and then
Email I like to just have email not another form field like name, for example
the more form fields you have
The less conversion you will get so I click on email
but if you really like
to have a name form field for example and click on
edit item and again this
elementor form
Functionality is only for elements of pro users. So you click on
Item number two label name placeholder name as you can see it appears
You can make it required if you want
You can just drag it above email
Next you click on submit button
I'd like to enter download
You can play around with it small or medium or whatever you want
Actions after submit. So I
use getresponse getresponse is
an email marketing service and
What happens is that
Somebody clicks on download now if you have set up your autoresponder correctly
the person will receive the e-book automatically and that is
possible because you have just integrated with an
Email marketing service and I use getresponse. Like I mentioned it's really beginner friendly and
Yeah, it doesn't cost a lot so that's why I use get responses really beginner friendly and if you are on a low budget
getresponse is something you like whether you are a blogger or
A digital marketer doesn't matter
you can also use drip or MailChimp for example, but I like getresponse and
It also has a 30-day free trial so you can basically play around with it and see if you like it
That's getresponse. You click on get response and custom
For the API key and just enter your API key
Before I forget it actions after submit I also like to send people to a thank-you page
So if they have opted in, they will get redirected to a thank-you page. And yeah, just enter your
URL of the of the Thank You page
I'm not going to show it but really easy just create a new page
create a thank-you page and just copy the URL of the Thank You page and
paste it over here and
That's basically it. Yeah, you can change the color of the button as well. So you go to submit button
And you go to style and
you click on button and
We like to yeah, we like to have a blue one
and yeah, that's basically it
so you click on publish a
couple of conditions well
we don't want to show the pop-up on the entire side, but just on our
landing page so you click on singular and
you click on all
pages and then you can choose our
And
then you can choose our page that we have just created how to lose weight within a couple of weeks and
Yeah, you have a couple of triggers so let's say that you want to get the pop-up shown if you
Click on anything or
Scroll or on page load or after inactivity, but we don't want that the same applies to advanced cruise
We don't want it just take a look, but we don't use it for now safe and close
So now it's done
So next up we go back
exit to the dashboard and
We go back to pages as well
We go to our page edit with Elementor. This is our landing page
we click on our button and click on dynamic and
Here you see pop up
And
again pop-up and
Now we just well what how did we call it?
how to lose
weight test
This is our pop-up
So now if I click on it
This is what people will see where should we send the e-book name email download now? No, thanks and
This is it. This is basically
what you need to create a high converting landing page and like I said
It doesn't matter if you are a blogger if you are digital marketer if you have an online business
You basically need a landing page. So
this is it and
make sure to subscribe make sure to like the video as well if you have any questions just
Yeah, reach out to me
leave a comment down below and
Yeah, that's basically it I see you in the next one
Không có nhận xét nào:
Đăng nhận xét