today i'm going to show you how to remove background
from the complicated hair
and so lets do it
first thing you have to make sure that whenyou are going to remove background
you have to make sure that your layer
have a alpha channel .so lets go
to this layer and
click on the alpha channel ,now
now create a dublicate layer by clicking on this and
now you have to make a layer mask
from the dublicate layer
go to colour
and click on curvs
now just follow me, you have to do what
you have to do that
the background should be white
the background you have to make fully white
so its ok now
now I'm going to make it black and white
because layer mask always black and white tool
so go to colour
and go to desaturated
and here click on the
luminosity
and ok
click on ok
now
again go to the colour
and click on invert
now you have to do one thing so
make sure you have ,upper side white
so lets pick up the brush tool
and increase the brush size
increase it
now you have to do
all the face area
you have to make white
lets do this
do it properly
now see
some hair
you can see hair
black,dark black
so you have to make white here
some of that part
now go to the
background layer
now you have to cut this layer and past on the main layer
so click on this
and go to edit
sorry
before cut and past
first thing you have to do click
on it and right click on it
and
click on add layer mask
white full opacity
add
now click on this
and go to edit
and cut this layer
and
go to this layer
and go to edit
now past
you see here one floating selector
posted layer
you just have to do click on this
and click on this and click on this anchor the floating layer
and now if you want to give
colour to the background
so you have to do
create a new layer
make sure it transparency
click on transparency and click ok
now if you want to give colour ,suppose i want to
give this colour click ok
now
go to this layer
and go to bucket tool
and fill this area
now make sure this new layer
under the main background layer
so click on this
that's it guys
i think this video may help you
don't forget to subscribe my channel
because i'm going to make more videos
on gimp
thank you for watching
For more infomation >> how To Remove Background From Hair In GIMP Shortcut (Cut Out Hair). - Duration: 6:23.-------------------------------------------
HOW TO SUCCEED IN LIFE - Best Motivational Videos Compilation /2017 - Duration: 3:49.
Subscribes ours channel
-------------------------------------------
✅ How to Configure Spanning Tree Root Primary and Root Secondary in GNS3 | SYSNETTECH Solutions - Duration: 10:30.
How to Configure Spanning Tree Root Primary and Root Secondary in GNS3 | SYSNETTECH Solutions
Open the GNS3 software.
Create a new project for Spanning Tree Root Primary.
Add four Cisco Layer 2 Switches to the GNS3 workspace.
Cable all the Switches.
Start all nodes.
Determine the Layer 2 Switch for Root Bridge to select manually using Root Primary command.
Determine the Layer 2 Switch for Root Secondary.
hostname SW1
show spanning-tree
The Priority value of SW1 is 32769.
Execute the spanning-tree vlan 1 priority root primary command to manually select the Root Bridge.
spanning-tree vlan 1 priority root primary
show spanning-tree
You can see that changed the Priority of SW1.
This time, when we apply Root Primary command on SW2 Switch, Root Bridge will be SW2 Switch.
Execute the no spanning-tree vlan 1 priority root primary to disable the Root Primary command.
Configure the Secondary Root Bridge as the SW2 using the spanning-tree vlan 1 priority root secondary command.
show spanning-tree
You can see that the Root Primary and Root Secondary commands automatically change the priority values of the switches.
Subscribe to our YouTube channel for more videos related to How to Configure Spanning Tree Root Primary and Root Secondary in GNS3 !!!
Read the video description...
-------------------------------------------
HOW TO GET RICH WITH EASY PROJECT? | Growtopia - Duration: 1:44.
-------------------------------------------
Natural Way to Reduce Belly Fat after Pregnancy at Home | How to Tighten Loose Skin After Pregnancy - Duration: 3:17.
Natural Way to Reduce Belly Fat after Pregnancy at Home | How to Tighten Loose Skin After Pregnancy
-------------------------------------------
నల్ల గుడ్డ తో నరదిష్టి పోగొట్టుకొండి ఇలా | How To Remove Drishti Problems | Drishti Problems | Disti - Duration: 2:57.
-------------------------------------------
How to paint Cliffs of Moher. Part 1. - Duration: 22:56.
CLIFFS OF MOHER. (IRELAND)
To not lengthen the video too much, I'll switch the normal speed with fast speed.
In addition I have divided the work into two parts.
I start with the sky.
I use sevres blue, violet and white.
Mixing blue sevres with violet I get a darker blue.
For the sea I use the same colors.
Darkened with a pinch of black.
As we get closer to the foreground we are getting darker.
Brown "toasted earth".
I start with the cliffs.
More clear and less detailed the further away.
I mix the blue with yellow to get green.
I'll use it for the cliffs and for the foreground.
We already have the base of our picture. Now we begin to detail.
With the palette knife we give even more detail to the cliffs.
To the first salient we will detail it to the maximum and we will diminish the detail in the others as we move away.
Continued in part two...
-------------------------------------------
How to Install a VPN Service Using an Anonymous Gift Card | Full Sail University - Duration: 5:31.
(lighthearted music)
- So the first thing we're gonna show you
is installing a VPN service
using an anonymous gift card.
So, going to a store, purchasing a gift card
and running though that.
So basically this is just gonna take you through it
and Jack and I will go kind of back and forth
on these slides,
but we're loading incognito window,
which we didn't talk about before.
It's basically making sure that you're not caching
anything locally on the machine, cookies, et cetera.
So, as you go to these sights,
it's not keeping that information.
We're gonna go to privateinternetaccess.com.
There's tons of VPN tools out there,
this is just one that I know we both like.
- Although one of the reasons we picked it,
there's a website called TorrentFreak,
which lists kind of the top VPN providers,
and one thing we do like about privateinternetaccess,
you've gotta understand where the company's based
and what their country laws are.
The U.S. does not have a retention policy
when it comes to VPN products.
So, we like PIA, they are out of the U.S.
They do not have a retention policy,
so they won't hold any data whatsoever.
So understanding kind of what they're bound to.
Like UK, I used to use hidemyass VPN.
That's out of the UK.
Don't use that one.
Cause GCHQ's a thing and they do have data retention rights
that they have to adhere to.
- So here's an important part to keep in mind.
This is that paying with an anonymous branded gift card.
One of the things you can do is go to a store,
and get a gift card for 50 bucks,
and they have literally hundreds,
we're gonna scroll through them real quick,
of different gift cards that you can take,
turn in, and purchase.
That means your not listed,
your not connected to your credit card.
You're not connected to your home address,
you're not connected to all these pieces,
because you went and took cash,
traded it for another mechanism,
and then used that to purchase your VPN service.
It's making one more level, one more obstacle
for people trying to figure out who you are,
and what you're doing.
So we're gonna make that purchase now and blur this out,
because I wanna make sure
that's the data that's protected here.
- Because of security.
- Yeah, security's good.
So we're gonna enter in the card number data
off that gift card.
It's gonna go in, it's gonna check the balance
because they wanna make sure
that it's an actual gift card.
And basically we're paying 50 bucks
for 366 days of VPN access.
I'm gonna put in an email address,
that was created for the presentation,
jamesmadison@fourthamendmentservice.com,
and basically they'll email you a set of credentials.
So you're probably saying to yourself but wait a minute.
They're gonna email me credentials,
that sounds pretty easy to trace.
We're gonna show you in a video in a few minutes here,
10-minute, basically burner email accounts,
so you can get your credentials.
- I prefer Guerrilla Mail, because you can get the email
address at SharkLasers.com.
- Who doesn't like sharks with lasers?
- Exactly.
So now we're going into gmail,
this is gonna cut for a second here.
So basically your username and password,
and then you go back to the site,
and a little pro tip,
I actually ran into this making the video.
They will send you a link for the actual installer,
don't use the link in the email,
they haven't updated it yet.
Actually go to the page, and download the client.
I spent about 20 minutes beating my head
against the wall on that so,
a pro tip from me to you.
So basically you'll download the installer,
we're obviously doing this on a Mac.
And what we wanna show you here
is really what you should be getting from these videos
as we run through them,
is these are being done in real time.
This is how quickly you can go from
I'm just on the internet.
And notice, you may have noticed at the top of these things
there's an IP address that's blurred,
they show you what you're externally-facing IP address is.
They know, because that's how networking works,
they know where you're coming from.
Once we get this installed,
we'll actually select a different location,
and in the video you'll see
we actually select London.
So whoever is seeing us connect to their website,
or their VPN, know our termination point is London.
I am not in London.
I'd like to be in London, but I'm not in London.
So we'll take those credentials, and we add them in
to the client that was just installed,
and it takes a couple seconds here,
but then in a few minutes, or not minutes, a few seconds,
you'll see the actual drop-downs
here for the selections.
So we'll paste those credentials in,
and like I said, what I like about these videos
is that they are real time.
This isn't alright I'm gonna go home,
it's gonna take me 20 minutes of reading something,
and then I gotta go get it installed, et cetera.
You go from no VPN, to VPN in about five minutes.
- Zero to hero.
- So here we are.
Notice all these connection types.
We can come from Florida, Texas, Chicago, Montreal, Sydney.
And we can go more, Denmark, Finland, Switzerland,
et cetera, et cetera, et cetera.
So these are all ways that you can say alright,
I want this traffic to look like it's originating
from a different point.
And you'll notice here I call out the IP address,
so I'm gonna go connect to London,
and right now I'm on Bright House Networks,
many of us probably have Bright House Networks.
And you'll see the little robot connect,
and once the little robot connects,
we'll refresh the page and
hootcha, hootcha, hootcha, lobster.
- Green robot good, red robot means it's disconnected,
and gray robot means you don't have PIA turned on so...
- And there we go.
So now we're at Choopa, or Choppa,
I can't say that right, LLC,
and the IP address is out of London.
Our data is now encapsulated and protected,
and it looks like we're sitting
maybe on the River Thames, surfing the internet.
And that's it, that's the VPN service.
-------------------------------------------
How to turn on an Applet - Duration: 0:50.
Hey all, today we're going to look at how easy it is to turn on a simple IFTTT Applet
There are lots of different ways to find new Applets to turn on but today we're on the
homepage, and we're going to look at what's recommended for us.
This looks pretty cool.
Get the weather forecast every day at seven a.m.
I always forget my umbrella so this could be helpful.
Applets show you what powers them.
In the top left corner is the Weather Underground logo so this works with the weather.
Which, duh.
In the bottom right is the notifications and I see here that I need the IFTTT app to send
me those notifications.
So that makes sense, too.
Let's turn it on.
Nice!
Our Applet is on.
It's that simple.
We can go to "My Applets" to visit it any time.
Thanks for watching, and stay tuned for more short IFTTT tutorials.
Happy IFTTT-ing!
-------------------------------------------
HOW DO YOU GROW FRESH ORGANIC VEGGIES & HERBS RIGHT IN YOUR KITC - Duration: 3:33.
HOW DO YOU GROW FRESH ORGANIC VEGGIES & HERBS RIGHT IN YOUR KITCHEN?
� NOW YOU CAN
What if you could have fresh organic veggies, herbs and flowers that are grown year round
with no chemicals, pesticides or fertilizers right in your kitchen?
Thanks to Hyundai you can!
This is a whole food lovers dream come true!
The Nano-Garden is an absolutely amazing invention especially for people, like myself, who are
living in condos, or in houses that don�t have much yard space
The nano-garden somewhat resembles a refrigerator, and takes up approximately the same amount
of space.
It contains a hydroponic system, which means that it is capable of growing plants in a
mineral nutrient solution, in water, without any soil, pesticides or fertilizers.
The garden also has features that will allow the user to decide the speed of growth of
the veggies and herbs by controlling the amount of light, nutrient supply and water.
In addition, the unit will alert its users when it is time to provide the plants with
water or nutrients.
It also functions as a natural air purifier by eliminating unpleasant smells.
Most people do not realize that vegetables will lose about half of their nutrients within
the first week of being picked.
The food that you are getting from the supermarket will not be as nutritionally rich as the food
you are growing yourself and consuming immediately after harvesting.
Imagine how much more fresh and alive this food tastes.
If you have or have ever had a garden I�m sure you have certainly noticed a difference.
Currently, Hyundai�s Nano-Garden is just a prototype and is not available for sale.
They are currently working with the manufacturer to get these on the market as soon as possible.
If you are looking for something to purchase right now, check out the Urban Cultivator,
which is available now and it is also quite sleek and modern looking
If you have the space to have your own garden or have access to a community garden, you
should totally take advantage of that.
Being able to grow your own organic foods is one of the best ways to opt out of the
system and take control of what you are putting into your body as well as those of your loved
ones.
Imagine fresh, local organic produce at your fingertips.
Gardening is a very rewarding hobby to take part in, it is such a great way to connect
back to nature and directly with the Earth.
�In our society growing food yourself has become the most radical of acts.
It is truly the only effective protest one that can �and will- overturn the corporate
powers that be.
By the process of directly working in harmony with nature, we do the one thing most essential
to change the world- we change ourselves.� �Jules Dervaes
-------------------------------------------
How I removed my armpit hair permanently body hair removal how to remove Underarms hair permanently - Duration: 3:54.
-------------------------------------------
Introduce yourself in english - Cómo presentarse en inglés - Duration: 4:33.
-------------------------------------------
StyleLink Sessions: How-To Create Faux Braids | Matrix - Duration: 2:13.
This is our weekend festival vibe
We're gonna do faux braids
I feel like it's easier for people to kind of like gather hair
maybe twist it, kind of pin it
We're going to do three sections
A Smooth Setter first just to kinda get it like soft
Some Over Achiever before I start the twisty so it gets super shiny
and I'm gonna do anchoring the twist by going up and then in to the hair
grabbing my second section, just re-wetting it a little bit
Some Smooth Setter, it's really soft
Grabbing some Over Achiever
Putting product at the root before I start to twist up
We kind of want a little more volume on the sides
So I'm just twisting it at the top of the ear
Again, I'm pinning the twist
and I'm making sure they're really secure about intertwining them
So if you lock them together, it'll be extra
We should add hair pieces before we like tease the back, what do you think?
Yeah
I love it
-------------------------------------------
How to Draw a Nose for Beginners - Duration: 16:26.
hey this is Darlene and you're watching a RapidFireArt tutorial on how to draw
a nose. Here are some general steps to draw an average-looking nose. Start with
a circle. This is the tip of the nose. On both sides draw two lines for the bridge.
Curve your lines outward at the top as the bridge turns into the brow bone. Through
the middle of the circle draw a horizontal line. Extend it to the right
and left - slanting your strokes down just a bit. At the ends, draw two short
vertical lines. Connect them together at the bottom by drawing a line stretching
from one side to the other. At the top, draw two strokes that point towards the
bridge. I'm gonna do a few more examples of this later so don't worry if you
don't get it right away! Now that we have a set of general guidelines we can start
to draw the actual nose! Define the tip of the nose by working your way around
the circle. Draw the nostrils and sides by following the rest of the guidelines.
I'm gonna show you some unique examples so you can create a variety of no shapes.
Watch how a few small changes will give me a completely different looking nose!
This one's more angular... draw a really big circle for a big bulbous nose... here's
one with narrow nostrils... this one has higher nostrils. The biggest difference
here is that the horizontal line is NOT going through the center of the circle.
It's going through the top. Continue to stretch your imagination to get some
pretty cartoonish noses. Once you get comfortable,
slowly eliminate some of the guidelines. Here, I'm down to using just the circle.
Okay this is good at all but what happens when you want to add eyes? Let me
quickly draw a pair of eyes for this example. Draw a line down the center of
the face so when you draw the nose it's nice and straight. Draw a vertical line
coming down from the inner corner of each eye as well. These will mark the
boundaries for the nose. Okay, now we know how wide to draw... but what about length?
Here are two methods to do this. Method one: you can measure the full iris and
add about three irises to the bottom of the eye to find the nose length.
You can do this with your pencil and finger to get a rough measurement or
your ruler. Method two: draw a triangle where the top two corners touch the
outer corners of the eyes. This method requires a bit of trial and error. A good
triangle shape is where all the sides are similar in length. Once you pinpoint
the length, draw your circle and the rest will follow!
Let's do this again with a longer triangle. You can do quick sketches like
this to find the triangle shape that works for you but make sure you keep
your lines super light so they're easy to erase just in case you need to
reposition anything. Just for funsies I'm gonna quickly draw a cartoon in the
narrow space I have on the left. This way you can see me draw a more complete face.
The rest of this video is going to be focused on shading. But first I'm going
to quickly build the guidelines and nose. We've got the circle... bridge.. and to
check the nose for crookedness, place a transparent ruler down the middle
vertically and any crookedness should become apparent. Draw a horizontal line
through the middle of the circle. Extend the ends out and down. Measure them to
make sure they're the same size or else one nostril could be bigger than the
other. This is easy to fix now instead of later, so take your time with the
guidelines. Add lines going up towards the bridge and another one at the bottom
going around the circle. Check that your nostrils are level by using a ruler
aligned to the edge of your sketchbook. The nostril is a little higher on the right
so let me fix that before we move on. Alright, guidelines are done! Remember, you
don't have to follow your guidelines exactly to the tee! I'm gonna draw the
bottom of the nose a little further down than the circle. This will make the nose
a lot less round. Still using an HB here.
To add some definition and bring out the tip of the nose I'm adding a few curves
around the circle. Before shading, make sure the outlines are a super light.
They should be barely visible. This way they won't show through in the end. I'm
darkening some areas so you can see just how effective this is. Roll a soft
kneaded eraser until it's wider than your drawing and is completely smooth so
you can lift the graphite evenly. Roll it over your drawing swiftly to lift the
graphite away until it's a light gray.
Now it's ready for shading! With a blunt HB pencil, shade a light even layer along
the bridge and circle. I'm using the circulism technique, which is comprised
of many overlapping circular shapes.
Avoid harsh lines like this along the nose bridge and instead outline it by
shading. I'm just drawing a bunch of tightly
woven circles.
Shading around the sides of the nose as well... If your original outlines start
disappearing, darken them ever so slightly. I'm gonna give this nose
overhead lighting, so any areas facing away from direct light will be shaded
darker. I'm still using an HB. Just slowly building and layering these values. While
you can shade it really dark to begin with, layering slowly will save you from
making permanent mistakes... or ones that are just hard to erase. Shading around
the circle... I'm leaving the center of the circle
white because I want to highlight it later.
So, I wanted to use a 2B pencil to slowly build this up... but I couldn't find it
anywhere. So I'm using a 4B with very little pressure. Earlier I made a few
outlines to define the tip of the nose but they disappeared, so I'm going back
over these areas to give the nose a more unique form.
To make the bridge look more interesting to the eye I'm making it more narrow at
the bottom.
Alright, before the nostrils disappear completely, I'm gonna shade them using a
4B. The top part of the nostril has an abrupt change between light and dark
values so it's okay to use dark strokes. I want the edge to be really defined!
Just make sure the shading is softer and more gradual at the bottom of the
nostril. I'm doing the same thing with the bottom of the nose but the lines are
much lighter. I'm trying to avoid what looks like thick or obvious outlines. Now
I'm using an HB to shade a super light layer of graphite over everything. Just
so it's a different shade from my sketch paper. To cover more ground, use
an overhand grip on the pencil. This will give you thicker strokes and they're
also easier to blend.
Along the bridge, make the shading look more gradual by slowly layering small
amounts of graphite all the way down. Do the same thing across the whole drawing
making sure there aren't any harsh edges where the skin should be soft or smooth.
The form is really coming together now! If you feel comfortable with the way it
looks, continue adding more layers on top of
the dark areas you defined earlier. Working in layers allows you to change
your mind before truly committing to the final design. I'm using a 4B mechanical
pencil for higher precision. For a beginner, I recommend shading smooth
areas of skin using a regular 4B pencil - just in case you catch a sharp edge.
It'll also be easier to blend. I like the shape of the nose so far, so I'm going
over the darkest areas and amplifying them bit by bit. You can do this with a
2B pencil as well. Using a 4B just means that you'll need to be extra careful
with the amount of pressure applied, since softer pencils produce darker
values with little effort.
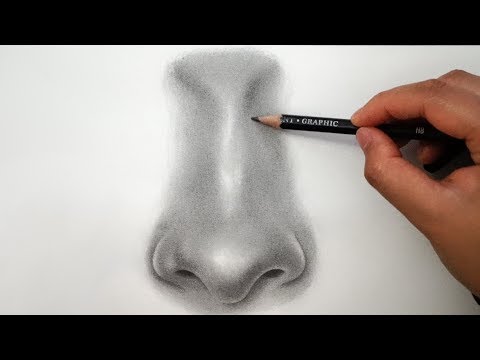
In case you're wondering, the thin highlight around the bottom of the nose
is coming from reflected light. As I mentioned earlier, the light source for
this drawing is coming from the top, but the light bounces and reflects off of
many surfaces such as other parts of the face, dust particles in the air, walls and
even flooring. These reflections can brighten areas facing away from the
direct light source. Hence the highlight around the bottom of
the nose and the sides of the nose.
I am going to shade this area a little darker because it's angled downward
which means there's less light reaching the surface. The example that I'm drawing
here is a profile view of the nose.
Alright, let's blend this. You can use many tools for blending. This is a
blending stump. I like to rough up the sides so I can
use the fuzzy part to blend instead of full-contact blending. It feels kind of
like shading and does a great job IF you have the time. To save time, I'm gonna use
a soft tissue. The tissue is wrapped around my finger to cover a large
surface area. After every swipe, remember to move your finger to a clean spot.
Prevent unwanted smudges by blending in sections and avoid blending from a dark
area into a lighter one.
Okay, I found my 2B pencil hidden under the desk.
I can shade a lot faster with a 2B because I can use it without thinking
too much about pressure.
I'm using an HB to shade along the bridge and tip of the nose. These are
areas I want to highlight later, so it helps to make them darker than the color
of the paper. I'm darkening the nostrils again and here's what I'm doing. I'm
outlining the top and gradually shading the bottom instead of outlining the
entire shape of the nostril and then shading it in.
Okay, let's blend this one more time. The skin looks a little bit grainy because
the sketch paper is textured. If you need to, use a sharp HB pencil to fill in
white dots or valleys on the paper's surface. I'm just filling in the really
obvious ones. Alright, there are a few blotches and black dots all around the
nose. To get rid of these, you can roll a kneaded eraser to a fine tip and lightly
dab them away. Repeat the process of filling white space or removing blotches
until your shading is as smooth as possible.
Okay, let's lift this drawing off the paper by adding some bright highlights!
Pinch or roll your kneaded eraser into your desired shape then dab rub or
swipe graphite from the lightest areas of your drawing. If you want to lift away
less graphite, use very light pressure. This is a great way to get soft edges.
I'm just lifting blotches and softening the edges around each highlight to make
the lighting look less harsh. If you make any mistakes,
use an HB pencil to fill in the spaces.
To give the drawing more depth, make your shadows even darker but remember to
darken some of the mid-tones as well.
So that's pretty much it guys! If you enjoyed this tutorial, don't forget to
hit that 'like' button and subscribe to my channel for more drawing tutorials. To be
notified when I post a new video, click the 'bell' icon beside the subscribe
button as well. And if you tried this tutorial, send me your drawing and I'll
feature it in the next video!
-------------------------------------------
How To Get A Guy To Like You ( 5 Amazing Tips ) - Duration: 5:31.
What is up guys
so if you guys are watching this video
It's because you guys want to find out how to get a guy to like you so stay tuned alright guys. I'll be right back
Whoa, I almost fell right there, but what is up guys
I hope you guys are having an amazing day because I'm having an amazing day, and we're back on this
amazing channel that we have together and
Today's video came from you guys
So I think it's even more special that we're finally getting to communicate with each other
You guys two of you message me on Instagram and asked for this exact video
So I was like you know what let's do it
Let's get it done and again if you want if you have any
suggestions on what I should do next or a video you would like to see in this channel or something out a little again with
my stumbling of the words
And if you would like me to you know talk about something or tell you guys something about me or learn something from my past
Experiences make sure to comment below
And if you haven't subscribed go ahead and subscribe now so that you can join this awesome
family of the artists and I say arts because my name is Arturo or - Oh
Artu all right, so let's get to it no hesitation at all
Let's jump into the number one of the top five tips that I think I will help you number one confidence
I know I said this before for the further how to get a girl
But confidence is something that both sexes like to see so we need you guys to be as confident as
we are when we're asking you out because
We are shy us guys we get shy so if you guys are confident
Then it's like we have to be even more confident, and I know that sounds really messed up
But there's always this competition in a guy's mind that we have to be more masculine or else. We'll look like little girls
My little girl. There's nothing wrong with being a little girl
But you know what I'm saying all right number two don't wait for him
To make the first move you know sometimes those guys
We're kind of slow when it comes to like realizing when it when somebody likes us
so don't be hesitant and make the first move go ahead and text them first or
You know say hi to him in the hot lake whenever you see in
Just make don't be hesitant that because you're the girl you can make the first move. It's totally cool
If you guys make the first move because again it shows confidence
And it shows that you really like the guy directly because like I said us guys we could be kind of
Number three so if you guys text like I said before texting him first saying hi to him
But if you guys happen to text them
Make sure you're not a different person when you're texting the guy
Because something that happens sometimes is that you know we get this extra confidence while we're texting because we're not face-to-face
But us guys
We don't like that because then we don't know who we're dating and we don't want to be dating a phone we want to be
dating
An actual girl who is who they say they are through text so make sure that you are the same person
When you text and when you're physically with the guy because that's a big plus all right number four be
Yourself you got a you have to be yourself like I said you don't want to be different people
through text real person
and you
You wanna from the beginning be yourself because you don't want this guy to think that they're gonna be taking this person when you're actually
This person because maybe they think they like this person
but they would much rather be with the actual person that you are because you guys are all amazing you're amazing and
You shouldn't have to pretend to be anybody
But yourself because there's a reason why you like the way you are there's reason why I'm like the way
I am so make sure that you're always yourself because we like we like girls that aren't afraid to
Wear their own skin you know thing so make sure to always be yourself and number five this one's a little bit harsh
But it's the truth
if for some reason the guy is not very entry sit in you don't try to push it because
What you can do is break a friendship or or you know really really push that person aside instead
Maybe maybe they don't like you at the moment because you know some stuff is going in their personal life
Or they're just not looking to like anybody, but if you give them that space
Who knows maybe in the future? They'll go ahead and come back to you and
You know maybe you guys get today, so I hope you guys really enjoyed those five tips on how to get a guy
Again, it's it's awesome that you guys have been commenting. We've have been having new subscribers again with mine
Stumbling with words, I'm just super excited
Thank you guys make sure to subscribe like I said we are dreamers here
And you like to get stuff done and have fun, and we're family so make sure to comment below
Which one of these what's your favorite tip and I'll see you tomorrow
because tomorrow
Between you and me we have a challenge video with two other people and it's going to be so much fun
So make sure to stay tuned make sure to press the subscribe button and I'll see you tomorrow guys. Bye
-------------------------------------------
How to DEVELOP The Perfect VOICE for video - Voice Tutorial - Duration: 4:41.
ladies and gentlemen this is BK THE
definition based on the meaning of anything and everything so in today's
video we are going to be discussing how to have the perfect voice for the camera
the stage public speaking attraction or new business opportunity etc etc etc so
sit back relax and get ready to receive the kind of information that you will be
applying strategically
toan speed resonance pronunciation Announciation and volume are all the
elements that are needed for you to give off the kind of voice that you have
absolute presence and indicates to the world that you have high qualities to
you you are so I'm going to break this down into four simple tips to basically
help you attain this but please understand that this is a slowly but
surely kind of process so let's get into it number one keep your voice warm when
keeping your voice warm you need to do two things first you need to drink hot
or lemon water daily second practice your humming exercises
seriously practiced them by practicing these two things alone you'll be able to
improve the capabilities of your immune system and your resonance plus create a
perfect gateway for you to speak powerfully from your diaphragm which is
located on the upper half of your stomach just below your chest
number two practice your vowel sound when you practice your vowel sound
this is all that you need to do ah
that's it now what vowel sounds do is that they
improve your clarity of speaking and they accurately increase your sound of
speech because vowels are what give your words they volume number three always always
always read out loud whether it is a word
document a PDF a book or a comic read out loud by reading out loud to yourself
consistently you will improve your verbal communication skills by a great
deal which means you'll be able to communicate and simplify more complex
messages at a much more faster pace when exchanging words between you and others
especially when people are gonna try to challenge you verbally last but not
least and in fact I should have started this as the first tip speak from your
diaphragm when learning and applying the daily use of this exercise you will
acquire the power to voice projects to speak out loudly without hurting your
throat there is a minor exam as you heard the voice rolls up loud and
smoothly next hello
as you heard didn't sound very well and it was quite harmful to the throat you
get the difference this is the perfect skill to have when it comes to acting
and theater productions or participates in public speaking of any kind within
these political matters or motivational speech so ladies and gentlemen we have
now come to the end of our video session for today I hope that these tips
have given you some great insights on what you can do to have and create the
perfect voice for you and remember if you loved what you heard and what you
saw feel free to like and subscribe to the channel
-------------------------------------------
HOW TO DECORATE HALLOWEEN COOKIES (EASY TUTORIAL) - COME DECORARE I BISCOTTI PER HALLOWEEN - Duration: 6:38.
-------------------------------------------
Coloring Pages How to Draw Rose Flowers Learn Colors for Kids - Duration: 2:18.
Coloring Pages
Learn Colors
-------------------------------------------
How differences in color can make a still image move (The rotating snakes illusion) - Duration: 2:30.
WHAT.
IS.
HAPPENING?
Either (A) your mind is melting.
Or (B) you're looking at a peripheral drift illusion.
Ok.
The answer is (B)….
But, your mind is also melting.
Here's how:
Look around the image.
Each circular snake like shape seems to be rotating, right?
But, this is a still image—not a gif, not a movie…
It's actually your brain that's creating the motion.
Let's try an experiment.
Stare down one circle.
Go ahead, really focus on it…
Keep staring...keep staring.
Notice how everything stops.
Now while still looking at the image,
move your gaze ever so slightly
from the point of focus.
The snakes.
Are.
moving.
But...why?
The image here was made by Akiyoshi Kitaoka, a psychologist at Ritsumeikan University
in Kyoto, Japan.
Neuroscientists think the shapes within the image mess with the way our brain adapts
to disparities in color contrast.
The black and whites have a stark difference, which causes a specific set of neurons
in your brain to fire all at once.
The paler blues and yellows trigger a slower, longer-lasting response.
This difference in timing sets off motion-detecting neurons in the visual cortex,
making the image appear animated even though it is perfectly still.
And humans aren't the only species that can see this.
In 2014, the journal Psychology published a paper called "Cats and Illusory Motion."
It presents evidence that non-human animals can also see optical illusions,
or at least this one.
Wait a second, why do the snakes stop when you stare directly at them?
The center of your eye contains the densest group of cones, a type of photoreceptor.
This cluster allows us to see fine details easily, which prevents our motion detecting neurons
from jumping into action when they shouldn't.
But once you start to look away, the image becomes slightly muddier, and your brain
is deceived into "seeing" the snakes move.
-------------------------------------------
How to Make a Paper Ninja Star - Origami Ninja Stars Making Tutorial - Duration: 3:56.
Welcome to Colors Paper. Enjoy, Origami Ninja Star Making Tutorial.
You need 2 pieces 10cm x 29cm papers.
Follo the video step by step for how to make a Paper Ninja Star.
Không có nhận xét nào:
Đăng nhận xét