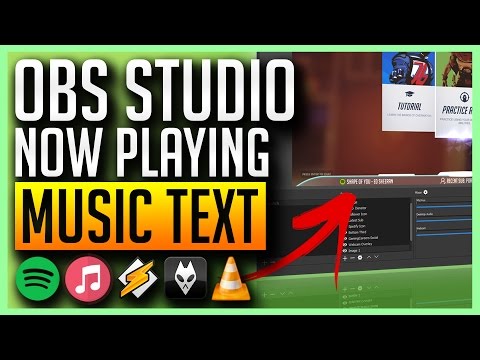
What's up guys, my name is Pete from the
Gaming Careers YouTube channel and today
we've got another OBS studio tutorial and we're
going to be talking about how you can add
scrolling music tickers into your stream.
Now I'm going to be covering how to get
the track and artist name from five
different music players into OBS so if
you're using: Spotify, iTunes, Winamp,
foobar or VLC then those are all covered
in today's guide. Now just before we jump
into the video it's worth mentioning
that on the Gaming Careers YouTube channel
here we have a few other OBS studio
guides and I'd recommend watching two of
them before you watch this if you
haven't already.
The first one which you can click up here is
the OBS settings guide, so that covers
all things like which Twitch server to
stream to, what bitrate, what resolution,
what frame rate, it's really an in detail
guide covering all the different
software options. The second video which
you can now click up here as well, covers
things like adding scenes and sources into
OBS, so things like adding your game, adding
your webcam, adding your overlay and adding
text and you kind of need to know how to
do all of that before we cover what we do
today. If you've finished with all that and you've
got all your settings correct then let's jump
into how to add a music scroller into
OBS studio.
Now in this video I'll be setting up
OBS to track what I am playing with
Spotify but if you're using one of the
other pieces of software like iTunes,
Winamp, foobar or VLC then it's only
one option that needs changing and I'll
be showing you exactly how to do that.
The first thing you want to do is to
head over to the link in the description
for the software called Snip. You want to
be downloading the latest version of the
software which should be the top file in
github, so download that and then unzip
it with your choice of compression
software, I use 7-zip but WinRaR should
work just as well. You want to be
extracting this somewhere that you're
going to remember, because you're going
to need to open this software every time
you want to stream. So I'd recommend
extracting it to your desktop but if you
have a folder with all of your stream
software in it then you can extract it
there as well but just remember where
you've extracted it to. So if we open up
the extracted folder you should see a
program called Snip and when you run
this it should create two new files, one
is a text file called snip, and one is a
JPG file which is called snip_artwork.
Next let's open up the music playing
software that we've chosen, so for me that's
Spotify, but for you it could be iTunes or
Winamp or foobar or VLC. Now it shouldn't
really matter which order you open the
program in, so if you open Snip and then
your music player or your music player
and then Snip, it shouldn't really matter.
But in earlier versions of the software's
development, you did need to open Snip first
so I still recommend opening up
Snip first. I keep a little notepad list
of all the things that I need to check before
I start my stream to Twitch so I just
write in there that I need to open up Snip
before starting to stream. So before we jump
into OBS the first thing we need to do
is look at the Snip software settings.
If you go down to the taskbar and locate
the Snip icon, keep in mind that you
might need to click the little arrow to
expand all the icons that you're running
right now, find the little blue circle
which is Snip, right click it and
there you can select the music
program that you're going to use. So for me
that's Spotify. The next thing we want to
change is the output format, so if you
select "set output format" this will open
up a new window which basically allows
us to customize how Snip is going to write
our Artist, Track and Album name into our
text file. So just to describe how this
works, basically for the track name it
replaces this $$t with the
track name from Spotify, $$a with
the artist name and $$l with the
album name.
It's worth noting here that if you're
using Spotify like me then the album
name actually won't appear in the text
file because Spotify didn't have that
but for other software I think iTunes and
Winamp, both of them will display the
album name as well. So for Spotify, Snip
is going to write the track name, then
the separator, and then the artist name.
That all goes into a text file and then
we use OBS to read that text file. Snip will
then update this text file every time
a song changes in Spotify, or whichever
music program you're using, and then OBS
can also update what it displays on
screen because the text file will have updated too.
So in terms of customizing this, if
you only want to display the track name
and not the artist or the album then you
can just remove anything in the
separator, artist and album boxes and
click Save. However I'm going to hit
defaults here to reset it and then I'm
going to do the track name without the
quotation marks,
I'm going to change the separator to
a dash and I'm going to add two spaces
after the artist name, so that it doesn't
bump up against each other when it
starts scrolling. This is just my
personal preference but I think this is
what looks best in OBS and on my stream.
Feel free to play around with the output
format to get exactly what you want for
your stream here.
OK time to get into OBS now, but the first
thing you need to do is make sure that
you have a song playing in your music
program of choice, so I'm just going to
start something in Spotify and then we
can open up OBS studio. Make sure
that you have the stream preview enabled
and then we'll select the scene that we
want to add the music scroller to. Within
this scene we want to add a text source
so click the plus icon and go to text,
name it whatever you like but I would
recommend calling it "now playing" or
"music scroller" so you don't forget which source
it is. And then we can select the font, font
style and font size. Now just as I covered
in the previous video when we looked at
scenes and sources, if you want to change
the size of your music scroller here, it's
really important that you come back and
edit the font size,
and you don't just drag and resize the
source within OBS, because it starts to
scale really badly and starts to look
really pixelated because obviously it's
text and the font size is what actually does
scale it correctly. Once you're happy
with the font, font style and font size,
the next thing we need to do is to
check the "read from file" box and this
is exactly how we tell OBS where to look
for this text file that Snip is
creating. Click the Browse button and locate
the snip.txt file and this is
located in the same folder that you installed
Snip in. Next thing we need to do is
select the color that we want the text
to be, so for me that is white but
obviously choose the color that suits
your stream layout. Here you can select the
opacity if you wanted to be anything
other than a hundred percent but I'm
going to leave it at 100 for me.
You can also add things like a gradient
if you want your text to be two tone and
you can add a background and opacity if
you want it to sit above a background
which can be quite useful actually if
you don't have an overlay that already
makes the text pop-out. You want the
alignment to be set to left, because
we're going to be having scrolling text
and we need somewhere to align it to and
everything else can be left unchecked.
So now if we look at our preview we should
have the text of the song playing in OBS
and if you go and skip to the next song in
Spotify or whatever program you're using,
you should see the text update within our
preview window. Let's drag it to where we
want the music scroller to be, so for me
that's down at the bottom next to this Spotify
icon. Once we're happy with the position
let's just try skipping a track and
making sure we're still happy with the
left alignment. Okay, looking good.
So the next thing we want to do is to
make our text scroll, what we need to do
for that is right click on the text
source and select Filters.
This will open up a new window showing
our text, if we click the plus button
within the filter window, we can add an
effect filter. We want to choose "scroll"
and I'll leave the filter name as scroll,
just because otherwise anything else
would be quite confusing I think and
here we can set the horizontal speed of
our text scroll, so I'd recommend anything
between 15 and 20, but it's completely up
to you, it can scroll super quick if
that's the design that you want for your
stream. So now we can see we have our
scrolling text, we're nearly there
there's just one more aesthetic
change that I want to make. Currently the
text source will change width based on
the title and artist name length, so if
we swap track to a longer title and longer
artist name, you can see that it overruns
into other parts of our overlay. Basically a
short track name and artist will only
occupy a small amount of screen space,
whereas a long track and artist name will
occupy a much larger amount. To fix this,
what we want to do is edit the filter on
our scrolling text and set a maximum
width that it can occupy. So to jump back
into the filter properties, right
click the text source and select
filters again.
Make sure that you have the scroll
effect filter selected and then check
the box to limit the width and enter
a value for the width that you'd like to
set. So for me that's 350. Now if we go
back to the preview window of OBS, we can
see that no matter which track we have
playing it always occupies the same
amount of space so if there's a short name
it will be repeated. This is why I presonally
recommend having two spaces
after the artist name in Snip. It doesn't
bunch together too much on the longer
artists. And that's it guys I hope you
have now got some scrolling text of your
now playing song from Spotify, iTunes, VLC,
foobar or Winamp that's the last one,
within OBS and your stream looks a
little bit more aesthetic. If you've enjoyed
this video and you've been watching
until now please do give it a thumbs up,
because that does help us grow and if
you haven't yet subscribed to the Gaming
Careers YouTube channel, maybe have a
look around at the kind of videos that
we have, we've got quite a good
collection now and all of them are
helping you get a better stream or a
better YouTube channel for your Gaming
Career, I'll see you in the next video,
Peace


 For more infomation >> Música maluca (Coreografia) / Crazy music ( choreography) / vocês pediram o Edu ensina. - Duration: 1:10.
  For more infomation >> MUSIC VIDEO | 'TOO DEEP' | ft. Ether by Silent Partner | Instrumental - Duration: 3:39.
  For more infomation >> OBLIQUE - Bhondo (Official Music Video) - Duration: 4:50.
  For more infomation >> Telifsiz Korku Müziği (No Copyright Horror Music) - Duration: 4:58.
  For more infomation >> Coldplay @ iHeartRadio Music Festival 2011 - Duration: 15:25.
 For more infomation >> Race Horses - Paradiso, Amsterdam. 12-11-2010 - Duration: 29:02.


Không có nhận xét nào:
Đăng nhận xét